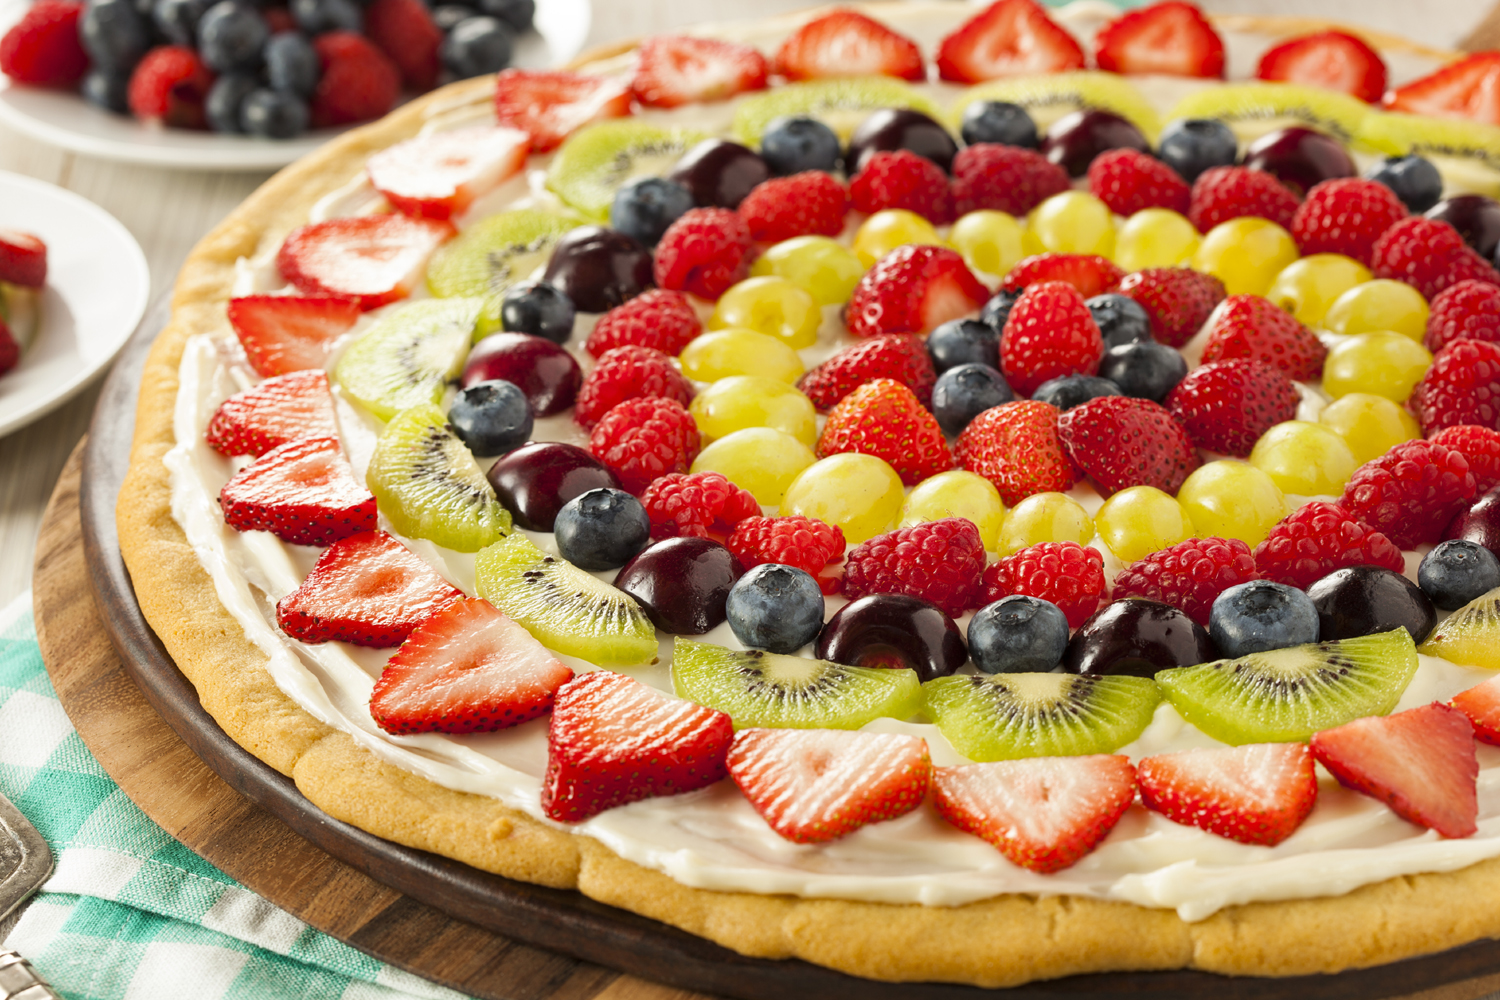
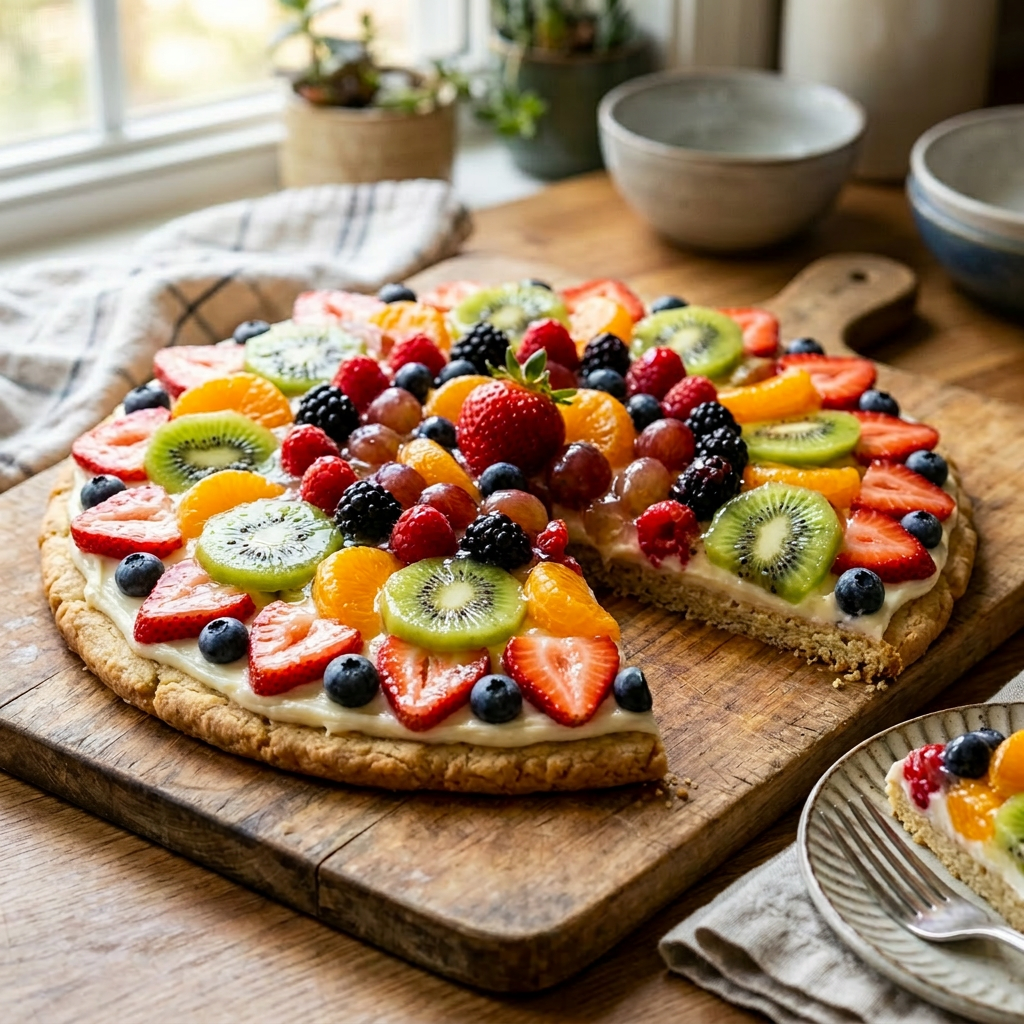
Tag Archives: desserts

Classic Strawberry Shortcake

Fresh strawberry shortcakes topped with whipped cream and mint leaves on a wooden board
Delicious fresh strawberry shortcakes topped with whipped cream and mint leaves.

This refreshing old-fashioned recipe for Strawberry Shortcakes is a delightful dessert that combines the sweetness of ripe strawberries with the light, fluffy texture of freshly baked shortcakes. This classic treat is perfect for summer gatherings, picnics, or any occasion where a cool, fruity dessert is desired. The key to a perfect strawberry shortcake lies in selecting fresh, juicy strawberries, which are sliced and often lightly sweetened to enhance their natural flavor. The shortcakes themselves are made from tender biscuit-like dough, baked until golden, then split open to hold the luscious strawberries and whipped cream. For an added touch of freshness, some recipes incorporate a hint of lemon zest or a splash of vanilla into the shortcake batter. This dessert is not only visually appealing with its vibrant red strawberries and fluffy layers but also offers a harmonious balance of sweetness and acidity.

Ingredients

Filling

  • 6 cups of fresh strawberries, sliced
  • ½ cup sugar
  • 1 teaspoon vanilla extract

Whipped Cream

  • 1 cup heavy whipping cream
  • ¼  cup of powdered sugar
  • 1 teaspoon of vanilla extract

Biscuits

  • 2-3/4 cups of all-purpose flour
  • ¼ cup sugar
  • 4 teaspoons baking powder
  • 3/4 cup of cold butter, cut up
  • 2 large eggs, lightly beaten
  • 1 (8-oz.) container of sour cream
  • 1 teaspoon vanilla extract

Preparation

  1.  Combine strawberries, 1/2 cup sugar, and vanilla extract. Cover and chill in the refrigerator for about 2 hours.
  2.  Beat whipped cream at medium-high speed with an electric mixer until foamy.
  3. Gradually add powdered sugar and vanilla, beating until stiff peaks form. Note: do not overbeat or the whipped cream will become butter! Cover and chill in the refrigerator until ready to use.

Biscuits

  1. Preheat oven to 450°F.
  2. Line a baking sheet with raised edges with parchment paper.
  3. Combine flour, sugar, and baking powder in a large bowl;
  4. Cut butter into the flour mixture with a pastry blender or two forks until crumbly.
  5. In a separate bowl, whisk together eggs, sour cream, and vanilla until blended
  6. Add to flour mixture, stirring just until dry ingredients are moistened.
  7. Drop dough into 10 mounds on an ungreased baking sheet; flatten each mound with the back of a spoon until about ¾ inch thick.
  8. Bake for 10 – 12 minutes until golden.

Presentation

  1. Cool on a wire rack for about 10 minutes. Cut shortcakes in half horizontally. Spoon half of the berries and whipped cream over the bottom layers.
  2. Replace the top layers and cover with the remaining strawberries and whipped cream.

Cream Puffs with Mascarpone Whipped Cream Filling

Tray of small cream puffs filled with cream, topped with powdered sugar, raspberries, blueberries, and mint leaves
A tray of cream puffs dusted with powdered sugar, fresh raspberries, blueberries, and mint leaves

Old-fashioned cream puffs are a timeless dessert that evokes a sense of nostalgia and elegance. These delicate pastries are made from choux pastry, which is baked to achieve a light, airy, and crisp exterior. For Mother’s Day, cream puffs are an ideal choice for a light and airy dessert that can be both elegant and satisfying. Their fluffy interior and this creamy Mascarpone cheese whipped cream filling make them a perfect treat to celebrate the special occasion without feeling overly heavy. Additionally, cream puffs can be customized with various fillings and toppings, such as chocolate glaze, powdered sugar, or fresh berries.

Ingredients

Pastry

  • 1 cup of water
  • 1/2 cup of butter (4 ounces)
  •  1 cup of all-purpose flour
  •  1/4 teaspoon salt
  •  4 large eggs

Process

  1. Preheat the oven to 400°F.
  2. In a small bowl, whisk together the flour and salt; set aside.
  3. In a medium-sized saucepan, bring 1 cup of water to a boil.
  4. Add the butter. 
  5. When the butter has melted, add the flour mixture all at once and stir vigorously. 
  6. Continue stirring until the mixture forms a ball that doesn’t separate.
  7. Remove from the heat and cool slightly (about 1 minute).  Add the eggs, one at a time, beating after each one until the dough is smooth.
  8. Place spoonfuls of dough, about 2 inches apart, onto a baking sheet lined with parchment paper. Alternatively, put the batter into a pastry bag fitted with a round tip and pipe circles approximately 2 inches wide and 1 inch apart onto the baking sheet.
  9. Bake the puffs for about until they are golden brown and puffy, about 25 to 30 minutes.
  10. If the puffs are mini-sized, bake for about 17 to 20 minutes. 
  11. Remove the cream puffs from the oven and cool on a cooling rack.

Mascarpone Cheese Filling

  • 2/3 cup mascarpone cheese
  • 2/3 cup heavy whipping cream
  • 5 tablespoons powdered sugar
  • 2 teaspoons pure vanilla

Process

  1. In a chilled bowl, beat the Mascarpone cheese and vanilla until creamy.
  2. Add the heavy whipping cream, and beat until thick.
  3. Gradually add the powdered sugar, mix until fully incorporated.
  4. Beat mixture on high speed until thick and fluffy.
  5. Cut cooled puffs in half, and set the top half of the puff aside.
  6. Fill the bottom halves of the puffs with the cream mixture, then replace the tops.
  7. Drizzle with melted bittersweet chocolate or dust with powdered sugar.
  8. Store in the refrigerator until ready to serve.

Angel Food Summer Fruit Cake

Layered vanilla cake with white frosting, strawberries, and blueberries on top
A beautifully decorated layered cake filled with strawberries and cream.

Experience the light and airy delight of our Angel Food Summer Fruit Cake, expertly layered with fresh seasonal fruit and luscious filling. This elegant dessert combines the fluffy texture of angel food cake with vibrant fruit toppings and a smooth filling, making it a perfect centerpiece for summer gatherings or a special treat. Its delicate sweetness and refreshing flavors are sure to please every palate.

Ingredients

  • 1 Angel Food Cake
  • 2 pints of fresh strawberries (see note below)
  • 1 Large container of Cool Whip
  • 1 regular-size box of instant vanilla pudding
  • 1 stick of butter (soft)
  • 2 cups of powdered sugar

Cake Filling

  1. In a mixer bowl, add 1 cup of milk to 1 regular-size box of instant vanilla pudding – beat for 2 minutes.
  2. Add half of the container of Cool Whip, blend the pudding mix and Cool Whip with a spoon, and refrigerate until ready to assemble the cake.
  3. Refrigerate the remaining Cool Whip to use for frosting.

Process

  1. Prepare cake according to box directions, cool completely.
  2. Slice the cooled cake into 2 layers.
  3. Slice strawberries into thin pieces.
  4. Spread half of the pudding filling onto the bottom layer.
  5. Spread sliced strawberries on top of the filling.
  6. Cover with the first layer of cake.
  7. Repeat the filling and strawberry layers, then place the top cake layer on and press gently to set.

Frosting

  1. Beat the butter until it becomes smooth and creamy.
  2. Add powdered sugar and mix until combined.
  3. Fold in the remaining half of the container of Cool Whip.
  4. Frost the sides of the cake and then the top. Decorate with sliced fruit.
  5. Keep cake refrigerated until ready to serve.

Note

You can use any fruit for this cake. The original recipe used canned mandarin oranges, sliced lengthwise.

  • Mandarin oranges (canned), sliced lengthwise
  • Strawberries
  • Blueberries
  • Blackberries
  • Any mix of the above

Vanilla Bean Sugar Cubes

Bowl of vanilla bean sugar cubes with wooden scoop, vanilla pods, and jar of vanilla bean sugar on wooden table
A bowl filled with vanilla bean sugar cubes on a wooden table beside vanilla pods and a jar of vanilla bean sugar

Homemade vanilla bean sugar cubes embody a charming rustic appeal that combines simplicity with elegance. Crafted with care, these sugar cubes are infused with the rich, aromatic essence of vanilla beans, offering a natural and authentic flavor profile. Their rustic charm lies in their handcrafted appearance, often featuring uneven edges and a slightly textured surface, which highlights their artisanal quality. These vanilla bean sugar cubes are versatile and ideal for sweetening hot drinks like coffee, tea, or hot chocolate. They add a gentle vanilla aroma that enhances flavor. These cubes also make thoughtful gifts when paired with homemade vanilla extract or vanilla syrup, offering a simple way to enjoy or share a delightful vanilla flavor.

Ingredients

  • 4 Madagascar vanilla beans
  • 3 cups of white sugar
  • 1/4 cup pure Madagascar vanilla extract

Process

Preheat the oven to 275° F.

  1. To prepare the vanilla beans, cut four beans into small pieces about half an inch long. Then, place them in a food processor and blend into a coarse powder.
  2. In a bowl, stir together the sugar, vanilla bean powder, and vanilla extract until well mixed. When the extract is fully blended in, the mixture will resemble dough.
  3. Empty the sugar mixture into an 8-by-8-inch pan and spread it out evenly to a 1/2-inch thickness.
  4. Use a knife to cut the dough into small cubes, 1/2 inch on each side. To do this, run the knife along the length of the pan every 1/2 inch, then turn the pan and cut across its width every 1/2 inch. This will help you create evenly sized cubes.
  5. Bake for 1½ hours, or until cubes are firm to the touch and slightly dry. Once cooled, carefully flip the pan over onto a large cookie sheet to remove the sugar.
  6. Allow to cool completely, and then gently break into cubes along the scored lines.
  7. For smoother, rounded edges, lightly shake the cubes in a covered pot, then empty them into a colander to remove loose sugar.
  8. Store sugar cubes in a glass container with a tight-fitting lid. The shelf life is 2+ years if stored properly.

Vanilla Bean Extract

Vanilla Bean Sugar

Vanilla Bean Syrup

Single Serve Cheese Soufflés

This was my first time attempting to make a cheese souffle, I’ve had the recipe for about 20 years and decided to check out other recipes online to compare ingredients and methods. I decided to use this one with a few ingredient additions because it was simple. I honestly didn’t think it would turn out. But I have to say, even though my 8-ounce ramekins were filled to the top with the egg mixture, they were beautifully puffed, golden, crispy crust and light as air inside. The taste was incredible and I devoured both.

Great for brunch, a light supper or as a versatile side dish, these melt-in-your-mouth souffles are flavorful, fluffy and fun. Served hot, egg soufflés can be accompanied by a fresh salad or a side of toasted bread, making them a wholesome and refined light meal option.

Ingredients

  • 1-1/2 tablespoons of butter
  • 1-1/2 tablespoons of all-purpose flour
  • ½ cup milk, or cream
  • 1 teaspoon Dijon mustard
  • ½ cup shredded cheddar cheese, or Gruyère cheese
  • ¼ teaspoon of cream of tarter
  • 2 eggs, separated

Process

  1. Preheat oven to 350°F. Spray two 8-ounce ramekins with nonstick cooking spray. Set aside.
  2. Crack eggs and separate yolks from whites.
  3. Beat egg yolks with a fork and set aside.
  4. In a saucepan over medium-low heat, melt butter.
  5. Stir in the flour until smooth; gradually add milk.
  6. Bring to boil and cook stirring for 1-2 minutes or until thickened.
  7. Reduce heat, stir in cheese until melted. Remove pan from heat.
  8. Gradually add a small amount of hot cheese mixture to the beaten egg yolks, stirring constantly to prevent cooking. Then, pour the mixture back into the pan, stirring continuously until fully incorporated. Set aside to allow it to cool slightly.
  9. In a mixing bowl, beat egg whites and cream of tartar until stiff peaks form.
  10. Fold a third of the whites into the egg yolk mixture to loosen then fold in the remaining whites, streaky whites are okay, do not overmix. Pour into prepared ramekins. Wipe rims of ramekins clean.
  11. Bake for 25 minutes or until a toothpick inserted near the center comes out clean. *Note: do not open the oven door while cooking.
  12. Serve immediately.  They will deflate as they cool, but will still be delicious!

Fruit Pizza Dessert

Perfect for any summer gathering, this impressive dessert is sure to wow your guests. This dazzling fruit pizza is a summer showstopper—and surprisingly easy to make!

Choosing the right fruit for a fruit pizza is important for both appearance and taste. The fruit should be soft enough to cut and bite easily, but not too watery. It should also resist browning to keep the pizza looking fresh. To make the presentation attractive, select fruits that vary in color and shape. When placing the fruit on the cream cheese layer, press gently to help it stick. Popular options include different berries, sliced peaches, bananas, canned mandarin oranges, strawberries, kiwi, and passion fruit. These fruits not only look appealing but also add a variety of flavors, making fruit pizza more delicious and visually attractive.

For the best texture and presentation, fruit pizza is best made the same day it’s served.

Crust
1 package (18oz) refrigerated sugar cookie dough

Preheat oven to 350°F.

  1. Unroll the refrigerated sugar cookie dough.
  2. Crumble dough into a 12” pizza pan, or 9″ x 13″ baking pan with raised edges.
  3. Work the dough until it is spread out to the outer edges of the pan.
  4. Bake until lightly brown, about 10 – 12 minutes. Remove from oven, cool completely.

Filling

  • 1/3 cup granulated sugar
  • 1 egg
  • 1 8oz cream cheese, room temperature
  • 1/4 cup of sour cream
  • 1 teaspoon vanilla

Glaze

Jelly: is used as a glaze for the fruit, it protects it from drying out or turning brown as well as giving it a healthy shine.

  • ½ cup of apple jelly, apricot jelly, orange marmalade or peach jelly make great options for glazing the fruit. Apple jelly is clear, allowing the fruit to stand out. Orange marmalade compliments the flavors of the fruit beneath.

Process

  1. With an electric mixer, in a medium bowl combine sugar and egg, beat until sugar is dissolved.
  2. Add cream cheese, sour cream and vanilla, beat until creamy. Add more sour cream if filling is too stiff to spread.
  3. Spread filling on cookie crust.
  4. Beginning in the center of the pizza begin adding fruit in a circular fashion until it fills the crust.
  5. Stir the jelly or marmalade until smooth and use a pastry brush or spoon spread on top of fruit. Note: if jelly or marmalade won’t smooth out by stirring, microwave for 20 seconds.
  6. Refrigerate 1 to 2 hours before serving.