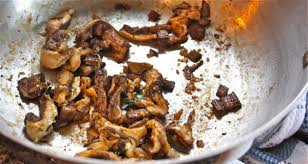
Kitchen Moxy’s Roasted Garlic Chicken Thighs

Kitchen Moxy’s Garlic Chicken

Roasted Garlic Chicken

Roasted Garlic Chicken

Here is a terrific recipe for skinless, boneless chicken thighs, great for a party or a special dinner.  Or use legs/thighs. Yes, you do have to love garlic, so be sure only to invite those who have an acquired taste for this tasty allium.

This recipe can be prepared the day before and as a note, the longer you marinate it – the taster it becomes.  It is best to marinade for at the very least, 6 hours up to 24 hours in advance.  Please use only fresh herbs and fresh garlic cloves with this recipe, or you will rob yourself of the intoxicating aroma and flavor of this dish.

If you prefer to cook chicken breasts, reduce cooking by about 20 minutes to prevent white meat from drying out. Keep the temperature at 400 degrees.

MARINADE

  • About 1 cup of olive oil – more or less to cover the chicken pieces
  • 6 peeled and smashed garlic cloves – cut in half after you smash them
  • ½ cup of fresh minced flat leaf Italian parsley

PROCEDURE

  •    Wash and dry chicken thighs
  • Spread them flat in a baking dish large enough to hold all thighs
  • Combine olive oil, garlic cloves and parsley and pour over thighs
  • Cover baking dish with plastic wrap or lid and refrigerate for up to 24 hours, turning only once during that time.

After 6 – 24 hours

  • Remove chicken from marinade and scrape off excess olive oil and place chicken in a shallow, foil lined, rimmed cookie sheet
  • With a slotted spoon, scoop up garlic and parsley from marinade and spread on top of chicken
  • Reserve 1/3 cup of olive oil from marinade
  • Preheat oven to 400 degrees

In a bowl combine

  • 8 more garlic cloves, minced or grated
  • The 1/3 cup reserved olive oil
  •   2 tablespoons fresh rosemary chopped
  •   2 tablespoons fresh thyme leaves
  1. Pour this mixture on top of chicken in pan
  2. Bake at 400 degrees for 50 – 55 minutes – do not turn chicken during baking.
  3. *Note: do not crowd chicken pieces in roasting pan – this will steam the chicken rather than roasting it.

Enjoy

*Great paired with my recipe for Barley Au Gratin and a salad, tossed with balsamic vinegar and olive oil.

Steamed Garlic Clams

clamsI used to serve steamed clams or muscles at all my cook-outs back home and they were always a hit.  These clams are steamed in wine, butter, and spices. When the clams are gone, dip Italian bread in the broth, or serve over fresh (not dried) cooked pasta!  Note:  Dry white wines are commonly used for cooking when you don’t want to add sweetness to the dish. As you cook the wine the alcohol will evaporate. This extracts the flavor profile of the wine and adds it to the dish.  Enjoy!

Steamed Garlic Clams 

Ingredients:

  •  1/2 cup butter
  • 5 cloves garlic, minced or grated
  • 2 cups dry white wine (such as a Chardonnay) *see note on cooking with wine above
  • 1 tablespoon dried oregano or 2 tablespoons of fresh chopped oregano
  • ¼ cup fresh chopped parsley
  • 1 teaspoon crushed red pepper flakes
  • 36 clams in shell, scrubbed

 Directions:

  1. Melt butter in a large skillet over medium heat. Cook garlic in butter briefly. Stir in wine, and season with oregano, parsley, and red pepper flakes.
  2. Place clams in the wine mixture. Cover, and steam until all the clams have opened: discard any that do not open. Serve in soup bowls, and ladle broth generously over them.

Frozen Custard

Frozen Custard

Frozen Custard

Frozen custard was invented in Coney Island, New York in 1919, when ice cream vendors Archie and Elton Kohr found that adding egg yolks to ice cream created a smoother texture and helped the ice cream stay cold longer. In their first weekend on the “boardwalk”, the Kohr brothers sold 18,460 cones.
The difference between frozen custard and soft serve ice cream is that the frozen custard is very dense and air is not incorporated into the mixture. Half the final product of soft service ice cream is composed of air. Frozen custard is the crem de la crem of all frozen desserts, enjoy it in moderation as a truly wonderful summer dessert.

Ingredients:
*You will need an ice cream maker

  • 6 cups whole milk
  •   6 eggs
  • 3/4 cup sugar
  • One fresh Vanilla Bean (don’t skimp on this ingredient, as it makes the end taste surreal) 

Directions:

1.    Whole milk adds a creamy texture to the custard.

2.    Pour six cups of whole milk into a saucepan over a low heat.

3.    Milk will scald quickly of you do not stir it often, so stir the pan often. Bring the milk up to about 200 degrees F.

4.    Real vanilla beans make the frozen custard delicious.

5.    Open a vanilla pod and scrape the seeds into the pan of warm milk. If you don’t have vanilla beans, wait and add vanilla extract later.

6.    Eggs add protein and thicken the mixture.

7.    Crack six eggs into a mixing bowl and add 3/4 of a cup of sugar. Whip them with a whisk or beaters until the mixture is creamy and smooth and no sugar granules remain.

8.    Don’t let the milk boil or it will spill over.

9.    Slowly pour the hot milk into the egg mixture, whisking it constantly to slowly warm up the eggs without curdling the proteins. Pour it back into the saucepan and place over medium heat.  The custard will coat the back of the spoon.

10.  Heat the mixture while constantly stirring it with a wooden spoon. The surface foam will subside as the custard heats up and starts to thicken. As soon as the custard coats the back of the spoon, remove it from the heat and continue to stir as it cools. Add the vanilla extract at this point if you didn’t use the fresh vanilla beans in step #5.

11.  Chill the custard for 12 hours. It will be thick and smell delicious. Freeze in the ice cream maker of your choice following manufacturer’s directions.

Lemon Pie Dessert without the Crust

lemon dessertLemon Dessert = WW 1 point per cup

 About This Recipe

“For a sugar free, low fat dessert, this is really good. Truly, not even one point per dessert and it tastes just like lemon meringue pie without the crust. Be sure to use the cook and serve pudding mix, not instant.”

 Ingredients

  • 1 (7/8 ounce) cook package sugar-free vanilla pudding, mix ( not instant)
  • 2 cups water
  • 1 (1/3 ounce) package sugar-free lemon gelatin
  • fat-free can of Reddi-wip Cream

Directions

1.    Add pudding mix to water and mix well.

2.    Bring to boil.

3.    Stir with a whisk until thickened.

4.    Add box of  lemon Jello and stir in well.

5.    Pour into individual dessert dishes and refrigerate until set.

6.    Top with fat free Reddi-wip whipped Cream

Raspberry Tiramisu

raspberry teramJust in time for Mother’s Day, I received this recipe in my email care of Food Network.  It was so special I had to repost it to Kitchen Moxy.  What a delightfully, fresh dessert this will make after a celebrated dinner on Sunday!  Happy Mother’s Day to all my friends and family.

Raspberry Tiramisu

Recipe courtesy Giada De Laurentiis

Prep Time: 20 min

Inactive Prep Time: 3 hr 0 min

Serves: 8 to 12 servings

Ingredients

  • 1 cup seedless raspberry jam
  • 6 tablespoons orange liqueur (recommended: Grand Marnier)
  • 1 pound mascarpone cheese, at room temperature
  • 1 cup whipping cream
  • 1/4 cup sugar
  • 1 teaspoon pure vanilla extract
  • 28 soft ladyfingers or 2 (12-ounce) pound cakes, cut into 3 by 1 by 1 1/2-inch pieces
  • 3 (1/2 dry pint) baskets fresh raspberries (about 3 3/4 cups total)
  • Confectioners’ sugar, for serving

Directions

  1. Stir the jam and 4 tablespoons of the orange liqueur in a small bowl to blend.
  2. Combine the mascarpone and remaining 2 tablespoons of orange liqueur in a large bowl to blend.
  3. Using an electric mixer, beat the cream, sugar, and vanilla in another large bowl until soft peaks form.
  4. Using a large rubber spatula, stir 1/4 of the whipped cream into the mascarpone mixture to lighten.
  5. Fold the remaining whipped cream into the mascarpone mixture.
  6. Line the bottom of a13 by 9 by 2-inch glass baking dish or other decorative serving dish with half of the ladyfingers.
  7. Spread half of the jam mixture over the ladyfingers. Spread half of the mascarpone mixture over the jam mixture, then cover with half of the fresh raspberries. Repeat layering with the remaining ladyfingers, jam mixture, mascarpone mixture and raspberries.
  8. Cover and refrigerate at least 3 hours or overnight.
Dust with the confectioners’ sugar and serve.

Classic Strawberry Shortcake

Classic Strawberry Shortcake

Classic Strawberry Shortcake

With juicy strawberries spooned over sweet and tender biscuits, old-fashioned strawberry shortcakes are the perfect springtime dessert.  If the berries are very sweet, decrease the sugar to suit your taste. Drop the dough easily by using a lightly greased 1/3-measuring cup.

  • 2 (16-oz.) containers fresh strawberries, sliced
  • 1/3 cup powdered sugar
  • 1 teaspoon vanilla extract
  • 1 cup heavy whipping cream
  • 3/4 cup sugar
  • ½ tsp of almond extract
  • 2 3/4 cups all-purpose flour
  • 4 teaspoons baking powder
  • 3/4 cup cold butter, cut up
  • 2 large eggs, lightly beaten
  • 1 (8-oz.) container sour cream
  • 1 teaspoon vanilla extract
  • Garnish: fresh mint sprigs

Preparation

  1.  Combine strawberries, 1/2 cup sugar, and, almond extract. Cover berry mixture, and let stand 2 hours.
  2.  Beat whipping cream at medium-high speed with an electric mixer until foamy; gradually add 1/3 cup of powdered sugar, and vanilla beating until stiff peaks form (do not over beat or whip cream will become butter!). Cover and chill up to 2 hours.

To Make biscuits

Preheat oven to 450 degrees

  1. Combine flour, 1/4 cup sugar, and baking powder in a large bowl; cut butter into flour mixture with a pastry blender or two forks until crumbly.
  2. Whisk together eggs, sour cream, and vanilla until blended; add to flour mixture, stirring just until dry ingredients are moistened.
  3. Drop dough by lightly greased 1/3 cupful’s onto a lightly greased baking sheet. (Coat cup with vegetable cooking spray after each drop.)
  4. Bake at 450° for 12 to 15 minutes or until golden.

Split shortcakes in half horizontally. Spoon about 1/2 cup berry mixture onto each shortcake bottom; top each with chilled whipped cream, and cover with tops. Serve with remaining whipped cream. Garnish, if desired.

Fresh Berry Pudding

Berry pudding

Berry pudding

What a truly exotic and simple dessert to make when berries are at their peak of flavor.  When I hear “pudding” I think of the chocolate puddings I ate as a girl, this recipe is a type of pudding called a bread pudding.  The history of “bread pudding” is a dish with very old roots. It evolved as a use for stale bread, many years ago.  Cooks from many cultures throughout history did not want to waste stale bread, so they invented many dishes, both savory and sweet, that utilized it. Today, bread pudding is still made, but its current forms tend to be far more luxurious than its humble origins. Modern bread puddings often utilize fresh, gourmet breads, such as brioche, and include expensive ingredients, such as vanilla beans, bourbon, Gruyere cheese or pecans. Sweet bread puddings may also be served with a variety of sauces and fruit.

Ingredients

  • 5 cups mixed fresh berries, such as blackberries, blueberries, and raspberries (about 3 pints)
  • 2 tablespoons fresh lemon juice
  • 2 tablespoons water
  • (optional) 1 vanilla bean split lengthwise
  • 1/2 cup sugar
  • Pinch of salt
  • 18 thin slices white sandwich bread

Directions

  1. In a saucepan, cook berries, water and lemon juice over medium heat until berries release their juices but still hold their shape, about 2 minutes, scrape vanilla beans from vanilla pod and add to berry mixture. Stir in sugar and salt; cook until dissolved, 3 to 5 minutes. Strain sauce into a bowl through a sieve or colander; do not discard the berries, set aside. Let cool.
  2. Line a cupcake tin with plastic wrap, pressing it into cups. Using cookie cutters or an inverted glass, cut out six 2 1/4-inch rounds and twelve 2 3/4-inch rounds from bread.
  3. Pour 1 tablespoon sauce into each cup; add 1 tablespoon of reserved cooked berries. Top with smaller bread rounds; add another tablespoon each of sauce and berries. Make another layer of bread, sauce, and berries; top with remaining bread rounds. Press down firmly with the bottom of a glass.
  4. Fold plastic over; cover with a baking sheet. Weight with a heavy skillet. Refrigerate at least 4 hours.
  5. To serve, pull up on plastic wrap, and gently unmold each pudding onto plates; drizzle with sauce.

Cook’s Note

Using a cupcake tin lined with plastic wrap makes it easy to form, transport, and unmold the chilled puddings.

Fresh Lemon and Berry Truffle Dessert

Lemon / Berry Truffle

Lemon / Berry Truffle

What a delightful, colorful way to end your Mother’s Day celebration with a light, lemony dessert.  This can be made the day before and left to refrigerate until ready to serve.  Leave your ladyfinger cookies, or if you prefer to use sponge cake or angel food cake chunks, out overnight to harden and dry slightly.  They will absorb the moisture from the lemon syrup and cream mixture.  Happy Spring!

Fresh Lemon & Berry Truffle Dessert

Ingredients

  • 1/4 cup fresh lemon juice
  • 1/4 cup granulated sugar
  • 12-ounces cream cheese, softened
  • One 8-ounce jar prepared lemon curd (or substitute lemon pie filling)
  • 2 cups heavy cream
  • 22 hard ladyfinger cookies (or sponge cake or angel food cake cut into chunks and left out overnight to harden)
  • 1-1/2 cup of raspberries
  • 1-1/2 cup of sliced strawberries
  • Powdered sugar, for garnish

Directions

  1. In a small measuring cup, mix the lemon juice with the sugar and 1/4 cup water until the sugar is dissolved. Set aside.
  2. Place the cream cheese, lemon curd and heavy cream in a heavy-duty mixer or food processor and beat until smooth and fluffy.
  3. To assemble, place half the ladyfingers (or sponge cake chunks) in the bottom of deep, clear decorative bowl
  4. Generously brush lady fingers or cake chunks with the lemon juice syrup.
  5. Top with half the lemon curd cream mixture
  6. Top with 1 cup raspberries and sliced strawberries
  7. Repeat the layers, using the remaining ladyfingers, syrup and lemon curd cream
  8. Cover with plastic wrap and chill at least 8 hours or overnight.

Before serving, top with the remaining 2 cups of berries and dust with powdered sugar. Serve with whipped cream.

Beef Bourguignon

Beef Bourguignon

Beef Bourguignon

Beef bourguignon is one of many examples of peasant dishes being slowly refined into today’s haute cuisine.  Most likely, the particular method of slowly simmering the beef in wine originated as a means of tenderizing cuts of meat that would have been too tough to cook any other way.  Over time, the dish became a standard of French cuisine. The recipe most people still follow to make an authentic beef bourguignon was first described by Auguste Escoffier. That recipe, however, has undergone subtle changes, owing to changes in cooking equipment and available food supplies. Julia Child‘s Mastering the Art of French Cooking describes the dish, sauté de boeuf à la Bourguignonne, as “certainly one of the most delicious beef dishes concocted by man”.  I have to agree!

Well it is still snowing here in Montana and it is the weekend, finally.  After a week of salads and sauteed chicken breasts, I need some comfort food.  To me a big pot of beef stew and crusty homemade bread is just a bowl full of comfort goodness.  This is a BIG recipe, but really, once you get your prep work done (all the chopping and measuring ahead of time) it comes together fairly easy.  The bottle of Pinot Noir adds such a wonderful flavor.  I buy a pot roast chuck and cube it – it makes the best stew meat because it becomes tender the longer it cooks.  This “stew” does not have potatoes in it – but if you must, add baby red potatoes. Print this out and keep it in a safe place, next winter you will want to make it again!

Beef Bourguignon

Ingredients

  • 1 tablespoon good olive oil
  • 8 ounces bacon, diced
  • 2 1/2 pounds chuck beef cut into 1-inch cubes (buy a pot-roast chuck and cube it)
  • Kosher salt
  • Freshly ground black pepper
  • 1 pound carrots, sliced diagonally into 1-inch chunks
  • 2 yellow onions, sliced
  • 2 teaspoons chopped garlic (2 cloves)
  • 1 (750 ml.) bottle Pinot Noir (or other dry red wine)
  • 1 can (2 cups) beef broth
  • 1 tablespoon tomato paste
  • 1 teaspoon fresh thyme leaves (1/2 teaspoon dried)
  • 4 tablespoons unsalted butter at room temperature, divided
  • 3 tablespoons all-purpose flour
  • 1 pound frozen whole onions (sometimes hard to find, but you can buy a bag of frozen peas & onions)
  • 1 pound fresh mushrooms thickly sliced  or quartered, set aside – added almost at the end of cooking

Directions

Preheat the oven to 250 degrees F.

  1. Heat the olive oil in a large Dutch oven.
  2. Add the bacon and cook over medium heat for 10 minutes, stirring occasionally, until the bacon is lightly browned.
  3. Remove the bacon with a slotted spoon to a large plate.  
  4. Dry the beef cubes with paper towels and then sprinkle them with salt and pepper.
  5. In batches in single layers, sear the beef in the hot oil for 3 to 5 minutes, turning to brown on all sides. Remove the seared cubes to the plate with the bacon and continue searing until all the beef is browned.
  6. Set aside.
  7. Toss the carrots, and onions, 1 tablespoon of salt and 2 teaspoons of pepper in the fat in the pan and cook for 10 to 15 minutes, stirring occasionally, until the onions are lightly browned.
  8. Add the garlic and cook for 1 more minute.
  9. Put the meat and bacon back into the pot with the juices.
  10. Add the bottle of wine plus enough beef broth to almost cover the meat.
  11. Add the tomato paste and thyme.
  12. Bring to a simmer, cover the pot with a tight-fitting lid and place it in the oven for about 2 hours (or more) or until the meat and vegetables are very tender when pierced with a fork. (you can also put this together in the morning and put in your slow cooker for the whole day)
  13. Combine 2 tablespoons of butter and the flour with a fork and stir into the stew.
  14. Add the frozen onions.
  15. Saute the mushrooms in 2 tablespoons of butter for 10 minutes until lightly browned and then add to the stew.
  16. Bring the stew to a boil on top of the stove, then lower the heat and simmer for 15 minutes.

Moxy’s Barbeque Sauce with Bourbon

Moxy's Barbeque Sauce

Moxy’s Barbeque Sauce

The origin of barbecue sauce can be  traced to the end of the 15th century, when Christopher Columbus brought a sauce back from Hispaniola, while some place it at the formation of the first American colonies in the 17th century. References to barbeque sauce start occurring in both English and French literature over the next two hundred years.  Early cookbooks did not include recipes for barbecue sauce. The first commercially produced barbecue sauce was made by the Georgia Barbecue Sauce Company in Atlanta, Georgia. Its sauce was advertised for sale in the Atlanta Constitution, January 31, 1909. Heinz released its barbecue sauce in 1940.  Kraft Foods also started making cooking oils with bags of spices attached, supplying another market entrance of barbecue sauce. Everyone has a favorite, give this one a try.  It makes 3 – 4 cups of sauce and will keep for up to a month in the refrigerator.  Enjoy.

Ingredients

  • 2 cups ketchup
  • 4 tablespoons Worcestershire sauce
  • 3/4 cup Bourbon
  • 1/4 cup strong coffee
  • 4 tablespoons soy sauce
  • 1 tablespoon spicy brown mustard
  • 1 cup packed brown sugar
  • 1/2 teaspoon cayenne pepper (less if you don’t like spicy, more if you like hot)
  • 4 tablespoons cider vinegar
  • 1 tablespoon Tabasco sauce (optional if you don’t like hot)

Directions

  1. In a medium saucepan, combine all ingredients.
  2. Bring to a boil over high heat, stirring occasionally.
  3. Reduce heat to low. Simmer for ½ hour, stirring occasionally until thickened.
  4. Store in refrigerator up to 1 month.