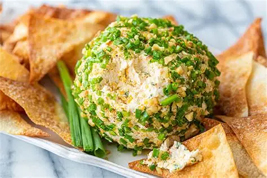
Here is a wonderful throwback to the 1970’s. This cheese ball was my first introduction to the world of different kinds of cheeses. It would be a great appetizer for the upcoming holidays, serve with crackers, pretzels, or toasted pita chips.
Ingredients
1 8-ounce cream cheese block
¾ cup blue cheese, crumbled
1 cup sharp cheddar cheese, grated
¼ cup yellow or sweet onion, minced
½ cup chopped, toasted pecans
1 tablespoon Worcestershire sauce
1 bunch parsley, finely chopped
Process
Bring cream cheese, blue cheese, and cheddar cheese to room temperature.
Crumble the blue cheese and shred the cheddar cheese.
Put cheeses in a mixer and beat on medium speed until fluffy, scraping sides and bottom of bowl. Stir in chopped, toasted pecans.
Cover and chill in refrigerator for 8 hours or overnight.
Shape chilled cheese mixture into a large ball and roll in the chopped parsley. Keep chilled in refrigerator until ready to serve.
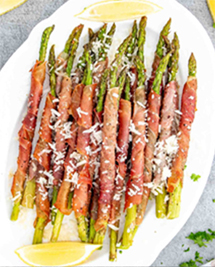
These asparagus spears are a dream, one of my favorites because they are easy to make ahead. Marinated fresh asparagus spheres in seasoned rice vinegar with herbs and garlic, then wrapped in a salty prosciutto. No cooking involved! Guaranteed to please your guests.
Ingredients
1-pound fresh, thin stalk asparagus
3 tablespoons of olive oil
¼ cup Seasoned Rice Vinegar
2 cloves of fresh grated or pressed garlic
¼ teaspoon red pepper flakes
1 3-oz package of prosciutto
Process
Clean the asparagus and trim off ends. Place in a gallon zip-lock bag with the rest of the ingredients except the prosciutto.
Marinate in the refrigerator at least an hour or more.
When ready to plate, and serve, slice prosciutto slices into thin strips horizontally and set aside.
Remove asparagus from the marinade (do not rinse).
With a thin strip of prosciutto begin winding it up the stalk from the base of the asparagus to the top.
Plate the spears and refrigerate until ready to serve.
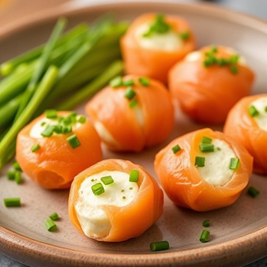
The holidays are fast approaching and you may need to consider appetizers for your guests, or perhaps you volunteered to bring something to a gathering. Why not something sweet and elegant? Roasted Stuffed Dates. Filled with goat cheese topped with a walnut, and herb mixture and drizzled with honey. Simply amazing.
Ingredients
1 12-ounce package pitted Medjool dates
1 4-ounce log goat cheese, softened to room temperature. I love the honey flavored
1/3 cup very finely chopped walnuts
2 teaspoons minced fresh rosemary
1 teaspoon orange zest plus 2 teaspoons fresh orange juice
½ teaspoon ground cinnamon
¼ teaspoon sea salt
3 tablespoons extra-virgin olive oil
Hot honey for garnish
Process
Preheat oven to 375° F.
Slice the dates open lengthwise, do not cut all the way through.
Fill each date with 1 to 2 teaspoons of the goat cheese.
Arrange dates in a 9” x 9” baking pan.
Combine walnuts, rosemary, orange zest, orange juice, cinnamon, salt, and olive oil in a small bowl. Mix well.
Spoon walnut mixture over dates. Bake for 15 minutes.
Remove from oven and let sit for 5 minutes before transferring to a platter.
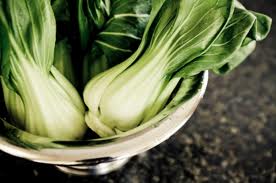
I received three baby Bok Choy, also known as Chinese cabbage in my Bountiful Basket (a local food co-op) today. I was stumped as to how I was going to prepare them since I have only eaten this cabbage in stir fry or marinated. I decided to experiment tonight with an oven cooked bok choy.
A little about boc choy that you may not know; this vegetable contains glucosinolates. These compounds have been reported to prevent cancer in small doses, but, like many substances, can be toxic to humans in large doses, particularly to people who are already seriously ill. Cultivated in China since ancient times, bok choy is found in soups and stir-fries, appetizers and main dishes. Bok choy’s popularity comes from its light, sweet flavor, crisp texture and nutritional value. Not only is bok choy high in Vitamin A, Vitamin C and calcium, but it is low in calories.
Preheat oven to 350 degrees
Ingredients
1 baby Bok Choy
Olive Oil
4 cloves of fresh garlic, grated or chopped very fine
Kosher salt
Pepper
Parmesan cheese
Directions
Bok Choy
Remove outer leaves if they look torn or bruised, or just cut short with scissors.
If leaves are overly long you can trim them with scissors, otherwise leave long, they will crisp up when cooked.
Wash with cool water and drain and dry on paper towels.
Slice the Bok Choy lengthwise into 4 quarters leaving the stem on each piece to hold leaves together.
Drizzle with olive oil, rub the olive oil into the leaves
Grate the garlic cloves and spread all over the Bok Choy and into the leaves
Sprinkle with kosher salt, pepper and Parmesan cheese
Place on a flat baking sheet covered with aluminum foil – do not use a pan with a lip, you want them to roast not steam.
Bake in 350 F. oven for 20 minutes, turn over and let bake for another 5 minutes
Be careful not to overcook, the Bok Choy should be crisp tender, at this point you can cut into chunks and serve or drizzle with a good quality balsamic vinegar and serve.
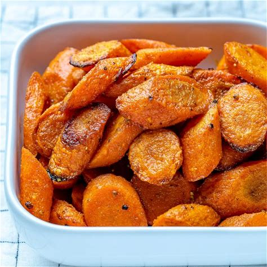
3 tablespoons butter 2 pounds carrots, peeled, halved lengthwise and sliced on the bias 1-inch thick 1/2 teaspoon salt 1/2 teaspoon ground black pepper 1 teaspoon curry powder 1/4 cup roughly chopped fresh cilantro or parsley
Directions
Heat a large heavy skillet over medium-high heat and add the butter. When hot, add the carrots in an even layer to maximize contact with the pan. Sprinkle with the salt and pepper, and fry the carrots, turning every 3 or 4 minutes, until are they are dark caramelized brown in spots, about 8 to 10 minutes. Add the curry powder and mix to combine. Scatter the cilantro (or parsley) over the top and serve.
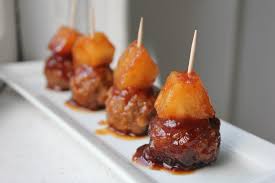
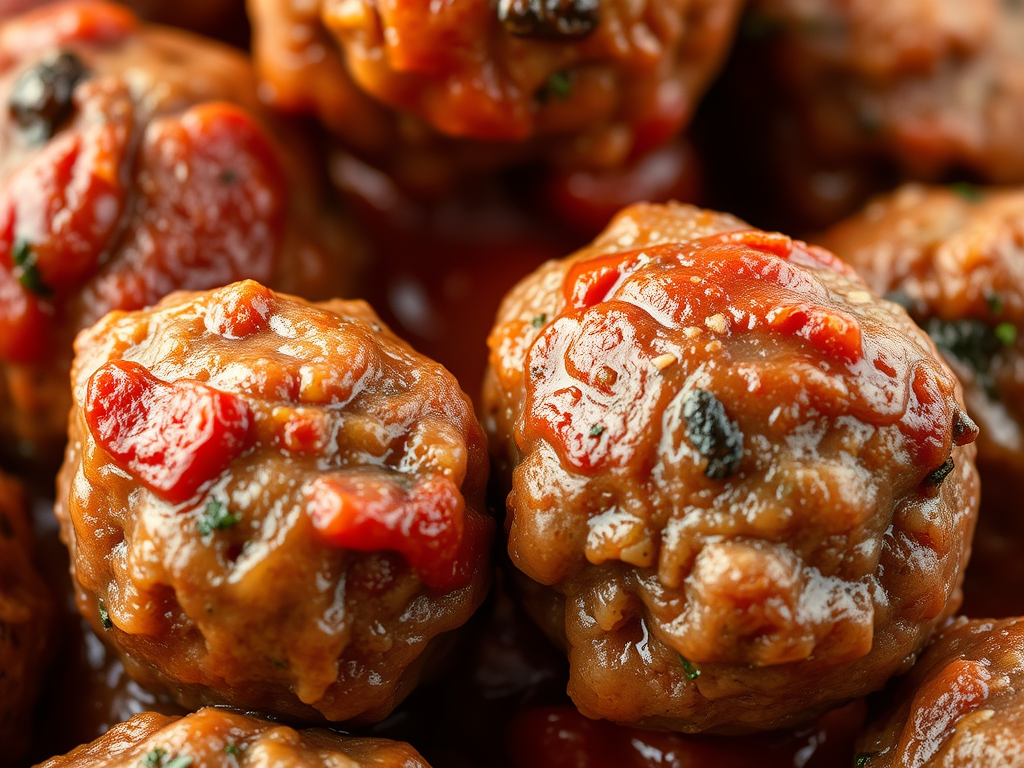
Purgatory Meatballs, yes the heat factor is there, but the pineapple and apricot preserves dial it down to a spicy sweetness. You can add additional hot jalapenos to dial up the heat factor. Start with this recipe and then add if it is not spicy enough.
I needed a fast, quick entrée to bring to work for an impromptu party. Off to the market I went to try and figure it out. Here is what I walked out with, I put it all together and decided it is yummy and great enough to post. Great as an appetizer, party food, over rice or great for a last minute potluck. I put it in a crock pot and was all set for the event.
Ingredients:
1 medium sweet onion, diced
½ cup of Italian parsley or cilantro, chopped fine
1 jar of chili sauce
1 large can of pineapple tidbits
1 jar of apricot preserves
1 jar of HOT Mango Chutney (I used half)
1 can of HOT jalapeno peppers (diced)
1 can of medium hot chilies peppers (diced)
4 bags of frozen, fully cooked meatballs (about 15 in each bag),
4 large green peppers, cut into chunks
Directions:
In a large saucepan, sauté the diced onion in 1 tablespoon of oil or 1 teaspoon of coconut oil until soft
On medium heat, add the next 6 ingredients, I only used ½ jar of the HOT Mango Chutney, but you can use the whole jar
Bring to a simmer, stirring constantly for 10 minutes, remove from heat. NOTE; because there is sugar in this mixture it will come to a boil quickly so keep the heat on medium and stir so the bottom does not burn.
After removing the pan from the heat, bring to room temperature if not using right away and refrigerate until you are ready to use.
When you are ready to serve; about 4 hours before the event, put the sauce in a crock pot and cook on high until hot, turn down to low and add the peppers, and meatballs, stir to coat and put the lid on and heat until meatballs are heated through.
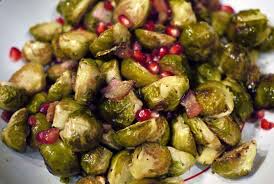
Brussel sprouts with bacon, garlic, and Sweet Onion
The Brussels sprout, not a favorite with many people, but I love them; they remind me of tiny cabbages (also a fav, must be my Germanic upbringing). Everything is “better” with bacon, right? As well as garlic and sweet onion, so give these little morsels a try with your next dinner. Brussels sprouts are hardy, and fair well with beef or pork dishes. Raw Brussels sprouts contain excellent levels of vitamin C, and vitamin, with more moderate amounts of B vitamins, such as folic acid and B6, essential minerals and dietary fiber. Brussels sprouts, contain sulforaphane, a phytochemical under research for its potential anticancer properties. Although boiling reduces the level of sulforaphane, steaming and stir frying do not result in significant loss. Brussels sprouts are also a source of indole-3-carbinol, a chemical being studied for how it affects DNA repair in cells and appears to block the growth of cancer cells in vitro. So there you have it, the almighty Brussels sprout. I hope this dish helps you on your way to acquiring a taste for these little gems. Enjoy.
Brussels Sprouts with Bacon, Garlic, and Onion
Ingredients
6 slices bacon
½ cup sweet onion, diced
1/2 pounds Brussels sprouts, trimmed and halved
4 garlic cloves, grated
1/2 cup fat-free chicken broth
1/8 teaspoon salt
1/8 teaspoon red pepper flakes
1 tablespoon red currant jelly
Directions
Heat a large nonstick skillet over medium-high heat. Add bacon, and sauté until bacon begins to brown. Remove pan from heat. Remove the bacon from pan, reserve 1 tablespoon drippings in pan (discard the remaining drippings).
Chop bacon into small pieces
Return pan to medium-high heat, and stir in bacon pieces, onion, and Brussels sprouts; sauté 4 minutes.
Add garlic, and sauté for 4 minutes or until garlic begins to brown, stirring frequently.
Add the chicken broth, and bring to a boil. Cook for 2 minutes until the broth reduces almost completely gone and the sprouts are crisp-tender, stirring occasionally.
Remove from heat; stir in salt and red pepper flakes, toss with a tablespoon of current jelly.
For a colorful, special Thanksgiving or Christmas dinner or any holiday dinner, try stirring in pomegranate seeds.
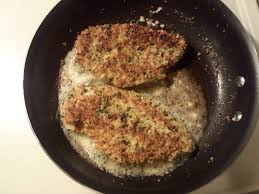
Not sure what to call this dish, so I researched other recipes that claim they are “oven cooked herb chicken” but most of them incorporate flour or breadcrumbs, and a stick of butter and/or olive oil. They didn’t seem all that healthy too me and took too much time in the oven. I decided to stick with my tried and true herb crusted chicken breast, coated with my own fresh herbs that I cut from my garden, from start to finish it took all of 15 minutes to prepare and cook. Yes, my chicken breast is “sautéed” in coconut oil I feel it is so much healthier than the alternative. This recipe is for an individual 7oz chicken breast, if you have two chicken breasts to add to the pan, you should probably increase the cooking time by one minute on each side or until done. My recipe does not use flour, breadcrumbs or an colossal amount of grease, oil or butter to cook with and it only takes 8 minutes to cook, so I consider this “fast food” for dinner.
Ingredients
7oz chicken boneless, skinless
¼ cup of chopped fresh herbs, I used a combination of: parsley, sage, oregano, rosemary
¼ tsp kosher salt
2 tsp of coconut oil
1 tsp of butter
Directions
Place chicken breast inside a plastic quart bag or between two pieces of plastic wrap and using a meat mallet begin to gently pound the chicken on both sides until all the same width
Take half of the chopped herbs and spread on one side of chicken breast, sprinkle with salt and gently pound the herbs into that side of the chicken breast
Turn chicken over and spread remaining herbs and salt on other side of breast and pound into the chicken breast.
Melt coconut oil and butter in a heavy pan or non-stick pan over medium high heat, when oil is hot place the chicken in the oil and cook uncovered for 4 minutes each side.
Turn the heat down to medium if it looks like it is browning too fast. When the chicken is ready to flip to the other side after 4 minutes, be careful not to splash yourself. Cook the second side for 4 more minutes. Slice the chicken breast to be sure the meat is white (cooked) before serving.
*Note: Melted oil must be hot before adding the chicken breast or it will absorb the oil as it is cooking. Hot oil will sear the meat as it hits the pan.
Pounded chicken breast cooks relatively fast, prepare your salad and vegetables while it is cooking.
The humble meatball, its beginnings tell early meatballs would have been made from leftover meat dishes and hand-shredded or pounded with a heavy object and minced with primitive tools. Food history tells us that meat was rare across the world and was enjoyed mostly by the rich. It was precious, so it can be assumed that it was never wasted, and no parts of a cut of meat or the leftovers would have been thrown away. Simply put, the meatball was a way to utilize this extraneous meat and squeeze another days’ meal from it, not to mention another days’ nutrition.
Italian immigrants brought along their own meatball (polpette) recipes, many of which had evolved according to family tradition. The polpette were not initially served with spaghetti. Spaghetti was typically served alone. The two forces came together in order to appease Americans who frequented Italian restaurants and wanted meat served alongside their pasta dishes.
The meatball was recorded in a 1754 Swedish cookbook by Cajsa Warg. The k”ttbullar were served with a cream-based gravy and loganberry preserves. Buttered noodles also became a popular side item, and nowadays are thought of as the expected accompaniment for Swedish meatballs.
There are meatball recipes from 25 AD. The Romans, as evidenced in an ancient recipe book written by Marcus Gavius Apicus (aka Apicius) called “De re coquinaria libri decem (Cuisine in Ten Books)”. Book II is devoted to “minces”, or mixtures of meat and other ingredients.
So to conclude, where did the first meatball come from? No one knows for sure. Every country has their own version of the meatball dating back in time throughout history using different meats, vegetables, and ingredients.
This is Kitchen Moxy’s version, I hope you enjoy these little morsels as they are a favorite of mine served with traditional spaghetti sauce or brown gravy. In this day and age we are all trying to watch our nutrition, fat, and calorie intake. Beef can be substituted with veal, venison, elk, which ever red meat you desire. The pork adds moisture and flavor, so your meatball does not end up dry. Eat well and rejoice.
½ pound of ground pork
½ pound of veal (or other meat)
½ pound of beef chuck (or other meat)
½ cup of grated Parmesan cheese
¼ cup finely chopped flat-leaf Italian parsley
2 teaspoons of kosher or sea salt
¼ to ½ cup of grated onion (food processor works great)
3 cloves of grated garlic
1 large beaten egg
¼ teaspoon black pepper
1/3 cup olive oil for frying. See methods of cooking below
1 cup of breadcrumbs, if using seasoned, dry breadcrumbs toss with 1/3 cup of milk to re-hydrate.
Directions:
Mix all ingredients together with your hands just until the mixture comes together.
Form meatballs with your hands, rolling into golf-ball sized balls. Do not pack the meat into tight balls or they will become tough.
May be refrigerated up to 24 hours at this point.
Cooking Methods:
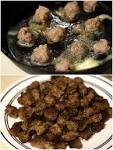
Method #1: Drop raw meatballs into your sauce. By the time your sauce is finished cooking, your meatball will be too. This is the easiest way, no prep, no mess. But no crusted sides. But it does flavor the sauce. Both my mom and I used this method many times. We were making our own marinara sauce from scratch. So cook time was long enough to cook the meat.
Method #2: Bake your raw meatballs in the oven at 350F. for 15 minutes. Your meatballs are done when no longer pink in the center. The internal temperature of a meatball should be 160F. You can finish cooking your pink centered meatball in your sauce.
Method #3: Fry your meatballs in olive oil. This is the traditional method. Your meatballs are crusted on all sides as they simmer in hot oil. Heat two tablespoons of olive oil in a non-stick skillet over medium-high heat. Add half of the meatballs and cook, turning occasionally, until well browned on all sides, about 6 minutes. Transfer the meatballs to a plate. Drain the oil and wipe out the skillet, return to the heat, and repeat with the remaining oil and meatballs.
Notes:
Great meatballs contain Parmesan cheese! Freshly grated Parmesan cheese is tasty, but you can use any hard Italian cheese like Grano Padano, or Pecorino Romano.
Fresh Parsley: Use fresh parsley either Italian parsley or common parsley. Use a food processor to mince fine or mince your parsley the old-fashioned way with a chef’s knife. But do not skimp on the parsley
Garlic: You need to smell the garlic in the meat! Use fresh garlic use a press, mince, or grate. Do not skip the garlic. You can also add a teaspoon of garlic powder with your fresh garlic.
Onions: Do not skip the onions! They add so much flavor. You can use either Yellow, white or sweet onion. they all add a different note of flavor.
Be sure to rehydrate your breadcrumbs before adding to the meat mixture. Add 1/3 cup of milk to 1 cup of breadcrumbs. Let sit for about 5 minutes.
Meat: I find that using 85% lean ground beef is the perfect amount of fat. If you do not eat beef, you can substitute ground turkey, ground chicken, venison, or veal. You can also add Italian sausage to the mix for a different flavor note.