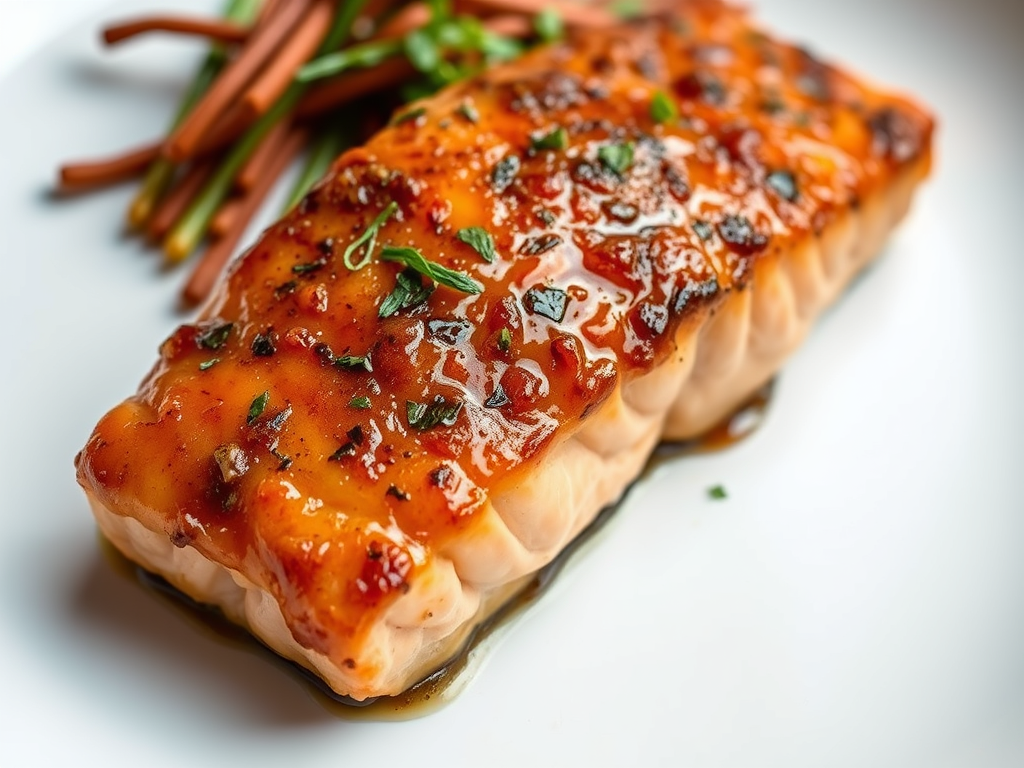
There are many reasons to love garlic chicken thighs, especially for their flavor. The crispy skin, juicy meat, and garlic sauce combine to create a rich, satisfying experience. Each bite offers a mix of textures, from the golden, seared exterior to the tender, flavorful interior. This recipe is reliable and versatile, suitable for a cozy home meal or a special gathering. It’s a dish that feels rustic yet impressive enough for a picnic or dinner party. For the best results, marinate the chicken for 24 to 36 hours before roasting. Dark meat cuts like chicken thighs and legs work best because they stay moist and tender during cooking. Overall, this garlic chicken recipe is a delicious, easy-to-make option that appeals to many tastes and occasions.
Marinade Ingredients
1 cup of olive oil
8 garlic cloves, flattened
½ cup minced fresh parsley
2 – 3 pounds of chicken thighs and legs, skin on and bone in
Process
Prep chicken by cutting off any extra fat or extra skin, pat it completely dry before adding it to the marinade.
Peel garlic cloves and flatten them with a knife.
Chop fresh parsley finely.
Mix olive oil, garlic, and parsley and pour into a gallon plastic bag.
Add the chicken and marinate the meat for at least 4 hours, up to 36 hours.
Place in the refrigerator, flipping every few hours to ensure even coverage of the marinade.
Sauce Ingredients
6 garlic cloves, pressed or grated
3 tablespoons chopped fresh rosemary or 1 tablespoon of dried, crumbled
2-1/2 tablespoons chopped fresh thyme or 2 teaspoons of dried
1 teaspoon of coarse Kosher salt
Ground Pepper
Process
Preheat oven to 425°F. Line a raised edge sheet pan with aluminum foil for easy clean up.
Take the chicken out of the marinade, keeping any garlic or parsley stuck to it. Place the chicken skin side up on a shallow roasting pan or sheet pan with raised edges. Save one-third of the marinade in a large bowl for later use.
Stir the pressed garlic cloves, rosemary, and thyme into the reserved marinade.
Pour this mixture over the chicken in the roasting pan.
Season with salt and pepper and cook skin side up until cooked through for about 50 minutes.
This German Käsespätzle is a tasty homemade pasta tossed with onion and Emmentaler cheese. It’s a German version of macaroni and cheese. Made with Spätzle a type of egg noodle that originated in the Swabian region of Germany. The name “Spätzle” translates to “little sparrows” in English, reflecting the small, irregular shapes of the noodles. They are made from a simple batter of eggs, flour, and milk, resulting in a chewy, dumpling-like texture.
Ingredients
2 cups of all-purpose flour
¾ teaspoon freshly grated nutmeg, if possible
¾ teaspoon salt
⅛ teaspoon pepper
3 large eggs
3/4 cup milk more as needed (milk produces a richer Spaetzle) (**add more flour if the dough is too runny, add more milk if it’s too stiff)
3 tablespoons of butter
1 ½ cups shredded Emmentaler cheese (See note for substitute)
1 onion, sliced thin
Process
Gather all ingredients.
Mix flour, nutmeg, salt, and pepper.
Beat eggs in a medium bowl. Alternately mix in milk and flour mixture until smooth. Set aside for 30 minutes.
Bring a large pot of lightly salted water to a boil. Press batter through a spaetzle press into the water. One can also use a rubber spatula to push the batter through the holes of a large-holed colander or a kitchen spoon with holes.
Don’t overload the pot of water. Work in small batches. The spätzle batter will sink to the bottom of the pot of boiling water, then float to the top as it cooks. Cook the spätzle for approximately five minutes. Remove from boiling water with a slotted spoon to a clean colander to drain.
Mix in 1 cup of cheese.
Melt butter in a large skillet over medium-high heat. Add onion and cook until golden. Stir in spaetzle and remaining 1/2 cup cheese until well blended. Remove from heat and serve immediately.
Notes:
Gruyère is the best substitute for Emmental cheese. It’s super easy to find in food stores and should be around the same price as a pack of Emmental. In terms of flavor, gruyere cheese is more complex. Along with the nutty notes it shares with Emmental, there’s also a salty and earthy undertone.
Traditionally Spätzle batter is quite thick because it was cut into noodles using the board & knife method. Even if using a Spätzle press or other method, thicker batter yields a better consistency. If you’re using the Spätzle press yes, it will require some muscle strength – you don’t want the batter to be so runny that it squishes right through with ease. That said, if you’re straining way too hard to press the batter through, go ahead and add a bit more liquid to thin it out.
The history of Whoopie Pies is an interesting part of American food culture, mainly in the Northeastern U.S. They likely started in the early 1900s, possibly in Pennsylvania or Maine. The name “Whoopie” may come from children’s exclamations of joy or surprise when discovering the sweet filling inside. These treats have become a beloved regional specialty, reflecting local culinary traditions and history.
Cookie Ingredients
1 cup sugar
½ cup shortening
1 egg
1 egg yolk
2 cups of all-purpose flour
2/3 cup unsweetened cocoa powder
¼ teaspoon salt
1 teaspoon of baking soda
½ cup hot water
2/3 cup buttermilk
Cookie Process
Preheat oven to 350°F. Line 2 cookie sheets with parchment paper.
Beat together sugar and ½ cup shortening at high speed with a stand mixer until fluffy.
Add the egg and egg yolk and beat until incorporated.
In a separate bowl, stir together the flour, cocoa powder, and salt; set aside.
Dissolve baking soda in the ½ cup of hot water; cool slightly.
Add the flour mixture, the soda mixture, and 2/3 cups of buttermilk alternately to the sugar, shortening mixture.
Beat at a medium speed until well mixed.
Drop batter by rounded tablespoonfuls 2 inches apart onto a parchment paper lined cookie sheet. Bake for 8 – 10 minutes.
Cool cookies on a cookie rack. Yields 48 cookies.
Filling Ingredients
2 cups sifted powdered sugar
½ teaspoon of meringue powder
1 teaspoon vanilla
½ cup shortening (such as white Crisco)
¼ cup butter
Filling Process
In a stand mixer, add shortening and butter, vanilla, 1 teaspoon of water and beat at high speed until light and fluffy.
Turn mixer to low and gradually add powdered sugar and meringue powder.
Beat on high until mixture is light and fluffy. If mixture is too thick to spread, add 1 teaspoon of water at a time, until it is spreading consistency.
Spread some filling on the flat side of half the cookies, top with the remaining cookies, flat side down.
Creamy risotto is a classic Italian dish renowned for its rich, velvety texture and comforting flavor. Made with Arborio rice, which has a high starch content, risotto achieves its signature creaminess through slow cooking and gradual addition of broth. The process involves sautéing onions or shallots in butter or olive oil, then adding the rice to toast it lightly. Gradually, warm broth is added in small increments, allowing the rice to absorb the liquid slowly, releasing its starch and creating a smooth, creamy consistency. Preparing creamy risotto at home takes about 40 minutes, start to finish. Served as a main meal or side dish, it is so worth the effort.
Ingredients
4 cups of Vegetable Stock
8 ounces of button mushrooms, sliced very thin
1 medium onion, or shallots peeled and finely chopped
2 cloves of garlic, peeled and grated or pressed
1-1/2 cups of Arborio Rice
8 ounces of grape tomatoes, quartered or sliced into thirds
¼ ounce chives, snipped fine
4 tablespoons of garlic butter
1 tablespoon of unsalted butter
1/3 cup freshly grated Parmesan cheese (or substitute with Asiago, Sharp Cheddar, Gruyere, or Pecorino Romano)
1 teaspoon Korean red chili flakes
Salt & pepper to taste
Process
Heat vegetable stock in a medium pot, bring to a low simmer.
Heat a drizzle of olive oil in a large pan over medium-high heat. Add sliced mushrooms, spread out in a layer and cook until brown on underside, flip mushrooms and continue to cook until browned and slightly crispy., Season with salt and pepper.
Turn off heat and transfer mushrooms to a plate. Set aside.
In the same pot, drizzle olive oil over medium heat. Add onion or shallots, cook stirring until slightly softened and very lightly browned about 2 – 3 minutes.
Add garlic, rice and 1 tablespoon unsalted butter. Cook, stirring for about 2 minutes until garlic is fragrant and rice is translucent. Season with salt and pepper.
Begin making Risotto by adding ½ cup vegetable stock to the pan with rice. Stir until liquid is mostly absorbed. Repeat with remaining stock, adding ½ cup at a time and stirring until liquid has mostly absorbed until the rice is “al dente” and risotto is creamy. This will take about 30 minutes. Season with salt and pepper.
Stir in mushrooms, tomatoes, garlic herb butter, half of the cheese and half of the chives.
Cook until the tomatoes are softened for about 6 minutes.
If risotto is too thick, stir in a little water or more vegetable stock. Risotto should be soft and creamy, not thick.
Stir in red chili flakes.
To serve, top bowl with remaining chives and remaining Parmesan.
Onion jam is a versatile condiment crafted by slow-cooking onions with honey, vinegar, and spices until they reach a thick, sweet, and tangy consistency. This culinary creation offers a unique blend of flavors that can enhance a variety of dishes. Its rich, caramelized taste makes it an excellent accompaniment to meats, cheeses, and bread, adding depth and sweetness to savory dishes. Onion jam can be used as a topping for burgers, sandwiches, and grilled meats, providing a burst of flavor that elevates the overall dish. It also pairs well with cheese platters, serving as a sweet contrast to sharp cheese like cheddar or blue cheese. Whether spread on toast, dolloped on roasted vegetables, or used as a marinade component, onion jam is a flavorful addition that enhances a wide range of culinary creations.
Ingredients
2 tablespoons of olive oil
About 2 pounds of sweet onion (about 3 large)
2 sprigs of fresh thyme
¼ teaspoon Kosher salt and ground pepper
1 cup of red wine
¼ cup of honey
¼ cup of red wine vinegar
Directions:
Slice onions thin, a mandoline is a great tool for this task.
Preheat a heavy skillet over medium-low heat with 2 tablespoons of olive oil
Add onions, thyme, salt and pepper, cover and cook until onions have wilted, about 10 to 15 minutes. Stir occasionally with a wooden spoon to prevent sticking. You do NOT want to brown the onions, just sweat them
Remove lid. You will not need the lid for the next steps.
Add red wine, cook over medium-high heat until the wine is absorbed into the onions.
Remove pan from high heat. Turn heat down to medium-low. Return the pan to medium-low heat.
Add the honey and red wine vinegar and simmer gently until onions have a jam like consistency, about 15 minutes.
Remove from heat, cool and use immediately or cover and store in the refrigerator.
Compound flavored butters serve multiple culinary purposes. They can be melted over grilled meats, seafood, or vegetables to add moisture and flavor. Perfect to add fun and flair to any breakfast spread. They are also used as finishing touches on baked potatoes, bread, or pasta, providing an extra layer of richness. Additionally, they can be incorporated into sauces, marinades, or used as a base for more complex flavor combinations. Their ease of use and ability to add depth to meals make them popular among chefs and home cooks alike. Following are six compound butters that are equally delicious for all meals.
Compound Herb and Garlic Butter
Compound herb and garlic butter is a versatile culinary ingredient that enhances a wide range of dishes with its rich, aromatic flavor. Made by blending softened butter with fresh herbs, this butter offers a fragrant and savory profile that elevates both simple and complex recipes. Its culinary appeal lies in its ability to add depth and richness to meats, seafood, vegetables, and bread.
Ingredients
½ cup of unsalted butter, softened to room temperature
¼ cup of fresh chopped fresh herbs
Example: rosemary, oregano, thyme, parsley, sage, basil or chives. Fresh herbs will give a beautiful display of green flecks in your butter.
2 grated or pressed garlic cloves
½ teaspoon fresh lemon juice
½ teaspoon Kosher salt
Process
Place the softened butter in a small bowl. Add the chopped herbs, garlic, lemon juice and salt and mix well.
Transfer the mixture onto a sheet of plastic wrap. Roll into a log shape and twist ends to seal tightly. Or leave it in a covered bowl.
Refrigerate the butter for at least 2 hours, or until firm.
Room Temperature – Let butter sit out for a few minutes before using to soften. Butters can sit at room temperature for a couple of days, just like plain butter. But if the weather is hot, store it in refrigerator so butter doesn’t melt.
Compound Lemon Dill Butter
Delicious spread over seafood dishes, such as grilled salmon, baked cod or shrimp where the citrus notes complement the natural flavors of seafood. It also works well as a finishing touch for roasted vegetables or spread on warm bread.
Ingredients
1 stick of unsalted butter room temperature
2 tablespoons finely chopped fresh dill weed
1 tablespoon fresh squeezed lemon juice
½ teaspoon lemon zest
¼ teaspoon kosher salt
½ teaspoon freshly ground black pepper
Process
Wash and finely mince the dill leaves.
Zest and juice lemon.
Cut the softened stick of butter in a mixing bowl.
Using a stand mixer or hand beater, mix until light and fluffy.
Add the chopped dill, lemon zest, lemon juice, salt and pepper. Mix until combined.
Transfer the mixture onto a sheet of plastic wrap. Roll into a log shape and twist ends to seal tightly. Or leave in a covered bowl.
Refrigerate the butter for at least 2 hours, or until firm.
Room Temperature – Let butter sit out for a few minutes before using to soften. Butters can sit at room temperature for a couple of days, just like plain butter. But if the weather is hot, store it in refrigerator so butter doesn’t melt.
Compound Maple Bourbon Butter
This is a smooth, sweet butter with a smoky flavor from bourbon. It is great to spread on bread, pancakes, waffles, roasted vegetables or melted over steak.
Ingredients
1 cup (2 sticks) unsalted butter, softened
2 tablespoons pure maple syrup
1 tablespoon bourbon
1 tablespoon brown sugar
1/2 teaspoon cinnamon
1/2 teaspoon vanilla extract
Pinch of salt
Process
Bring butter to room temperature.
In a mixing bowl, add softened butter and beat butter until light and fluffy.
Gradually mix in pure maple syrup, bourbon, brown sugar, cinnamon, vanilla extract and salt.
Taste and adjust sweetness or bourbon as needed.
Transfer the mixture onto a sheet of plastic wrap. Roll into a log shape and twist ends to seal tightly. Or leave in a covered bowl.
Refrigerate the butter for at least 2 hours, or until firm.
Room Temperature – Let butter sit out for a few minutes before using to soften. Butters can sit at room temperature for a couple of days, just like plain butter. But if the weather is hot, store it in refrigerator so butter doesn’t melt.
Compound Hot Honey Butter
One of my favorite ways to enjoy this whipped hot honey butter is on Jalapeno and Cheese Cornbread or Cheddar and Chive Biscuits, sweet potatoes or baked potatoes or corn on the cob.
Ingredients
1 stick of unsalted butter, room temperature
2 tablespoons honey
2 teaspoons hot sauce
½ teaspoon Koren red chili flakes
Process
Bring butter to room temperature.
In a mixing bowl, add softened butter and beat butter until light and fluffy.
Gradually mix in honey, hot sauce and chili flakes.
Transfer the mixture onto a sheet of plastic wrap. Roll into a log shape and twist ends to seal tightly.
Refrigerate the butter for at least 2 hours, or until firm.
Room Temperature – Let butter sit out for a few minutes before using to soften. Butters can sit at room temperature for a couple of days, just like plain butter. But if the weather is hot, store it in refrigerator so butter doesn’t melt.
Compound Orange Butter
Orange butter is a tasty spread that can be used on French toast, pancakes, sweet breads, and more. It is smooth and rich, making it perfect for breakfast and brunch. It adds color and flavor to your dishes, making them more appealing.
Ingredients
1 cup (2 sticks) butter, softened
1 teaspoon of Grand Marnier, substitute with Cointreau, or orange juice.
1 tablespoon orange zest. Be careful not to zest the white pith under the orange skin as it is bitter.
Process
Bring butter to room temperature.
In a mixing bowl, add softened butter and beat butter until light and fluffy.
Gradually mix in Gand Marnier, and orange zest.
Transfer the mixture onto a sheet of plastic wrap. Roll into a log shape and twist ends to seal tightly.
Refrigerate the butter for at least 2 hours, or until firm.
Room Temperature – Let butter sit out for a few minutes before using to soften. Butters can sit at room temperature for a couple of days, just like plain butter. But if the weather is hot, store it in refrigerator so butter doesn’t melt.
Compound Chocolate Butter
Spread chocolate butter on various baked goods such as toast, pancakes, croissants, or bagels, and explore different flavor combinations to enhance your culinary experience.
Ingredients
1 cup butter, softened
2 tablespoons unsweetened cocoa
3 tablespoons powder sugar
½ teaspoon of vanilla extract
Process
Bring butter to room temperature.
In a mixing bowl, add softened butter and beat butter until light and fluffy.
Gradually mix in unsweetened cocoa, powder sugar and vanilla extract.
Transfer the mixture onto a sheet of plastic wrap. Roll into a log shape and twist ends to seal tightly. Or leave in covered bowl.
Refrigerate the butter for at least 2 hours, or until firm.
Room Temperature – Let butter sit out for a few minutes before using to soften. Butters can sit at room temperature for a couple of days, just like plain butter. But if the weather is hot, store it in refrigerator so butter doesn’t melt.
During the chilly embrace of winter, few comforts compare to the warmth and aroma of a hot, steamy bowl of soup. As the cold air bites outside, a steaming soup offers not only nourishment but also a sense of coziness and relaxation. A bowl of steamy soup on a cold winter day is more than just food; it is a comforting experience that restores energy, lifts spirits, and provides a much-needed respite from the harshness of winter weather. Enjoy with a slice of crusty bread and salad.
Ingredients
3 carrots
1 medium onion
8 ounces of kale
1 can (15.5 oz) of cannellini beans, do not drain
1-package Italian Chicken (or Turkey) Sausage
1 32-ounce carton of either chicken broth or stock
1 tablespoon of all-purpose flour
1 tablespoon of softened butter
Process
Trim, peel, and halve carrot lengthwise, thinly slice crosswise into half-moons. Set aside.
Remove and discard any large stems from kale. Finely chop into small pieces. Set aside.
Peel onion and dice into small pieces.
Heat a tablespoon of olive oil in a large pot over medium heat. Add onion and slowly cook until caramelized for about 10 minutes. Remove from pot.
Turn heat up to medium-high and add sausage. If sausage comes in links, squeeze the meat out of the casing and discard the casing. Flatten the sausage into an even layer. Cook undisturbed until meat is brown on bottom, about 5 minutes.
Break up meat into pieces, then add cooked onion, carrot and kale. Add ½ teaspoon of salt and cook, stirring until carrot is slightly softened and the kale begins to wilt.
Stir in the 32-ounce carton of chicken broth and add the cannellini beans. Bring mixture to a boil and turn heat down so soup can simmer for 10 minutes to continue cooking the sausage and vegetables.
If you want to thicken the soup broth, make a Beurre Manié by mixing 1 tablespoon of softened butter and one tablespoon of flour. Incorporate the flour into the butter with your hands or in a bowl until the flour has completely disappeared.
Whisk into your soup until the Beurre Manié has been completely melted in.
I’ll bet you are thinking, “really?” Not your typical, pizza dough from your local Italian eatery by any means, not only delicious but healthy, and pretty darn easy to make. I made this dough, baked it on my pizza stone and must say, it was all I could do to not eat the whole thing. I am not one to “recreate” the wheel, so I used a 1/4 cup of Ragu’s Lite Parmesan Alfredo sauce with a piece of garlic grated into the sauce – and layered my ingredients, it smelled wonderful while cooking. The crust was full of flavor, crispy and a little sweet.
Ingredients:
1 cup of self-rising flour (you can make your own, see below)
1 cup of Greek Plain Yogurt
Directions:
Preheat oven to 450°F. if using a pizza stone, preheat stone in oven before using.
Mix flour and yogurt together with a spatula.
Put ball of dough onto a floured board and knead for 5 minutes.
Roll out on board sprinkled with corn meal to prevent sticking and to make transferring to pizza stone easier.
Spread with ¼ cup of sauce (white or red).
Add your favorite toppings.
Bake on pizza stone preheated in oven for 15 minutes or until bubbly and crust turns a golden color.
Zucchini Couscous is a delightful dish that combines the tender, mild flavor of zucchini with the fluffy, light texture of couscous. The entire process is quick, often taking less than 20 minutes, making it an easy and satisfying meal option. Its lightness and flavor make it a popular choice for those seeking a healthy yet flavorful dish. Whether served as a main course or a side dish, Zucchini Couscous offers a delicious and effortless way to enjoy fresh vegetables and grains in one bowl.
Ingredients
2 small – medium zucchini diced into 1/4 -inch pieces
5 ounces of Couscous
1 tablespoon of Olive Oil
4 cloves of garlic, minced
2 scallions, sliced separate white from green (use whites for another recipe)
1 lemon, zest lemon and set aside,
quarter remaining lemon and set aside
1 tablespoon butter
½ teaspoon salt
¼ teaspoon black pepper
Process
Heat oil in pan over medium-high heat.
Add zucchini and season with half of the garlic, salt and pepper.
Cook stirring frequently, until browned and tender, 4 – 7 minutes.
Remove from heat and cover to keep warm.
Melt 1 tablespoon of butter In a small pot over medium-high heat.
Add couscous and remaining garlic, stir until fragrant, 30 seconds.
Stir in 1-1/2 cups of water and a pinch of salt. Bring to a boil, cover and reduce to a low simmer. Cook until couscous is tender, follow package instructions. Drain excess water.
Stir in zucchini, scallion greens, and lemon zest. squeeze juice from one lemon quarter and stir, add salt and pepper to taste.
Perfect for any summer gathering, this impressive dessert is sure to wow your guests. This dazzling fruit pizza is a summer showstopper—and surprisingly easy to make!
Choosing the right fruit for a fruit pizza is important for both appearance and taste. The fruit should be soft enough to cut and bite easily, but not too watery. It should also resist browning to keep the pizza looking fresh. To make the presentation attractive, select fruits that vary in color and shape. When placing the fruit on the cream cheese layer, press gently to help it stick. Popular options include different berries, sliced peaches, bananas, canned mandarin oranges, strawberries, kiwi, and passion fruit. These fruits not only look appealing but also add a variety of flavors, making fruit pizza more delicious and visually attractive.
For the best texture and presentation, fruit pizza is best made the same day it’s served.
Crumble dough into a 12” pizza pan, or 9″ x 13″ baking pan with raised edges.
Work the dough until it is spread out to the outer edges of the pan.
Bake until lightly brown, about 10 – 12 minutes. Remove from oven, cool completely.
Filling
1/3 cup granulated sugar
1 egg
1 8oz cream cheese, room temperature
1/4 cup of sour cream
1 teaspoon vanilla
Glaze
Jelly: is used as a glaze for the fruit, it protects it from drying out or turning brown as well as giving it a healthy shine.
½ cup of apple jelly, apricot jelly, orange marmalade or peach jelly make great options for glazing the fruit. Apple jelly is clear, allowing the fruit to stand out. Orange marmalade compliments the flavors of the fruit beneath.
Process
With an electric mixer, in a medium bowl combine sugar and egg, beat until sugar is dissolved.
Add cream cheese, sour cream and vanilla, beat until creamy. Add more sour cream if filling is too stiff to spread.
Spread filling on cookie crust.
Beginning in the center of the pizza begin adding fruit in a circular fashion until it fills the crust.
Stir the jelly or marmalade until smooth and use a pastry brush or spoon spread on top of fruit. Note: if jelly or marmalade won’t smooth out by stirring, microwave for 20 seconds.