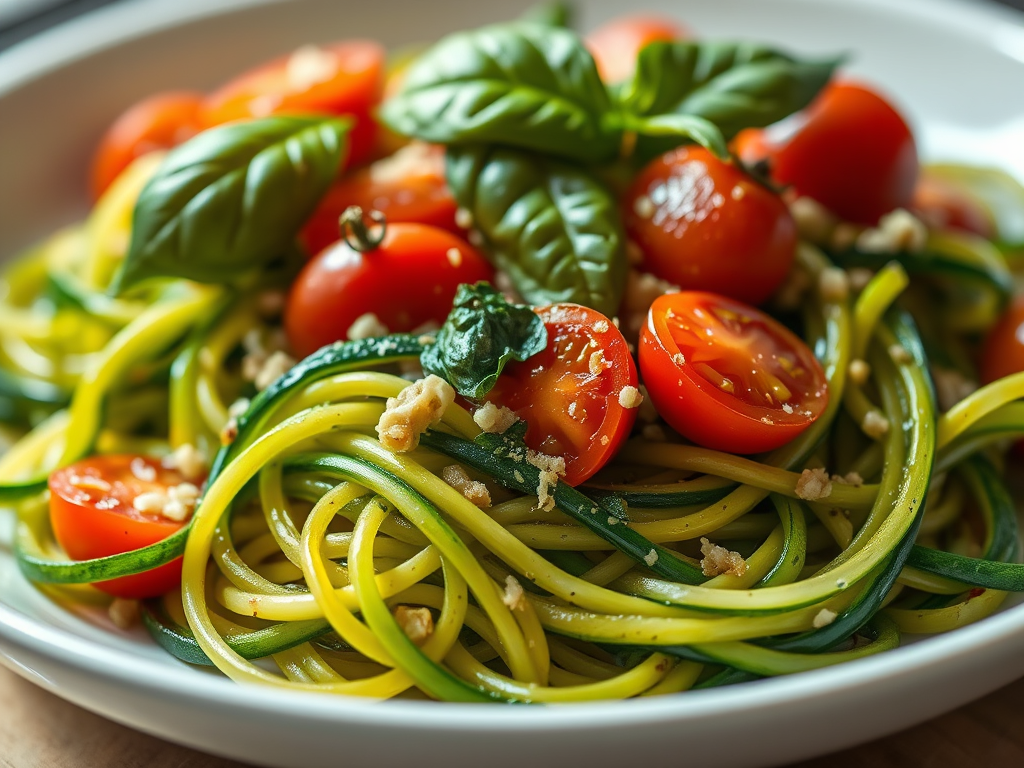
I purchased a small, handheld device that turns zucchini into noodle-like strands, similar to spaghetti. Alternatively, you can use a vegetable peeler to create thin slices, then stack and cut them into strips. A box grater can also be used by sliding the zucchini down its large holes. Additionally, spiralizers or mandolins are effective tools for slicing zucchini into noodles. Many slicers suitable for this purpose are available at market or online offering a variety of options for preparing zucchini noodles easily and efficiently.
Incorporating zucchini into your diet offers numerous health benefits, making it a valuable addition to a balanced nutritional plan. Zucchini, a versatile and nutrient-dense vegetable, is low in calories but rich in essential vitamins, minerals, and antioxidants. Its inclusion can support overall health, aid in weight management, and promote well-being.
Ingredients
2 – 3 zucchinis’, wash do not peel, remove ends
1 medium sweet onion, diced
3 fresh garlic cloves, sliced on the long side
About 1 cup of any other vegetable, such as sweet peppers, mushrooms, broccoli florets, spinach or cauliflower
¼ cup fresh parsley, chopped fine
4 tablespoons Parmesan grated
1 tablespoon of olive oil
2 tablespoons of butter (use real butter)
½ tsp of kosher salt
¼ tsp of red pepper flakes
Process
Set your sliced zucchini aside.
Chop your onions, slice your other vegetables.
Heat a wok or other heavy pan on medium-high with 1 tablespoon of olive oil
When oil is hot, add onions, and vegetables (except fresh spinach, add that last)
Sauté until soft
Push the vegetables to the side of the pan and add butter
When butter is melted, add the garlic and sauté for about 30 seconds, add zucchini noodles and sauté for 3-4 minutes in hot butter. Sprinkle red pepper flakes, Parmesan and salt over vegetables in pan and stir together, if using fresh spinach add it now and stir until wilted.
Add Ins
Add shredded chicken, scallops, or shrimp to noodles to turn a side dish into a full meal. Include poached eggs for breakfast or add spaghetti sauce with ground beef or turkey for a hearty, satisfying dish.
Notes
Overcooking zucchini strands makes them soggy, similar to overcooked pasta. Aim for a firm texture, or ‘al dente.’ The strands should have a slight bite, not be too soft, ensuring better taste and texture.
There are so many recipes for Banana Nut Bread and truthfully, they are all pretty good. I discovered this recipe about 10 years ago and decided it is the best recipe I have ever made for Banana Nut Bread, moist, dense with an intense banana flavor highlighted by toasted walnuts and cinnamon streusel topping. This recipe makes two loaves, great for gifting or freezing for later use.
Ingredients
¾ cup butter, softened
1 8oz package of cream cheese, softened
2 cups of sugar
2 large eggs
3 cups of all-purpose flour
½ teaspoon baking powder
½ teaspoon baking soda
½ teaspoon salt
1-1/2 cups mashed ripe bananas (about 4 with dark spots) *
1 cup chopped toasted walnuts
1 teaspoon vanilla extract
Process
Preheat oven to 350°F. Grease and flour two 8 x 4-inch bread pans.
Mix butter and cream cheese with an electric mixer until smooth.
Gradually add sugar and beat until the mixture is light and fluffy.
Add eggs one at a time, beating until just blended after each addition.
COMBINE flour and next three ingredients
Gradually add to the butter mixture at low speed until blended.
Add bananas, vanilla and nuts.
Spoon batter into two greased and floured bread pans.
Top with streusel topping.
Bake for 1 hour until a toothpick inserted in the center comes out clean and sides pull away from pan.
Cool pans on wire rack for 10 minutes before removing from pans.
Cool completely before slicing.
STREUSEL TOPPING
Ingredients
½ cup firmly packed brown sugar
½ cup chopped toasted walnuts
1 tablespoon melted butter
1 tablespoon flour
1/8 tsp ground cinnamon.
Process
Mix all ingredients for streusel together in a bowl.
Sprinkle over the batter before baking
Press streusel into the dough with the back of a spoon to ensure streusel is baked into the loaf and doesn’t shed when removed from the pan.
*Note: the riper the bananas (black even) the more banana flavor will impart in your recipe. I use frozen bananas that have been defrosted in the refrigerator, they are overripe and work wonderfully.
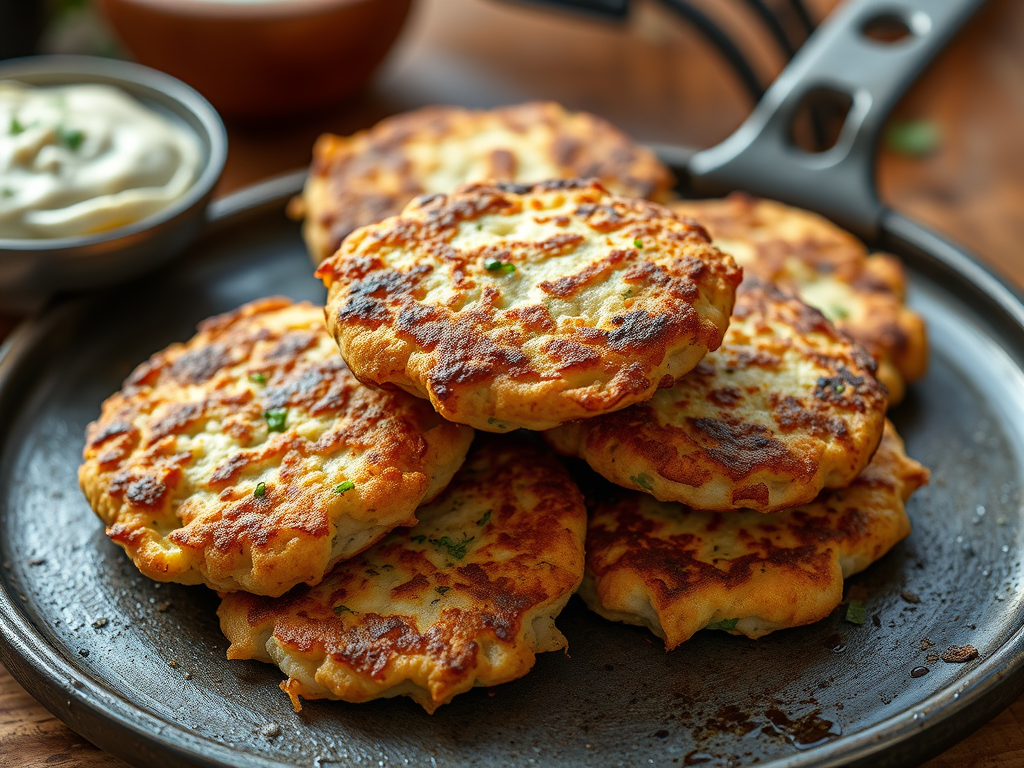
These cabbage pancakes make an excellent appetizer or side dish, but they are also hearty enough to serve as a meatless main dish serve them with fried eggs for a delicious meatless meal. The spicy sauce is excellent. The pancakes are good on their own, but with the sauce, they taste even better.
Ingredients
2 cups of finely grated and chopped cabbage
1 small onion grated, about ½ cup
1 small carrot, finely shredded
¼ cup all-purpose flour (or ½ cup almond flour for gluten free)
3 large eggs
1 tablespoon soy sauce
¼ teaspoon black pepper
1 tablespoon fresh garlic – minced
2 tablespoons of oil for sautéing
Process
Thinly slice the cabbage, if using pre-bagged coleslaw mix, finely chop it and place it into a mixing bowl.
Grate small onion and carrot with box grater, add the eggs, salt, and dill to the bowl. Stir well to combine.
Add the flour and mix until all ingredients are well incorporated.
Heat the oil in a non-stick skillet over medium heat.
Use a measuring cup to scoop half a cup and put it on the skillet.
Cook the pancakes until browned on both sides, about 3 minutes per side.
Serve immediately with the dipping sauce.
Spicy Sauce
4 tablespoons sour cream (or plain Greek Yogurt)
1 tablespoon soy sauce
1/2 teaspoon hot sauce (adjust for taste)
Notes
You can keep the leftovers in an airtight container in the fridge for 3-4 days. I reheat them in the microwave or eat them cold. You can also freeze them in freezer bags, separating layers with wax paper.
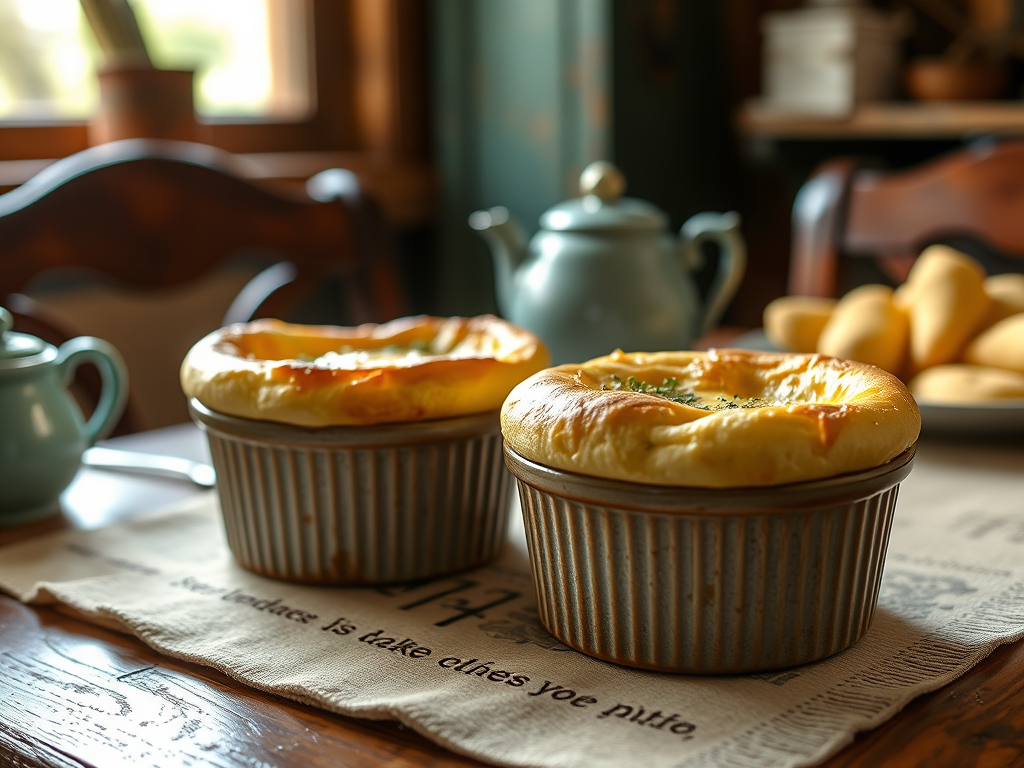
This was my first time attempting to make a cheese souffle, I’ve had the recipe for about 20 years and decided to check out other recipes online to compare ingredients and methods. I decided to use this one with a few ingredient additions because it was simple. I honestly didn’t think it would turn out. But I have to say, even though my 8-ounce ramekins were filled to the top with the egg mixture, they were beautifully puffed, golden, crispy crust and light as air inside. The taste was incredible and I devoured both.
Great for brunch, a light supper or as a versatile side dish, these melt-in-your-mouth souffles are flavorful, fluffy and fun. Served hot, egg soufflés can be accompanied by a fresh salad or a side of toasted bread, making them a wholesome and refined light meal option.
Ingredients
1-1/2 tablespoons of butter
1-1/2 tablespoons of all-purpose flour
½ cup milk, or cream
1 teaspoon Dijon mustard
½ cup shredded cheddar cheese, or Gruyère cheese
¼ teaspoon of cream of tarter
2 eggs, separated
Process
Preheat oven to 350°F. Spray two 8-ounce ramekins with nonstick cooking spray. Set aside.
Crack eggs and separate yolks from whites.
Beat egg yolks with a fork and set aside.
In a saucepan over medium-low heat, melt butter.
Stir in the flour until smooth; gradually add milk.
Bring to boil and cook stirring for 1-2 minutes or until thickened.
Reduce heat, stir in cheese until melted. Remove pan from heat.
Gradually add a small amount of hot cheese mixture to the beaten egg yolks, stirring constantly to prevent cooking. Then, pour the mixture back into the pan, stirring continuously until fully incorporated. Set aside to allow it to cool slightly.
In a mixing bowl, beat egg whites and cream of tartar until stiff peaks form.
Fold a third of the whites into the egg yolk mixture to loosen then fold in the remaining whites, streaky whites are okay, do not overmix. Pour into prepared ramekins. Wipe rims of ramekins clean.
Bake for 25 minutes or until a toothpick inserted near the center comes out clean. *Note: do not open the oven door while cooking.
Serve immediately. They will deflate as they cool, but will still be delicious!
Pancakes for dinner? Why yes! When my kids were young, we often ate breakfast for dinner once a week, usually on Friday. We also had a special night called Taco Tuesday, which they enjoyed. Having a plan where you have one breakfast and one dinner each week can make meal planning easier and healthier. It helps organize meals better, reduces the stress of deciding what to eat, and allows trying new recipes or cuisines. This method also simplifies shopping and helps control portion sizes. As the children grew into teenagers, I encouraged them to plan and cook a family meal on a designated night, which helped them learn cooking skills and become more independent.
Initially, this plan did not provide much relief from the kitchen work. However, as they gained confidence in their skills, planning meals became easier and less tiring. Watching them become more independent turned mealtime into an enjoyable experience.
Light as Air Pancakes
Ingredients
1 cup all-purpose flour
1-1/2 teaspoons baking powder
2 tablespoons sugar
½ teaspoon salt
2 eggs, separated
¾ cup milk
1 teaspoon vanilla extract
Strawberry syrup, to serve (see below
Process
Sift the flour, baking powder, sugar, and salt into a bowl.
Put egg yolks and milk into another bowl and gently beat in the sifted dry ingredients.
Put the egg whites into a clean mixer bowl and beat until stiff peaks form. Using a spatula, fold whites into the batter.
Heat the prepared griddle over medium-low heat. Pour 1/4 cup of batter into the pan and cook in batches over low heat until small bubbles begin to appear on the surface and the underside is golden brown. Flip the pancakes over and cook the other side for 1 more minute.
Spread with whipped butter (recipe below) and maple syrup, strawberry syrup, blueberry syrup, or fresh fruit.
Whipped Butter
½ cup of softened butter
1 ½ teaspoon of whipping cream, milk or water
Whip the butter and liquid of your choice until light and fluffy.
Variations
Add a teaspoon of honey for honey butter or
½ teaspoon of Cinnamon and 1 tablespoon of maple syrup for a sweet topping
Fruit Syrup Ingredients
1 cup sugar
1 cup of water
1-1/2 cups mashed unsweetened strawberries, raspberries or blueberries
Compound flavored butters serve multiple culinary purposes. They can be melted over grilled meats, seafood, or vegetables to add moisture and flavor. Perfect to add fun and flair to any breakfast spread. They are also used as finishing touches on baked potatoes, bread, or pasta, providing an extra layer of richness. Additionally, they can be incorporated into sauces, marinades, or used as a base for more complex flavor combinations. Their ease of use and ability to add depth to meals make them popular among chefs and home cooks alike. Following are six compound butters that are equally delicious for all meals.
Compound Herb and Garlic Butter
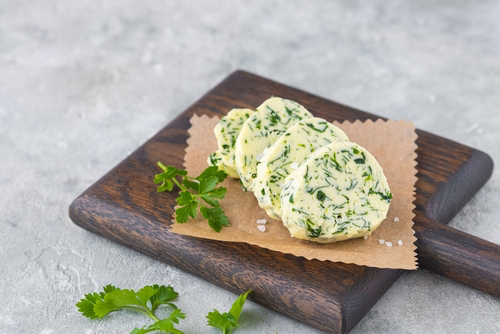
Compound herb and garlic butter is a versatile culinary ingredient that enhances a wide range of dishes with its rich, aromatic flavor. Made by blending softened butter with fresh herbs, this butter offers a fragrant and savory profile that elevates both simple and complex recipes. Its culinary appeal lies in its ability to add depth and richness to meats, seafood, vegetables, and bread.
Ingredients
½ cup of unsalted butter, softened to room temperature
¼ cup of fresh chopped fresh herbs
Example: rosemary, oregano, thyme, parsley, sage, basil or chives. Fresh herbs will give a beautiful display of green flecks in your butter.
2 grated or pressed garlic cloves
½ teaspoon fresh lemon juice
½ teaspoon Kosher salt
Process
Place the softened butter in a small bowl. Add the chopped herbs, garlic, lemon juice and salt and mix well.
Transfer the mixture onto a sheet of plastic wrap. Roll into a log shape and twist ends to seal tightly. Or leave it in a covered bowl.
Refrigerate the butter for at least 2 hours, or until firm.
Room Temperature – Let butter sit out for a few minutes before using to soften. Butters can sit at room temperature for a couple of days, just like plain butter. But if the weather is hot, store it in refrigerator so butter doesn’t melt.
Compound Lemon Dill Butter
Delicious spread over seafood dishes, such as grilled salmon, baked cod or shrimp where the citrus notes complement the natural flavors of seafood. It also works well as a finishing touch for roasted vegetables or spread on warm bread.
Ingredients
1 stick of unsalted butter room temperature
2 tablespoons finely chopped fresh dill weed
1 tablespoon fresh squeezed lemon juice
½ teaspoon lemon zest
¼ teaspoon kosher salt
½ teaspoon freshly ground black pepper
Process
Wash and finely mince the dill leaves.
Zest and juice lemon.
Cut the softened stick of butter in a mixing bowl.
Using a stand mixer or hand beater, mix until light and fluffy.
Add the chopped dill, lemon zest, lemon juice, salt and pepper. Mix until combined.
Transfer the mixture onto a sheet of plastic wrap. Roll into a log shape and twist ends to seal tightly. Or leave in a covered bowl.
Refrigerate the butter for at least 2 hours, or until firm.
Room Temperature – Let butter sit out for a few minutes before using to soften. Butters can sit at room temperature for a couple of days, just like plain butter. But if the weather is hot, store it in refrigerator so butter doesn’t melt.
Compound Maple Bourbon Butter
This is a smooth, sweet butter with a smoky flavor from bourbon. It is great to spread on bread, pancakes, waffles, roasted vegetables or melted over steak.
Ingredients
1 cup (2 sticks) unsalted butter, softened
2 tablespoons pure maple syrup
1 tablespoon bourbon
1 tablespoon brown sugar
1/2 teaspoon cinnamon
1/2 teaspoon vanilla extract
Pinch of salt
Process
Bring butter to room temperature.
In a mixing bowl, add softened butter and beat butter until light and fluffy.
Gradually mix in pure maple syrup, bourbon, brown sugar, cinnamon, vanilla extract and salt.
Taste and adjust sweetness or bourbon as needed.
Transfer the mixture onto a sheet of plastic wrap. Roll into a log shape and twist ends to seal tightly. Or leave in a covered bowl.
Refrigerate the butter for at least 2 hours, or until firm.
Room Temperature – Let butter sit out for a few minutes before using to soften. Butters can sit at room temperature for a couple of days, just like plain butter. But if the weather is hot, store it in refrigerator so butter doesn’t melt.
Compound Hot Honey Butter
One of my favorite ways to enjoy this whipped hot honey butter is on Jalapeno and Cheese Cornbread or Cheddar and Chive Biscuits, sweet potatoes or baked potatoes or corn on the cob.
Ingredients
1 stick of unsalted butter, room temperature
2 tablespoons honey
2 teaspoons hot sauce
½ teaspoon Koren red chili flakes
Process
Bring butter to room temperature.
In a mixing bowl, add softened butter and beat butter until light and fluffy.
Gradually mix in honey, hot sauce and chili flakes.
Transfer the mixture onto a sheet of plastic wrap. Roll into a log shape and twist ends to seal tightly.
Refrigerate the butter for at least 2 hours, or until firm.
Room Temperature – Let butter sit out for a few minutes before using to soften. Butters can sit at room temperature for a couple of days, just like plain butter. But if the weather is hot, store it in refrigerator so butter doesn’t melt.
Compound Orange Butter
Orange butter is a tasty spread that can be used on French toast, pancakes, sweet breads, and more. It is smooth and rich, making it perfect for breakfast and brunch. It adds color and flavor to your dishes, making them more appealing.
Ingredients
1 cup (2 sticks) butter, softened
1 teaspoon of Grand Marnier, substitute with Cointreau, or orange juice.
1 tablespoon orange zest. Be careful not to zest the white pith under the orange skin as it is bitter.
Process
Bring butter to room temperature.
In a mixing bowl, add softened butter and beat butter until light and fluffy.
Gradually mix in Gand Marnier, and orange zest.
Transfer the mixture onto a sheet of plastic wrap. Roll into a log shape and twist ends to seal tightly.
Refrigerate the butter for at least 2 hours, or until firm.
Room Temperature – Let butter sit out for a few minutes before using to soften. Butters can sit at room temperature for a couple of days, just like plain butter. But if the weather is hot, store it in refrigerator so butter doesn’t melt.
Compound Chocolate Butter
Spread chocolate butter on various baked goods such as toast, pancakes, croissants, or bagels, and explore different flavor combinations to enhance your culinary experience.
Ingredients
1 cup butter, softened
2 tablespoons unsweetened cocoa
3 tablespoons powder sugar
½ teaspoon of vanilla extract
Process
Bring butter to room temperature.
In a mixing bowl, add softened butter and beat butter until light and fluffy.
Gradually mix in unsweetened cocoa, powder sugar and vanilla extract.
Transfer the mixture onto a sheet of plastic wrap. Roll into a log shape and twist ends to seal tightly. Or leave in covered bowl.
Refrigerate the butter for at least 2 hours, or until firm.
Room Temperature – Let butter sit out for a few minutes before using to soften. Butters can sit at room temperature for a couple of days, just like plain butter. But if the weather is hot, store it in refrigerator so butter doesn’t melt.
Soft buttermilk biscuits are a classic baked good renowned for their tender texture and rich flavor. Crafted with simple ingredients such as all-purpose flour, baking powder, salt, and generous amounts of buttermilk, these biscuits are a versatile addition to breakfast, brunch, or any meal. They can also serve as a base for savory toppings like fried chicken, sausage gravy, or cheese. Their delicate crumb and slightly tangy flavor from the buttermilk make them a favorite among bread lovers and a staple in Southern cuisine. In addition to their delicious taste and texture, these biscuits are relatively quick to prepare, making them an excellent choice for both novice bakers and experienced cooks. Their adaptability allows for variations, such as adding herbs, cheese, or spices to customize the flavor profile. Overall, soft buttermilk biscuits are a comforting, versatile, and timeless baked good that continues to be cherished across many households and culinary traditions.
Ingredients
3 cups unbleached all-purpose flour, plus more for dusting the board
4 teaspoons baking powder
1 teaspoon salt
1 tablespoon sugar
1 teaspoon salt
¾ teaspoon cream of tartar
½ cup cold butter sliced into pieces, plus ¼ cup shortening (or ¾ cup cold butter, omit shortening)
1-1/4 cup buttermilk * You can make your own buttermilk: Place a Tablespoon of white vinegar or lemon juice in a liquid measuring cup. Add enough milk to bring the liquid up to the one-cup line. (if possible, use whole milk or heavy cream). Let stand for five minutes. Then, use as much as your recipe calls for.
Process
Preheat your oven to 450°F.
Combine the dry ingredients in a bowl
Add shortening and butter. Cut butter and shortening into the flour until it resembles coarse meal, using a pastry dough cutter or two knives.
Create a well in the middle of the dough, add the buttermilk all at once, and using a fork mix JUST until combined, do not beat.
Turn the dough out onto a floured board.
Fold the dough about 5 times, gently press the dough down to inch thick. Use flour to dust the board or counter if dough is sticking. Gently PAT (do NOT roll with a rolling pin) the dough out until it’s about 1/2″ thick.
Use a round cutter to cut into rounds. You can gently press the scraps together and make a few more. Or pat dough into a square and slice 2-1/2” squares using all the dough.
Place the biscuits on a cookie sheet. If you like soft sides, put them touching each other. If you like “crusty” sides, put them about 1 inch apart- these will not rise as high as the biscuits put close together.
Bake for about 10-12 minutes- the biscuits will be a beautiful light golden brown on top and bottom.
Important Notes:
Do not over-bake.
The key to real biscuits is not in the ingredients, but in the handling of the dough.
The dough must be handled as little as possible, or you will have tough biscuits.
Use a fork to mix the wet ingredients into the dry – do not stir to mix – just “fluff” together
Rolling with a rolling pin is a guaranteed way to overstimulate the gluten, resulting in a tougher biscuit, use your hands to pat the dough out
You can make these biscuits, cut them, put them on cookie sheets and freeze them, place in plastic bags when frozen for up to a month.
When you want fresh biscuits, simply place them frozen on the cookie sheet and bake at 450°F for about 20 minutes.
Lastly; break biscuits apart, do not cut them open with a knife.
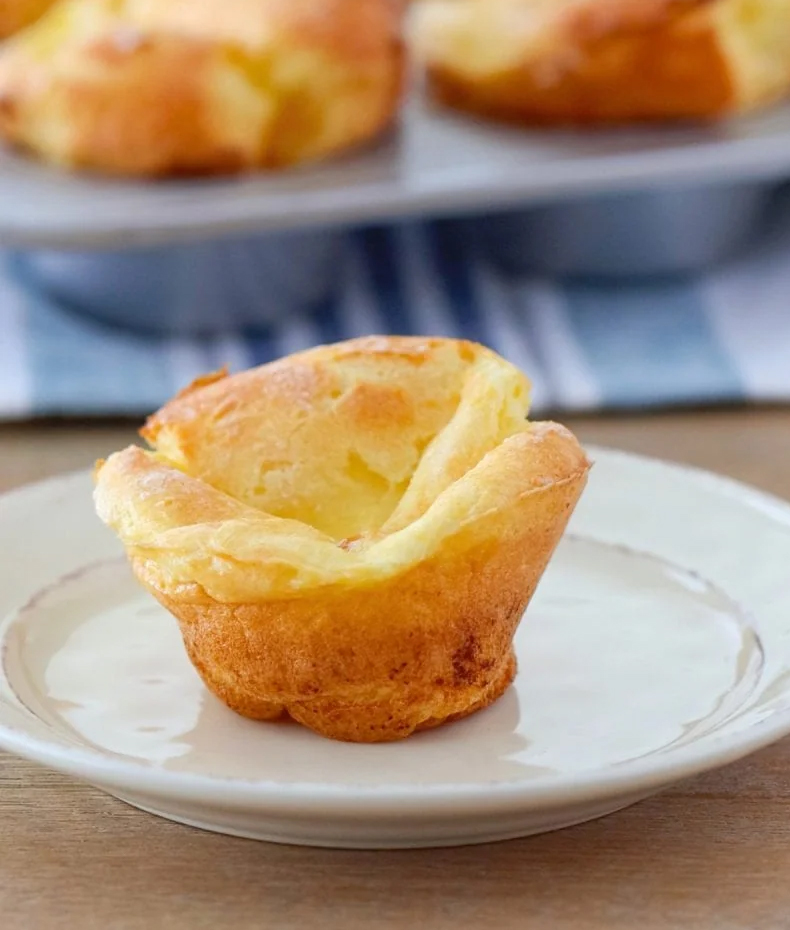
A light, tender pastry that can be filled like a cream puff or eaten “as is” drizzled with
honey. They are so easy to make and you won’t be disappointed. They are not cake, a muffin, or a doughnut. They are sunken after baking but oh so moist and delicious I guarantee you won’t eat just one.
INGREDIENTS
½ cup butter
¾ cup flour
1 cup of milk
4 eggs
DIRECTIONS
Preheat oven to 375°F. degrees
Heavily grease 12 muffin cups, be sure to grease the tops and edges.
Melt the butter in a saucepan.
When the butter is melted, add the milk and bring to a boil.
Add flour all at once and stir until a ball forms and does not fall apart.
Remove from heat for 5 minutes.
After 5 minutes, add one egg at a time and beat with a wooden spoon for one minute.
Continue with each egg beating with wooden spoon for a minute.