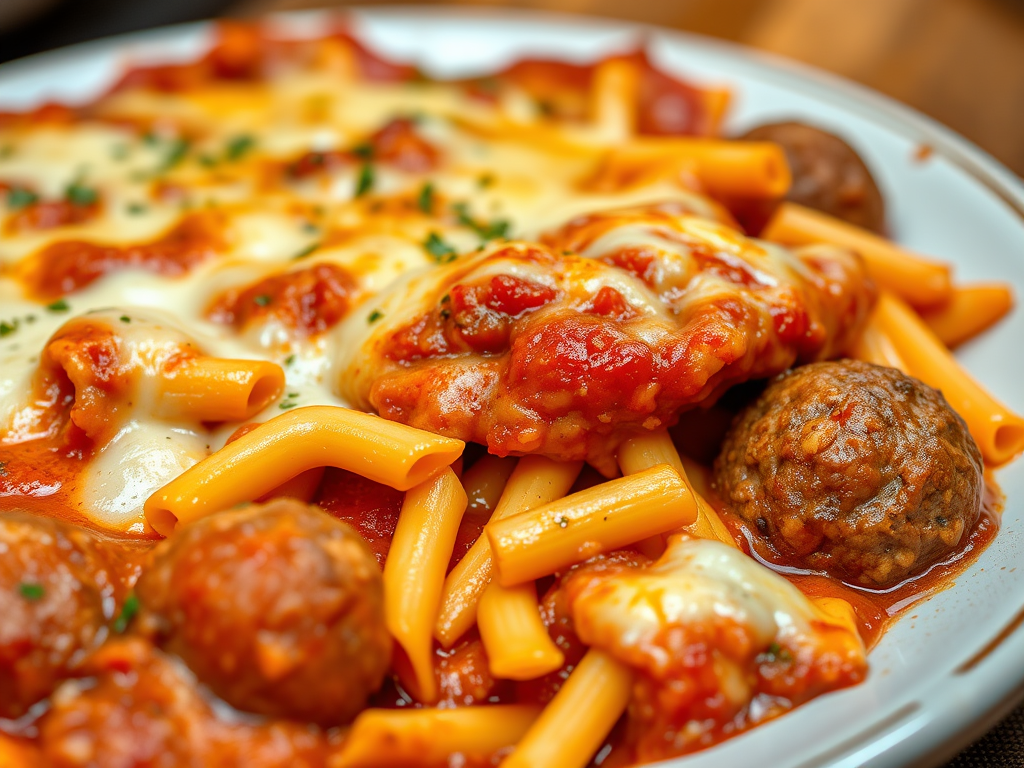
Tag Archives: dinner

Shrimp Lettuce Wraps

This recipe involves wrapping a tasty filling in lettuce leaves, creating a satisfying vegetable and shrimp wrap. A store-bought rotisserie chicken, shredded, can substitute for the shrimp. For variety, consider experimenting with other vegetables such as snow peas, mushrooms, or canned bamboo shoots. These additions can enhance the dish’s flavor and texture, making it more exotic and satisfying. The preparation is simple, and the result is a healthy, flavorful wrap that can be enjoyed as a snack or light meal. Feel free to customize the ingredients to suit your taste preferences and create new flavor combinations.

Ingredients:

  • 1 tablespoon of sesame oil to coat pan
  • 2 tablespoons low sodium soy sauce
  • 1 tablespoon dry sherry or apple cider vinegar
  • 1 tablespoon hoisin sauce
  • 1 teaspoon rice vinegar
  • ¼ teaspoon red pepper flakes
  • 1 tablespoon minced garlic
  • 1 tablespoon minced peeled ginger
  • 1 (14 oz) bag of coleslaw
  • 1/2 cup sliced scallions
  • 1 small, peeled zucchini, sliced very thin with a vegetable peeler
  • About 12 Bibb lettuce leaves rinsed, and dried, or Boston lettuce.
  • 1 lb. of deveined and peeled medium shrimp
  • 1/4 cup chopped cashews or peanuts

Process

  1. In a bowl, mix soy sauce, dry sherry, hoisin sauce, red pepper flakes, and rice vinegar. Set aside.
  2. In a small bowl combine minced garlic and minced ginger. Set aside.
  3. In another bowl, combine coleslaw, scallions and zucchini, set aside

Directions:

  1. Heat a large wok or frying pan on medium-high heat, add 1 tablespoon of sesame oil and swirl oil to coat pan or use a pastry brush.
  2. Add garlic and ginger, cook for about 30 seconds, stirring to prevent burning.
  3. Add soy sauce mixture, coleslaw, and vegetables. Cook for 1 minute stirring.
  4. Add shrimp and stir fry until shrimp is pink and cooked through. Coleslaw and veggies should be crisp tender at this point.
  5. Divide mixture among lettuce leaves, sprinkle with cashews and enjoy.

Spaghetti Squash

Tonight, I prepared spaghetti squash for dinner. Instead of steaming it in the oven, which is my usual method, I roasted the squash, and it turned out excellent. Spaghetti squash can be cooked in various ways, including baking, boiling, steaming, and microwaving. It is versatile and can be served with or without sauce, making it a good substitute for traditional pasta. The seeds of the squash can also be roasted, like pumpkin seeds, providing an additional snack. When raw, the flesh is firm and similar to other raw squash. After cooking, the flesh easily separates into ribbons or strands resembling spaghetti. Nutritionally, spaghetti squash is rich in nutrients such as folic acid, potassium, vitamin A, and beta carotene. It is low in calories, with approximately 42 calories per one-cup (155 grams) serving. Although it does not taste like traditional spaghetti, it absorbs the flavors of the ingredients it is cooked or served with. Besides being healthy, it is also gluten-free, making it suitable for various dietary needs.

Ingredients

  • 1 large spaghetti squash
  • 2 tablespoons of olive oil
  • 1 large Roma tomato finely chopped
  • 2 tablespoons of fresh basil
  • ¼ cup shredded mozzarella or parmesan cheese
  • 1 teaspoon each coarse salt and pepper
  • 1 teaspoon garlic powder

Directions

Preheat oven to 400°F. degrees

  1. Place the squash on a towel to reduce the rocking, if cutting lengthwise, cut the stem end off first. Split the squash in half lengthwise using a very sharp knife.
  2. Use a fork to remove the seeds and center strings.
  3. Drizzle the inside of the two halves with the olive oil, using hands or a brush to be sure all surfaces have been coated.
  4. Sprinkle the coarse salt, pepper and garlic powder all over the inside surface of the squash.
  5. Using an oven safe dish or pan place the cut ends of the squash down on surface.
  6. Bake in a 400° F. degree oven for 40 – 50 minutes or until the squash is soft and the strands pull up easily with a fork.
  7. Remove from the oven and fluff the squash with a fork, pulling the strands away from the sides – leave squash in shell
  8. Turn oven onto broil
  9. Add the tomatoes and fresh basil to the fluffed squash and sprinkle each half with the cheese.
  10. Place under broiler for 3 to 4 minutes or until the cheese is melted and lightly browned.

Allow to cool 5 minutes before serving.

Buttermilk Biscuits

Soft buttermilk biscuits are a classic baked good renowned for their tender texture and rich flavor. Crafted with simple ingredients such as all-purpose flour, baking powder, salt, and generous amounts of buttermilk, these biscuits are a versatile addition to breakfast, brunch, or any meal. They can also serve as a base for savory toppings like fried chicken, sausage gravy, or cheese. Their delicate crumb and slightly tangy flavor from the buttermilk make them a favorite among bread lovers and a staple in Southern cuisine. In addition to their delicious taste and texture, these biscuits are relatively quick to prepare, making them an excellent choice for both novice bakers and experienced cooks. Their adaptability allows for variations, such as adding herbs, cheese, or spices to customize the flavor profile. Overall, soft buttermilk biscuits are a comforting, versatile, and timeless baked good that continues to be cherished across many households and culinary traditions.

Ingredients

  • 3 cups unbleached all-purpose flour, plus more for dusting the board
  • 4 teaspoons baking powder
  • 1 teaspoon salt
  • 1 tablespoon sugar
  • 1 teaspoon salt
  • ¾ teaspoon cream of tartar
  • ½ cup cold butter sliced into pieces, plus ¼ cup shortening (or ¾ cup cold butter, omit shortening)
  • 1-1/4 cup buttermilk * You can make your own buttermilk: Place a Tablespoon of white vinegar or lemon juice in a liquid measuring cup. Add enough milk to bring the liquid up to the one-cup line. (if possible, use whole milk or heavy cream). Let stand for five minutes. Then, use as much as your recipe calls for.

Process

Preheat your oven to 450°F.

  1. Combine the dry ingredients in a bowl
  2. Add shortening and butter. Cut butter and shortening into the flour until it resembles coarse meal, using a pastry dough cutter or two knives.
  3. Create a well in the middle of the dough, add the buttermilk all at once, and using a fork mix JUST until combined, do not beat.
  4. Turn the dough out onto a floured board.
  5. Fold the dough about 5 times, gently press the dough down to inch thick. Use flour to dust the board or counter if dough is sticking. Gently PAT (do NOT roll with a rolling pin) the dough out until it’s about 1/2″ thick.
  6. Use a round cutter to cut into rounds. You can gently press the scraps together and make a few more. Or pat dough into a square and slice 2-1/2” squares using all the dough.
  7. Place the biscuits on a cookie sheet. If you like soft sides, put them touching each other. If you like “crusty” sides, put them about 1 inch apart- these will not rise as high as the biscuits put close together.
  8. Bake for about 10-12 minutes- the biscuits will be a beautiful light golden brown on top and bottom.

Important Notes:

  • Do not over-bake.
  • The key to real biscuits is not in the ingredients, but in the handling of the dough.
  • The dough must be handled as little as possible, or you will have tough biscuits.
  • Use a fork to mix the wet ingredients into the dry – do not stir to mix – just “fluff” together
  • Rolling with a rolling pin is a guaranteed way to overstimulate the gluten, resulting in a tougher biscuit, use your hands to pat the dough out
  • You can make these biscuits, cut them, put them on cookie sheets and freeze them, place in plastic bags when frozen for up to a month.
  • When you want fresh biscuits, simply place them frozen on the cookie sheet and bake at 450°F for about 20 minutes.
  • Lastly; break biscuits apart, do not cut them open with a knife.

Old Fashioned Ham and Bean Soup

Are you unsure about what to do with leftover holiday ham? Consider making a traditional ham and bean soup. The key to a delicious soup is the broth, which should be prepared first. To do this, start by making the ham stock, as it takes a few hours for the ham flavor to fully develop from the ham bone. If you have leftover ham from the holidays, you’ll need about 2 cups of cubed ham to add to the soup. Ham hocks can also be used as a substitute for a ham bone, providing rich flavor. For added texture and richness, you can include barley in the broth, although this is optional. Preparing the stock first ensures your soup will be flavorful and hearty, making the most of your holiday leftovers.

Ingredients

  • 2 ham hocks or a ham bone
  • Enough water to cover the ham bone or ham hocks
  • 2 bay leaves
  • 1 medium onion chopped
  • 1 bag of dry navy, great northern, or cannellini beans, rinse well
  • 1 cup of sliced celery
  • 1 – 2 cups of chopped carrots
  • 2 cups of cubed potatoes
  • 2 cups of chopped ham
  • 1/3 cup of barley (optional)
  • 2 chopped or grated garlic cloves
  • 1/2 cup chopped parsley
  • ¼ tsp pepper
  • ½ tsp nutmeg
  • 1 tsp salt

Process

  1. Place ham hocks or ham bone in a large soup pot and cover with cold water.
  2. Add chopped onion, celery, 1 teaspoon of salt, bay leaves, and beans *see note below.
  3. Bring to boil and reduce heat to simmer.
  4. Skim any foam or froth from the top of the soup as it simmers and discard.
  5. Simmer for about 1.5 – 2 hours until meat is tender and can be cut off the bone.
  6. Remove meat from bones, discard the bones and cut meat into small pieces add to broth, add remaining two cups of chopped ham to the broth, remove bay leaves from the broth.
  7. Add remaining ingredients, potatoes, barley, garlic, parsley, pepper, and nutmeg. Simmer for about 45 minutes or until carrots and potatoes are tender.
  8. Serve with crusty bread and salad.

*My mom never pre-soaked her beans, I don’t presoak my beans either, I just add them to the water while the ham is cooking, they become soft and flavor the broth.

Roasted Pork Shoulder

Tender Roasted Pork Shoulder
Roasted Pork Shoulder

The Pennsylvania Dutch started the tradition of eating pork and sauerkraut on New Year’s Day. This tradition is linked to hopes for good luck and prosperity in the coming year.

Eating sauerkraut on New Year’s Eve is a common practice in Germany. People believe that eating sauerkraut will bring blessings and wealth. Before the meal, people at the table wish each other good fortune and money, symbolized by the amount of shredded cabbage in the dish. The pig is also a symbol of good luck and well-being. Many believe that eating pork will bring luck for the new year. The pig is seen as a symbol of looking forward because it cannot turn its head from side to side or look behind. Instead, it faces forward, reminding us to focus on future opportunities rather than past events.

Ingredients

  • 9-10 lb bone-in Pork Shoulder
    • Bake 1.5 – 2.0 hours per pound in a low heat oven (250° – 275°F.)
    • Will take about 8 – 12 hours to cook
    • It is done when an internal meat thermometer reaches 195 – 205°F. for shredded pulled pork.
    • Or 160°F. for slicing.

Seasoning

  • 2 tablespoons coarse salt to season overnight
  • 4 – 6 garlic cloves
  • 1 tablespoon coarse salt
  • ½ tablespoon fresh cracked peppercorns
  • 1-1/2 tablespoon ground mustard
  • 1-1/2 tablespoon onion powder
  • 3 tablespoons of minced fresh rosemary

Process

  1. Rub the pork shoulder with 2 tablespoons of coarse salt all over, tie it, wrap it air-tight with cellophane, place in a sheet pan or roasting dish, and refrigerate overnight.
  2. Pull the pork out of the refrigerator about 30 minutes before cooking to bring to room temperature.
  3. Preheat the oven to 450°F. line the bottom of a roasting pan with aluminum foil for easy clean up and fit a roasting rack inside the pan.
  4. Cut each garlic clove into slivers. With a small knife poke holes in the pork that are about ½ inch deep (or the length of the garlic clove) to create slits and push the garlic sliver into each slit.
  5. Mix the seasoning together and rub into the pork shoulder, seasoning on all sides.
  6. Place the seasoned pork onto the roasting rack in the pan.
  7. Place the pan into the oven and let it roast for 15 minutes at 450°.
  8. Lower the heat to 275°F.  and let it slowly cook until it reaches the tender internal temperature of 200 – 203°F. internal temperature.
  9. Pull pork out of the oven, tent with aluminum foil and let rest for 1/2 hour up to 1 hour.

Cooking a City Ham for the Holidays

The main difference between city ham and country ham is how they are cured. Country hams are dried and cured with salt and seasonings over several months. This slow process makes them saltier and gives them a strong, unique flavor. They tend to be dry and are best sliced very thin, like prosciutto. City hams are soaked in a salty water solution for a shorter time, which keeps them moist and tender. They are milder in flavor and can be sliced thicker. The curing method affects the taste, texture, and how each ham is served. Country ham has a salty, intense flavor and is good for appetizers or charcuterie boards. It is often used in small slices. City ham is more versatile, suitable for sandwiches, main dishes, or breakfast. It has a milder taste and is easier to slice in thicker pieces. When choosing between the two, consider the flavor you want and how you plan to serve the ham. Both types are popular and can be the main part of a meal. Proper preparation can make either type of ham more enjoyable for different occasions.

Applying a glaze to your ham during the final stages of cooking enhances its appearance and flavor, resulting in a caramelized, lightly crisp exterior. It is important to time the glazing appropriately; applying it too early, especially during prolonged cooking, can lead to burning and an undesirable burnt glaze.

Ingredients

  • 1 city style (brined) ham, hock end
  • ¼ cup brown mustard
  • 2 cups dark brown sugar
  • 1-ounce bourbon (poured into a spritz bottle)
  • 2 cups of crushed ginger snap cookies

Directions

  1. Heat oven to 250°F.
  2. Remove ham from bag, rinse and drain thoroughly. Place ham, cut side down, in a roasting pan. Using a small parting knife score the ham from bottom to top, spiraling clockwise as you cut. Be careful to only cut through the skin and first few layers of fat. The aim is to create a diamond pattern all over the ham.
  3. Tent the ham with heavy duty foil, cook for 3 to 4 hours or until the internal temperature at the deepest part of the meat registers 130°F.
  4. Remove ham from oven and remove the aluminum foil. Using tongs, pull away the diamonds of skin and any sheets of fat that come off with them.
  5. Heat oven to 350° F.
  6. Dab the ham dry with paper towels and then brush on a liberal coat of mustard, using a basting brush. Sprinkle on the brown sugar, packing loosely as you go until the ham is coated. Spritz this layer lightly with bourbon, then loosely pack on as much of the cookie crumbs as you can.

Insert the thermometer and cook until the interior temperature reaches 140°F. approximately one hour.

Let the ham rest outside of the oven for ½ hour before slicing.

Oyster Stuffing

The history of oyster stuffing dates back to at least 1685, when it was first mentioned in the cookbook The Accomplisht Cook in London. Traditionally, the stuffing was placed under the skin of the bird, a common practice at the time. By 1796, culinary advice suggested stuffing the cavity of the bird instead. Different regions have their own preferred types of stuffing: Southerners often favor pecan, rice, or cornbread; Italians typically include sausage; and Germans enjoy dried fruit, potatoes, and apples. I personally discovered an oyster stuffing recipe many years ago and decided to try it. I am pleased to say that this stuffing is delicious, it does not have a fishy smell or taste. One of its advantages is that it can be served as a standalone dish. For the best flavor, I recommend using fresh herbs whenever possible. Enjoy your cooking experience and the unique taste of oyster stuffing.

SERVES 8—10

INGREDIENTS

  • 11 cups ½” cubed white French bread (about 14 oz.)
  • 6 slices bacon
  • 6 tbsp. butter, melted, plus more for greasing the pan
  • 6 shallots, thinly sliced
  • 4 celery ribs, thinly sliced
  • 40 medium oysters, such as Bluepoint’s shucked (about 1 lb.), with 1 cup of the liquor reserved (I have used canned oysters)
  • 1 cup chicken stock
  • ¼ cup madeira or port (a sweet wine)
  • ⅓ cup chopped flat-leaf parsley leaves
  • 2 tbsp. fresh chopped thyme leaves
  • 2 tbsp. fresh chopped sage leaves
  • ½ tsp. Tabasco (or any hot sauce)
  • ¼ tsp. fresh grated nutmeg
  • ⅛ tsp. ground cloves
  • Kosher salt and freshly ground black pepper, to taste

DIRECTIONS

  1. Preheat oven to 250˚F.
  2. Arrange bread cubes on a baking sheet in a single layer and bake, stirring occasionally, until dried but not browned, about 15 minutes. Remove bread cubes from the oven and let cool.
  3. Put bacon into a 12″ skillet; cook over medium-high heat, stirring frequently, until crisp for about 10 minutes. Remove bacon from pan. Reserve 1 tablespoon of grease.
  4.  Add 4 tablesopoons of butter to bacon grease and heat. Add shallots and celery, reduce heat to medium, and cook, stirring occasionally, until vegetables are soft, about 10 minutes.
  5.  Add oyster liquor, stock, Madeira or port, parsley, thyme, sage, Tabasco, nutmeg, cloves, and salt and pepper. Bring to a boil over high heat and cook, stirring occasionally, for 5 minutes.  Scrape the mixture into a large bowl and stir in the bread cubes and oysters. Set aside to allow the flavors to come together for 10 minutes.
  6. Raise the oven temperature to 400˚. Transfer mixture to a buttered 2-qt. oval baking dish and cover with foil. Bake for 30 minutes, remove foil, drizzle with remaining butter, and continue baking until golden brown and crusty, about 15 minutes more. Serve immediately.

Crab and Flounder Dish

flounder crabTraditionally we served fish for our Christmas Eve dinner. My mom loved her herrings in sour cream. Today, I will share my favorite dish and that is Crab Meat stuffed Flounder. This incredible dish can be served as a main entrée using the method below; or a side dish using smaller fillets; wrap a smaller flounder around a small scoop of crab meat mixture, secure with a toothpick. I have also served this crab mixture scooped on top of salmon or trout. You will enjoy this dish however you decide to serve it. Happy Holidays.

FLOUNDER FILLETS

4 to 5 Large fillets

Preheat the oven to 350 degrees F.

flounder slicedSprinkle flounder with salt and pepper. Using a fillet knife, carefully open the flounder by cutting along the left and right sides of the seam down the middle of the fish to make pockets. Lay the cut sides back.

CRAB MIX

Ingredients

  • 2 green onions, thinly sliced (about 1/4 cup)
  • 1 clove garlic minced
  • 1 minced red pepper
  • 2 tablespoons chopped fresh parsley
  • 1 egg
  • 1/8 teaspoon cayenne pepper
  • 1/8 teaspoon garlic powder
  • 3 tablespoons heavy cream
  • 1 1/2 tablespoons spicy mustard
  • 1/2 lemon, juiced
  • 2 tablespoons mayonnaise
  • 10 saltine crackers, crumbled medium to fine
  • 1/2-pound lump crabmeat, picked clean of shells
  • 1/2-pound claw crabmeat, picked clean of shells
  • Salt and freshly ground black pepper

Directions:

  1. In a medium skillet, melt the butter and sauté the onions, garlic, parsley and peppers until soft. Let cool.
  2. In a mixing bowl, combine the egg, cayenne pepper, garlic powder, heavy cream, mustard, lemon juice and mayonnaise together. Gently mix in the Saltine crackers and crabmeat. Add salt and pepper, if needed. Set aside to stuff in flounder.
  3. Stuff the flounder with the Crab Mix and press the sides down to cover the filling. Sprinkle with paprika.
  4. Coat a glass baking dish with cooking spray. Place the fish in the dish and bake for 20 minutes.
  5. Without removing the dish from the oven, turn the oven to broil and broil for 5 additional minutes.
  6. When the fish is done, remove it from the oven.

*Optional: Melt ½ cup of butter and drizzle over fillets when finished baking.

Roasted Garlic Chicken Thighs

Here is a terrific recipe for chicken thighs, great for a party or a special dinner.  Or use legs/thighs. Yes, you do have to love garlic, so be sure only to invite those who have an acquired taste for this tasty allium.

This recipe should be prepared the day before and as a note, the longer you marinate it – the taster it becomes.  It is best to marinade for at the very least, 6 hours up to 24 hours in advance.  Please use only fresh herbs and fresh garlic cloves with this recipe, or you will rob yourself of the intoxicating aroma and flavor of this dish.

INGREDIENTS

  • 3 – 4 pounds of skin on and bone in chicken thighs
  • 1 cup of olive oil
  • 16 fresh garlic cloves
  • 2-tablespoons fresh rosemary, chopped
  • 2-tablespoons fresh thyme, chopped
  • 1/2 cup (or more) fresh parsley, chopped

MARINADE

  • About 1 cup of olive oil – more or less to cover the chicken pieces
  • 6 peeled and smashed garlic cloves – cut in half after you smash them
  • ½ cup of fresh minced flat leaf Italian parsley

PROCESS

  •  Wash, and trim extra skin and fat from chicken thighs, pat them dry.
  • Spread them flat in a baking dish large enough to hold all thighs
  • Combine olive oil, garlic cloves and parsley and pour over thighs
  • Cover baking dish with plastic wrap or lid and refrigerate for up to 24 hours, turning only once during that time.

After 6 – 24 hours

  • Remove chicken from marinade and scrape off excess olive oil and place chicken in a shallow, foil lined, rimmed  cookie  sheet. 
  • With a slotted spoon, scoop up garlic and parsley from marinade and spread on top of chicken.
  • Reserve 1/3 cup of olive oil from marinade.
  • Preheat oven to 400F. 

In a bowl combine

  • 8 more garlic cloves, minced or grated
  •  1/3 cup reserved olive oil
  •   2 tablespoons fresh rosemary chopped
  •   2 tablespoons fresh thyme leaves
  1. Pour this mixture on top of chicken in pan.
  2. Bake at 400F.  for 45 minutes – do not turn chicken during baking.
  3. *Note: do not crowd chicken pieces in roasting pan – this will steam the chicken rather than roasting it.

Enjoy

Pineapple Gravy for Ham

If you’re preparing a ham for the holidays, consider adding a special dish to your table. I recommend trying a pineapple gravy. This flavorful gravy can enhance your holiday meal, making it more delicious and memorable. Pineapple gravy is easy to prepare and adds a sweet and tangy touch that complements the savory ham perfectly. Whether you’re hosting a large gathering or a small family dinner, this recipe is a great addition to your holiday menu, providing a unique and tasty accompaniment to your main dish.

Ingredients

  • 8.5 ounce can of crushed pineapple
  • ½ cup orange juice (or pineapple juice)
  • ½ cup brown sugar
  • 1 tablespoon cornstarch
  • ¼ teaspoon ground ginger
  • ¼ teaspoon ground cloves
  • 1/8 teaspoon ground nutmeg

Process

  1. Add all ingredients to a small saucepan and stir until well combined.
  2. Bring mixture to a boil over medium high heat. Boil for 1 minute or until thickened.