Traditionally we served fish for our Christmas Eve dinner. My mom loved her herrings in sour cream. Today, I will share my favorite dish and that is Crab Meat stuffed Flounder. This incredible dish can be served as a main entrée using the method below; or a side dish using smaller fillets; wrap a smaller flounder around a small scoop of crab meat mixture, secure with a toothpick. I have also served this crab mixture scooped on top of salmon or trout. You will enjoy this dish however you decide to serve it. Happy Holidays.
FLOUNDER FILLETS
4 to 5 Large fillets
Preheat the oven to 350 degrees F.
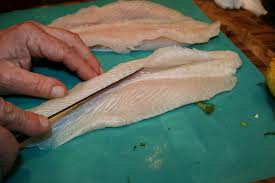 Sprinkle flounder with salt and pepper. Using a fillet knife, carefully open the flounder by cutting along the left and right sides of the seam down the middle of the fish to make pockets. Lay the cut sides back.
CRAB MIX
Ingredients
- 2 green onions, thinly sliced (about 1/4 cup)
- 1 clove garlic minced
- 1 minced red pepper
- 2 tablespoons chopped fresh parsley
- 1 egg
- 1/8 teaspoon cayenne pepper
- 1/8 teaspoon garlic powder
- 3 tablespoons heavy cream
- 1 1/2 tablespoons spicy mustard
- 1/2 lemon, juiced
- 2 tablespoons mayonnaise
- 10 saltine crackers, crumbled medium to fine
- 1/2-pound lump crabmeat, picked clean of shells
- 1/2-pound claw crabmeat, picked clean of shells
- Salt and freshly ground black pepper
Directions:
- In a medium skillet, melt the butter and sauté the onions, garlic, parsley and peppers until soft. Let cool.
- In a mixing bowl, combine the egg, cayenne pepper, garlic powder, heavy cream, mustard, lemon juice and mayonnaise together. Gently mix in the Saltine crackers and crabmeat. Add salt and pepper, if needed. Set aside to stuff in flounder.
- Stuff the flounder with the Crab Mix and press the sides down to cover the filling. Sprinkle with paprika.
- Coat a glass baking dish with cooking spray. Place the fish in the dish and bake for 20 minutes.
- Without removing the dish from the oven, turn the oven to broil and broil for 5 additional minutes.
- When the fish is done, remove it from the oven.
*Optional: Melt ½ cup of butter and drizzle over fillets when finished baking.