Category Archives: Fun Stuff

Recreating The Salad

saladHow to build a salad for lunch or dinner

It never fails, when I sit down at work to eat my lunch someone will comment, your salad smells and looks so good, can I pay you to make one for me.  I allow time in the morning to make my lunch, which is usually ½ hour.  If you build your salad the night before do not add the lettuce or dressing, add that in the morning.  At lunch all I have to do is shake my container to distribute my dressing and eat. My unusual salads typically contain any and all leftovers from dinner during the week, things someone would not typically put in a salad, what I get is a plethora of wonderful vegetables marinating in a dressing of:

Dressing:

  • A sprinkling of kosher salt,
  • A dash of pepper,
  • A sprinkle of garlic powder,
  • 2 teaspoons of olive oil,
  • 2 teaspoons of balsamic vinegar, apple cider vinegar, or wine vinegar

 Directions:

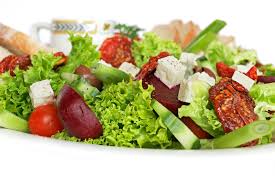
I mix all of my vegetables and the dressing together and then add my layer of dry salad greens on top, about 2 cups. I do not mix my lettuce into the dressing as the greens will wilt by lunch time. There is no right or wrong ingredient to add to a salad, I have mixed fruit and vegetables. Things you can add to a salad include the following, canned, frozen or fresh:

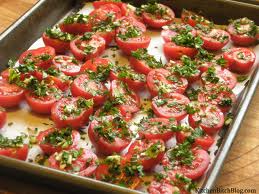
Cucumber, shredded cabbage, chives, sliced leek, scallions or sliced onion, jarred roasted red pepper, olives, 1/2 sliced avocado, sliced or quartered mushrooms, left over vegetables; broccoli, cauliflower, mixed vegetables, green beans, peas, canned artichokes, celery, canned beans, carrots, celery, beets, baby corn, alfalfa sprouts, bean sprouts, quartered tomato, sun dried tomatoes, pasta, Pomegranate seeds, asparagus. I have sliced peaches, apples, oranges, strawberries, raspberries, blackberries, etc. and added them to my vegetables. What ever you love to eat.

For protein: A ¼ cup canned white beans, black beans or chick-peas, cheese, hard boiled egg, cooked chicken, left over pork, or beef,  If you use tuna or salmon, pack it in another container or plastic bag and add to your salad at lunch. Add walnuts, peanuts, sunflower seeds etc.  All you need is a 1/4 cup of any protein.

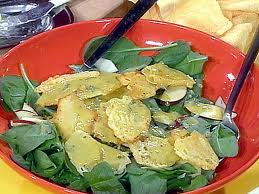
You can put anything you love to eat in a salad.  It is fresh, and filling and it is a meal.  I think the salad is underrated. Don’t eat a boring salad, get rid of the iceberg lettuce, buy a bag of mixed greens, spring mix or use fresh spinach.  Ditch the bottled salad dressing, the flavor of olive oil and balsamic vinegar is amazing and healthier.  Add chopped fresh basil and parsley to your dressing.  Create or rather recreate the healthy salad.  Make it your own – Enjoy!

*To steam fresh vegetables; add to a microwaveable container with a tablespoon of water and cook on high for 2 minutes, remove from microwave and add ice cold water to stop the cooking. Vegetables will be crisp-tender.

Oven Roasted Tomatoes

Roasted Tomatoes

Roasted Tomatoes

It is that time of year where tomatoes are in abundance especially on the East coast where I am from.  Here is a wonderful recipe for roasting your tomatoes, you can then use them in sauces, soups, gravies, appetizers or freeze them.  Try roasting cherry tomatoes for bruschetta. Roasting tomatoes brings out the sweetness in the tomato and just gives it a rustic, hearty flavor.

OVEN ROASTED TOMATOES

This recipe can easily be increased. The important thing is to use a baking dish or pan big enough so that you do not crowd the tomatoes. You want room between them for the moisture to escape, which will concentrate the tomato flavor.

If you use a metal pan, make sure it’s not aluminum or made of another material that might react with the acidic fruits.

 Ingredients

  • 2 tablespoons olive oil
  • ½ tsp of sea salt or kosher salt
  • ¼ tsp of ground pepper
  • 2 cloves garlic, peeled and thinly sliced (throw some unpeeled whole garlic cloves in the pan to roast, you can squeeze the soft garlic out of the clove after the roasting and add to your favorite dish)
  • Fresh herbs; basil, oregano, thyme, rosemary – mix or add your favorite herb
  • 1 pound (450g) tomatoes, (8 small or 4 medium-sized)

 Directions

  1. Preheat the oven to 325ºF
  2. Pour the olive oil into a shallow baking dish or pan and add the herbs and salt and pepper
  3. Cut the tomatoes in half horizontally, then use a sharp knife to remove the stems. (note: stems will come out easy after roasting)
  4. Toss the tomatoes with the oil and seasonings, lay them cut side down in the dish.
  5. Bake for two hours, or until the tomatoes are completely softened and wilted, and start to wrinkle. Depending on the tomatoes, they may take longer to cook.

    Storage: The tomatoes will keep for about five days in the refrigerator. They can also be frozen for up to six months.

Cheese Crisps

Cheese crisps are so versatile and fun served with a salad, as a snack, served as an appetizer or use as

Cheese Crisps

Cheese Crisps

a scoop with your favorite dip. They are very easy to make, and the main ingredient is cheese. You can add fresh herbs or spices to the mixture to suit your theme or just leave plain. They are entertaining little treats full of protein and make great conversational foods at the dinner table, try adding cheese crunches with your next meal.

CHEESE CRISPS

Ingredients:

  • 3/4 cup grated Gruyere cheese or (you can use packaged grated cheese, any flavor you prefer)
  • 1 tablespoon all-purpose flour
  • You can add whatever seasoning you like: A teaspoon of powdered Ranch dressing mix, chili powder, garlic powder, Parmesan cheese, dry or fresh chopped basil, diced fresh parsley, fresh chopped herbs, whatever feels good to you or nothing at all.
  • Do NOT add salt, the crisps will be salty by default because of the cheese.
  • Parchment Paper to line your cookie tray with (nothing else will work)

Directions:

Preheat the oven to 350 degrees F

  1. Toss the cheese with the flour and pepper and any herbs or seasoning to taste in a bowl.
  2. Arrange a teaspoon of the cheese mixture on the parchment paper lined baking sheet and flatten slightly.
  3. Bake until golden, about 7 minutes. Cool slightly, then remove with a spatula to a rack and let cool.

Stuffed Banana Bites

Don’t these little morsels look positively delicious, and they are pretty too! Found the recipe on Facebook.Banana Pic1 The treat prior to serving, but I think freezing them would also work. Great for an after school healthy snack, after dinner dessert, a buffet dessert table – well you get the picture. Enjoy!

Ingredients:

  • Straight 6” bananas (cut them into 3” sections)
  • Stuffing; Options: Creamy peanut butter, whipped cream, or marshmallow fluff
  • Chocolate chips – any flavor you want to dip your banana into, chocolate, white chocolate, peanut butter, cherry etc.
  • Chopped nuts or sprinkles

Directions:

  1. Try and find bananas with little to no curve for best results.
  2. Peel and slice off the ends of each banana. Cut the banana into about two 3″ long pieces.
  3. Stand your banana bites up on their flat, cut side.
  4. Hollow out the center using a straw
  5. Be sure not to go all the way down, leaving about a half inch banana, unhallowed, at the bottom.
  6. Melt your chocolate according to the package, pour your melted chocolate into a small, deep bowl.
  7. Dip the bottom half of your banana bites into the melted chocolate and roll in chopped nuts or sprinkles.

Banana Pic 2

    • Stand up on wax paper to dry. Refrigerate until chocolate has set and dry.
    • Once dry, remove the bananas from your refrigerator.
    • Transfer the peanut butter or marshmallow fluff to a pastry bag or a zip lock bag with the corner snipped off, and pipe it into your hollowed out bananas.
    • Enjoy!

Candy Corn Shots

candy corn shotsWhat another great idea for an adult Halloween party or just a Fall cookout!  They are so pretty and can be paired up with the Caramel Apple Shots posted earlier.  If you know you saw a recipe and cannot find it – email me and I will send it to you.

Ingredients:

Directions:

  1. Cut the oranges in half and hollow them out.

For the orange layer:

  1. Boil one cup of water and stir in the orange jello.
  2. Once dissolved, remove from heat and add 1 cup of Cointreau.
  3. Pour the mixture into the orange peels, filling halfway.
  4. Refrigerate for 2-3 hours, until firm.

For the white layer:

  1. Add 1/2 cup of water, 1/2 cup coconut milk, Knox gelatin, and sugar to a saucepan.
  2. Over medium heat, stir until gelatin and sugar are dissolved.
  3.   Remove from heat and add 1/2 cup Cointreau.
  4. Pour mixture on top of orange jello layer and refrigerate overnight.
  5. With a sharp knife, cut the orange halves in eighths.

Serve.

Caramel Apple Shots

apple shotsFall is around the corner at least in this part of the country where mornings are now in the 50’s and the day time temp reaches 80.  I saw this awesome recipe on Facebook and followed the link to a blog called “That’s Michelle.”  http://www.thatssomichelle.com  How much fun for an adult picnic or Halloween party?

Ingredients:

  • 10 small Granny Smith apples
  • 1 envelope knox gelatin (unflavored)
  • ½ cup water
  • ½ cup coconut milk
  • 2 drops yellow food coloring
  • 1 envelope of Land o Lakes Caramel Hot Chocolate
  • ¼ cup sugar
  • ½ cup butterscotch schnapps
  • Lemon juice

 Directions:

1.      Halve your apples and hollow them out cutting from the stem down.  Use a spoon to hollow the applies. 

2.      After hollowing out your apples halves – spritz lemon juice on the halves, covering completely – or dip into lemon juice to prevent browning.

3.      Mix ½ cup water with the envelope of caramel hot chocolate in a medium sized sauce pan, whisk to be sure all ingredients are combined.

4.      Add ½ cup of coconut milk, whisk again

5.      Add ¼ cup sugar and simmer slightly until sugar is dissolved and combined with mixture

6.      Add food coloring until you get the caramel color you desire (2 drops)

7.      Let mixture cool to warm, pour in ½ cup of butterscotch schnapps.

8.      Place apple halves on a rimmed cookie sheet and pour the caramel jello mixture into the apples. Refrigerate overnight

9.      Cut halves into quarters and those quarters in half again and serve immediately. 

Frozen Custard

Frozen Custard

Frozen Custard

Frozen custard was invented in Coney Island, New York in 1919, when ice cream vendors Archie and Elton Kohr found that adding egg yolks to ice cream created a smoother texture and helped the ice cream stay cold longer. In their first weekend on the “boardwalk”, the Kohr brothers sold 18,460 cones.
The difference between frozen custard and soft serve ice cream is that the frozen custard is very dense and air is not incorporated into the mixture. Half the final product of soft service ice cream is composed of air. Frozen custard is the crem de la crem of all frozen desserts, enjoy it in moderation as a truly wonderful summer dessert.

Ingredients:
*You will need an ice cream maker

  • 6 cups whole milk
  •   6 eggs
  • 3/4 cup sugar
  • One fresh Vanilla Bean (don’t skimp on this ingredient, as it makes the end taste surreal) 

Directions:

1.    Whole milk adds a creamy texture to the custard.

2.    Pour six cups of whole milk into a saucepan over a low heat.

3.    Milk will scald quickly of you do not stir it often, so stir the pan often. Bring the milk up to about 200 degrees F.

4.    Real vanilla beans make the frozen custard delicious.

5.    Open a vanilla pod and scrape the seeds into the pan of warm milk. If you don’t have vanilla beans, wait and add vanilla extract later.

6.    Eggs add protein and thicken the mixture.

7.    Crack six eggs into a mixing bowl and add 3/4 of a cup of sugar. Whip them with a whisk or beaters until the mixture is creamy and smooth and no sugar granules remain.

8.    Don’t let the milk boil or it will spill over.

9.    Slowly pour the hot milk into the egg mixture, whisking it constantly to slowly warm up the eggs without curdling the proteins. Pour it back into the saucepan and place over medium heat.  The custard will coat the back of the spoon.

10.  Heat the mixture while constantly stirring it with a wooden spoon. The surface foam will subside as the custard heats up and starts to thicken. As soon as the custard coats the back of the spoon, remove it from the heat and continue to stir as it cools. Add the vanilla extract at this point if you didn’t use the fresh vanilla beans in step #5.

11.  Chill the custard for 12 hours. It will be thick and smell delicious. Freeze in the ice cream maker of your choice following manufacturer’s directions.

Lemon Pie Dessert without the Crust

lemon dessertLemon Dessert = WW 1 point per cup

 About This Recipe

“For a sugar free, low fat dessert, this is really good. Truly, not even one point per dessert and it tastes just like lemon meringue pie without the crust. Be sure to use the cook and serve pudding mix, not instant.”

 Ingredients

  • 1 (7/8 ounce) cook package sugar-free vanilla pudding, mix ( not instant)
  • 2 cups water
  • 1 (1/3 ounce) package sugar-free lemon gelatin
  • fat-free can of Reddi-wip Cream

Directions

1.    Add pudding mix to water and mix well.

2.    Bring to boil.

3.    Stir with a whisk until thickened.

4.    Add box of  lemon Jello and stir in well.

5.    Pour into individual dessert dishes and refrigerate until set.

6.    Top with fat free Reddi-wip whipped Cream

Raspberry Tiramisu

raspberry teramJust in time for Mother’s Day, I received this recipe in my email care of Food Network.  It was so special I had to repost it to Kitchen Moxy.  What a delightfully, fresh dessert this will make after a celebrated dinner on Sunday!  Happy Mother’s Day to all my friends and family.

Raspberry Tiramisu

Recipe courtesy Giada De Laurentiis

Prep Time: 20 min

Inactive Prep Time: 3 hr 0 min

Serves: 8 to 12 servings

Ingredients

  • 1 cup seedless raspberry jam
  • 6 tablespoons orange liqueur (recommended: Grand Marnier)
  • 1 pound mascarpone cheese, at room temperature
  • 1 cup whipping cream
  • 1/4 cup sugar
  • 1 teaspoon pure vanilla extract
  • 28 soft ladyfingers or 2 (12-ounce) pound cakes, cut into 3 by 1 by 1 1/2-inch pieces
  • 3 (1/2 dry pint) baskets fresh raspberries (about 3 3/4 cups total)
  • Confectioners’ sugar, for serving

Directions

  1. Stir the jam and 4 tablespoons of the orange liqueur in a small bowl to blend.
  2. Combine the mascarpone and remaining 2 tablespoons of orange liqueur in a large bowl to blend.
  3. Using an electric mixer, beat the cream, sugar, and vanilla in another large bowl until soft peaks form.
  4. Using a large rubber spatula, stir 1/4 of the whipped cream into the mascarpone mixture to lighten.
  5. Fold the remaining whipped cream into the mascarpone mixture.
  6. Line the bottom of a13 by 9 by 2-inch glass baking dish or other decorative serving dish with half of the ladyfingers.
  7. Spread half of the jam mixture over the ladyfingers. Spread half of the mascarpone mixture over the jam mixture, then cover with half of the fresh raspberries. Repeat layering with the remaining ladyfingers, jam mixture, mascarpone mixture and raspberries.
  8. Cover and refrigerate at least 3 hours or overnight.
Dust with the confectioners’ sugar and serve.

Classic Strawberry Shortcake

Classic Strawberry Shortcake

Classic Strawberry Shortcake

With juicy strawberries spooned over sweet and tender biscuits, old-fashioned strawberry shortcakes are the perfect springtime dessert.  If the berries are very sweet, decrease the sugar to suit your taste. Drop the dough easily by using a lightly greased 1/3-measuring cup.

  • 2 (16-oz.) containers fresh strawberries, sliced
  • 1/3 cup powdered sugar
  • 1 teaspoon vanilla extract
  • 1 cup heavy whipping cream
  • 3/4 cup sugar
  • ½ tsp of almond extract
  • 2 3/4 cups all-purpose flour
  • 4 teaspoons baking powder
  • 3/4 cup cold butter, cut up
  • 2 large eggs, lightly beaten
  • 1 (8-oz.) container sour cream
  • 1 teaspoon vanilla extract
  • Garnish: fresh mint sprigs

Preparation

  1.  Combine strawberries, 1/2 cup sugar, and, almond extract. Cover berry mixture, and let stand 2 hours.
  2.  Beat whipping cream at medium-high speed with an electric mixer until foamy; gradually add 1/3 cup of powdered sugar, and vanilla beating until stiff peaks form (do not over beat or whip cream will become butter!). Cover and chill up to 2 hours.

To Make biscuits

Preheat oven to 450 degrees

  1. Combine flour, 1/4 cup sugar, and baking powder in a large bowl; cut butter into flour mixture with a pastry blender or two forks until crumbly.
  2. Whisk together eggs, sour cream, and vanilla until blended; add to flour mixture, stirring just until dry ingredients are moistened.
  3. Drop dough by lightly greased 1/3 cupful’s onto a lightly greased baking sheet. (Coat cup with vegetable cooking spray after each drop.)
  4. Bake at 450° for 12 to 15 minutes or until golden.

Split shortcakes in half horizontally. Spoon about 1/2 cup berry mixture onto each shortcake bottom; top each with chilled whipped cream, and cover with tops. Serve with remaining whipped cream. Garnish, if desired.