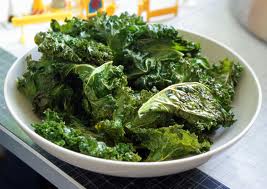
Category Archives: Side

Cheese Crisps

Cheese crisps are so versatile and fun served with a salad, as a snack, served as an appetizer or use as

Cheese Crisps

Cheese Crisps

a scoop with your favorite dip. They are very easy to make, and the main ingredient is cheese. You can add fresh herbs or spices to the mixture to suit your theme or just leave plain. They are entertaining little treats full of protein and make great conversational foods at the dinner table, try adding cheese crunches with your next meal.

CHEESE CRISPS

Ingredients:

  • 3/4 cup grated Gruyere cheese or (you can use packaged grated cheese, any flavor you prefer)
  • 1 tablespoon all-purpose flour
  • You can add whatever seasoning you like: A teaspoon of powdered Ranch dressing mix, chili powder, garlic powder, Parmesan cheese, dry or fresh chopped basil, diced fresh parsley, fresh chopped herbs, whatever feels good to you or nothing at all.
  • Do NOT add salt, the crisps will be salty by default because of the cheese.
  • Parchment Paper to line your cookie tray with (nothing else will work)

Directions:

Preheat the oven to 350 degrees F

  1. Toss the cheese with the flour and pepper and any herbs or seasoning to taste in a bowl.
  2. Arrange a teaspoon of the cheese mixture on the parchment paper lined baking sheet and flatten slightly.
  3. Bake until golden, about 7 minutes. Cool slightly, then remove with a spatula to a rack and let cool.

Fresh Berry Pudding

Berry pudding

Berry pudding

What a truly exotic and simple dessert to make when berries are at their peak of flavor.  When I hear “pudding” I think of the chocolate puddings I ate as a girl, this recipe is a type of pudding called a bread pudding.  The history of “bread pudding” is a dish with very old roots. It evolved as a use for stale bread, many years ago.  Cooks from many cultures throughout history did not want to waste stale bread, so they invented many dishes, both savory and sweet, that utilized it. Today, bread pudding is still made, but its current forms tend to be far more luxurious than its humble origins. Modern bread puddings often utilize fresh, gourmet breads, such as brioche, and include expensive ingredients, such as vanilla beans, bourbon, Gruyere cheese or pecans. Sweet bread puddings may also be served with a variety of sauces and fruit.

Ingredients

  • 5 cups mixed fresh berries, such as blackberries, blueberries, and raspberries (about 3 pints)
  • 2 tablespoons fresh lemon juice
  • 2 tablespoons water
  • (optional) 1 vanilla bean split lengthwise
  • 1/2 cup sugar
  • Pinch of salt
  • 18 thin slices white sandwich bread

Directions

  1. In a saucepan, cook berries, water and lemon juice over medium heat until berries release their juices but still hold their shape, about 2 minutes, scrape vanilla beans from vanilla pod and add to berry mixture. Stir in sugar and salt; cook until dissolved, 3 to 5 minutes. Strain sauce into a bowl through a sieve or colander; do not discard the berries, set aside. Let cool.
  2. Line a cupcake tin with plastic wrap, pressing it into cups. Using cookie cutters or an inverted glass, cut out six 2 1/4-inch rounds and twelve 2 3/4-inch rounds from bread.
  3. Pour 1 tablespoon sauce into each cup; add 1 tablespoon of reserved cooked berries. Top with smaller bread rounds; add another tablespoon each of sauce and berries. Make another layer of bread, sauce, and berries; top with remaining bread rounds. Press down firmly with the bottom of a glass.
  4. Fold plastic over; cover with a baking sheet. Weight with a heavy skillet. Refrigerate at least 4 hours.
  5. To serve, pull up on plastic wrap, and gently unmold each pudding onto plates; drizzle with sauce.

Cook’s Note

Using a cupcake tin lined with plastic wrap makes it easy to form, transport, and unmold the chilled puddings.

Beef Bourguignon

Beef Bourguignon

Beef Bourguignon

Beef bourguignon is one of many examples of peasant dishes being slowly refined into today’s haute cuisine.  Most likely, the particular method of slowly simmering the beef in wine originated as a means of tenderizing cuts of meat that would have been too tough to cook any other way.  Over time, the dish became a standard of French cuisine. The recipe most people still follow to make an authentic beef bourguignon was first described by Auguste Escoffier. That recipe, however, has undergone subtle changes, owing to changes in cooking equipment and available food supplies. Julia Child‘s Mastering the Art of French Cooking describes the dish, sauté de boeuf à la Bourguignonne, as “certainly one of the most delicious beef dishes concocted by man”.  I have to agree!

Well it is still snowing here in Montana and it is the weekend, finally.  After a week of salads and sauteed chicken breasts, I need some comfort food.  To me a big pot of beef stew and crusty homemade bread is just a bowl full of comfort goodness.  This is a BIG recipe, but really, once you get your prep work done (all the chopping and measuring ahead of time) it comes together fairly easy.  The bottle of Pinot Noir adds such a wonderful flavor.  I buy a pot roast chuck and cube it – it makes the best stew meat because it becomes tender the longer it cooks.  This “stew” does not have potatoes in it – but if you must, add baby red potatoes. Print this out and keep it in a safe place, next winter you will want to make it again!

Beef Bourguignon

Ingredients

  • 1 tablespoon good olive oil
  • 8 ounces bacon, diced
  • 2 1/2 pounds chuck beef cut into 1-inch cubes (buy a pot-roast chuck and cube it)
  • Kosher salt
  • Freshly ground black pepper
  • 1 pound carrots, sliced diagonally into 1-inch chunks
  • 2 yellow onions, sliced
  • 2 teaspoons chopped garlic (2 cloves)
  • 1 (750 ml.) bottle Pinot Noir (or other dry red wine)
  • 1 can (2 cups) beef broth
  • 1 tablespoon tomato paste
  • 1 teaspoon fresh thyme leaves (1/2 teaspoon dried)
  • 4 tablespoons unsalted butter at room temperature, divided
  • 3 tablespoons all-purpose flour
  • 1 pound frozen whole onions (sometimes hard to find, but you can buy a bag of frozen peas & onions)
  • 1 pound fresh mushrooms thickly sliced  or quartered, set aside – added almost at the end of cooking

Directions

Preheat the oven to 250 degrees F.

  1. Heat the olive oil in a large Dutch oven.
  2. Add the bacon and cook over medium heat for 10 minutes, stirring occasionally, until the bacon is lightly browned.
  3. Remove the bacon with a slotted spoon to a large plate.  
  4. Dry the beef cubes with paper towels and then sprinkle them with salt and pepper.
  5. In batches in single layers, sear the beef in the hot oil for 3 to 5 minutes, turning to brown on all sides. Remove the seared cubes to the plate with the bacon and continue searing until all the beef is browned.
  6. Set aside.
  7. Toss the carrots, and onions, 1 tablespoon of salt and 2 teaspoons of pepper in the fat in the pan and cook for 10 to 15 minutes, stirring occasionally, until the onions are lightly browned.
  8. Add the garlic and cook for 1 more minute.
  9. Put the meat and bacon back into the pot with the juices.
  10. Add the bottle of wine plus enough beef broth to almost cover the meat.
  11. Add the tomato paste and thyme.
  12. Bring to a simmer, cover the pot with a tight-fitting lid and place it in the oven for about 2 hours (or more) or until the meat and vegetables are very tender when pierced with a fork. (you can also put this together in the morning and put in your slow cooker for the whole day)
  13. Combine 2 tablespoons of butter and the flour with a fork and stir into the stew.
  14. Add the frozen onions.
  15. Saute the mushrooms in 2 tablespoons of butter for 10 minutes until lightly browned and then add to the stew.
  16. Bring the stew to a boil on top of the stove, then lower the heat and simmer for 15 minutes.

Moxy’s Barbeque Sauce with Bourbon

Moxy's Barbeque Sauce

Moxy’s Barbeque Sauce

The origin of barbecue sauce can be  traced to the end of the 15th century, when Christopher Columbus brought a sauce back from Hispaniola, while some place it at the formation of the first American colonies in the 17th century. References to barbeque sauce start occurring in both English and French literature over the next two hundred years.  Early cookbooks did not include recipes for barbecue sauce. The first commercially produced barbecue sauce was made by the Georgia Barbecue Sauce Company in Atlanta, Georgia. Its sauce was advertised for sale in the Atlanta Constitution, January 31, 1909. Heinz released its barbecue sauce in 1940.  Kraft Foods also started making cooking oils with bags of spices attached, supplying another market entrance of barbecue sauce. Everyone has a favorite, give this one a try.  It makes 3 – 4 cups of sauce and will keep for up to a month in the refrigerator.  Enjoy.

Ingredients

  • 2 cups ketchup
  • 4 tablespoons Worcestershire sauce
  • 3/4 cup Bourbon
  • 1/4 cup strong coffee
  • 4 tablespoons soy sauce
  • 1 tablespoon spicy brown mustard
  • 1 cup packed brown sugar
  • 1/2 teaspoon cayenne pepper (less if you don’t like spicy, more if you like hot)
  • 4 tablespoons cider vinegar
  • 1 tablespoon Tabasco sauce (optional if you don’t like hot)

Directions

  1. In a medium saucepan, combine all ingredients.
  2. Bring to a boil over high heat, stirring occasionally.
  3. Reduce heat to low. Simmer for ½ hour, stirring occasionally until thickened.
  4. Store in refrigerator up to 1 month.

Moxy’s Baked Beans with Bourbon

Bourbon Baked Beans

Bourbon Baked Beans

Continuing with my love of Bourbon – let me share some bourbon recipes with you.  Here is a wonderful baked bean recipe.  You can go the old fashioned route of soaking dried beans etc. but it is just as easy to go ahead and buy canned beans.  Use your favorite barbeque sauce, why don’t you try Moxy’s Barbeque Sauce with Bourbon! Recipe to follow.

Ingredients:

  • 8 slices bacon, halved
  • 1 medium onion, cut into small dice
  • 1/2 medium green pepper, cut into small dice
  •  3 large cans (28 ounces each) pork and beans
  •  3/4 cup barbecue sauce (try Moxy’s)
  •  1/2 cup dark brown sugar
  •  1/4 cup cider vinegar
  •  ½ cup of strong coffee
  • 1/4 cup Bourbon
  • 3 teaspoons dry mustard or 2 tablespoons Dijon

Directions:

Adjust oven rack to lower-middle position and heat oven to 325 degrees.

  1. Fry bacon in large, deep saute pan skillet until bacon has partially cooked and released about 1/4 cup drippings.
  2. Remove bacon from pan and drain on paper towels.
  3. Add diced onions and diced peppers to drippings in pan and sauté until tender, about 5 minutes.
  4. Add beans and remaining ingredients bring to a simmer. (If skillet is not large enough, add beans and heat to a simmer then transfer to a large bowl and stir in remaining ingredients).
  5. Pour flavored beans into a greased 13-by 9-inch (or similar size) ovenproof pan, or large bean crock.
  6.  Top with bacon, then bake until beans are bubbly and sauce is the consistency of pancake syrup, about 2 hours. Let stand to thicken slightly and serve.

Serves up to 18

Mascarpone Cheese Whipped Cream Filling

strawberry filled3I have had several requests for my recipe for Mascarpone Cheese Whipped Cream filling.  I stuffed big strawberries with this filling the other day for a pot-luck and they were a hit.  You don’t have to hollow-out your strawberries, just cut a cross into the tip of the strawberry about 2/3’s the way down towards the stem.  I used a pastry bag to fill the strawberry and then sprinkled with edible glitter. Of course you are the master of your design, sprinkle with crushed almonds or drizzle with bittersweet chocolate.  This is a wonderful filling or icing for cakes and cupcakes too. Keep refrigerated until ready to serve.

MASCARPONE CHEESE WHIPPED CREAM FILLING

• 2/3 cup mascarpone cheese
• 3/4 cup heavy whip cream
• 1/4 cup powder sugar
• 1 teaspoon vanilla

1. In a chilled bowl beat the Mascarpone cheese and vanilla until creamy about 30 seconds
2. Add the powdered sugar and whipping cream
3. Beat on high speed until thick and fluffy – will not take long, about 1 minute – the cheese stiffens the whip cream rather quickly – don’t over beat this mixture or it will turn to butter.

Kale Chips

Baked Kale Chips

Baked Kale Chips

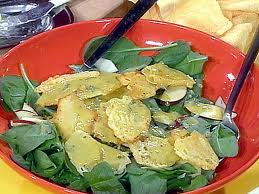
Kale Chips? A friend brought this to my attention a couple of weeks ago and asked me to make them. I took down the recipe but soon forgot about it. Tonight I decided to stop at the grocery store and pick up some Kale. I looked up other recipes on the internet and some very good information about Kale. I have to admit, I don’t cook with kale as much as I should considering the health benefits listed below. So Kale Chips, they have a special flavor, they do not taste like potato chips like some internet reviews suggest, but like potato chips, you can’t eat just one. They have their own flavor, very subtle, but surprisingly good. I made two batches, the first batch I ate with a glass of Merlot and thought they tasted wonderful. I ate my dinner a wonderful salad and decided to try another batch, they were good but not as good as the first batch, I poured another glass of wine and surprisingly, the wine enhanced the flavor of the Kale. You make a batch or two and see how you like them.

INGREDIENTS:

  • One bunch of kale
  • Olive oil – about a tablespoon
  • Kosher or Sea Salt
  • Garlic powder

DIRECTIONS:

  1. Preheat oven to 350 degrees
  2. Line a cookie sheet with foil
  3. Spray foil with cooking spray
  4. Tear apart the kale leaves into bite size pieces and place on cookie sheet
  5. Sprinkle a little olive oil on them and toss to coat
  6. Sprinkle on salt and garlic powder, be creative and try your own seasoning. I would start out with simple until you taste your first batch.
  7. Bake at 350 for 8 – 10 minutes
  8. Remove from oven and let cool for a few minutes and enjoy

Kale or borecole is a form of cabbage, with green or purple leaves, in which the central leaves do not form a head. It is considered to be closer to wild cabbage than most domesticated forms.

Top 10 Health Benefits of Eating Kale

By Alison Lewis

Kale is being called “the new beef”, “the queen of greens” and “a nutritional powerhouse.” Here are ten great benefits of adding more kale to your diet:

1. Kale is low in calorie, high in fiber and has zero fat. One cup of kale has only 36 calories, 5 grams of fiber and 0 grams of fat. It is great for aiding in digestion and elimination with its great fiber content. It’s also filled with so many nutrients, vitamins, folate and magnesium as well as those listed below.

2. Kale is high in iron. Per calorie, kale has more iron than beef. Iron is essential for good health, such as the formation of hemoglobin and enzymes, transporting oxygen to various parts of the body, cell growth, proper liver function and more.

3. Kale is high in Vitamin K. Eating a diet high in Vitamin K can help protect against various cancers. It is also necessary for a wide variety of bodily functions including normal bone health and the prevention of blood clotting. Also increased levels of vitamin K can help people suffering from Alzheimer’s disease.

4. Kale is filled with powerful antioxidants. Antioxidants, such as carotenoids and flavonoids help protect against various cancers.

5. Kale is a great anti-inflammatory food. One cup of kale is filled with 10% of the RDA of omega-3 fatty acids, which help, fight against arthritis, asthma and autoimmune disorders.

6. Kale is great for cardiovascular support. Eating more kale can help lower cholesterol levels.

7. Kale is high in Vitamin A. Vitamin A is great for your vision, your skin as well as helping to prevent lung and oral cavity cancers.

8. Kale is high in Vitamin C. This is very helpful for your immune system, your metabolism and your hydration.

9. Kale is high in calcium. Per calorie, kale has more calcium than milk, which aids in preventing bone loss, preventing osteoporosis and maintaining a healthy metabolism. Vitamin C is also helpful to maintain cartilage and joint flexibility

10. Kale is a great detox food. Kale is filled with fiber and sulfur, both great for detoxifying your body and keeping your liver healthy.

Mozzarella, Tomato & Basil Salad

tomato saladThis is truly a summer salad when the tomato vines are dripping with ripe, red, sweet tomatoes and the smell of fresh basil growing in the sun. But I do enjoy this salad in winter using vine grown tomatoes and fresh basil in the produce section of your grocery store. Wonderful on its own or pair with fish or chicken, or a hearty loaf of grain bread. Always use fresh basil and ripe tomatoes for this recipe. Buy fresh Mozzarella, you can’t beat its creamy, smooth texture. You will want to slice it into slices. Place it in the freezer for 5 – 10 minutes before slicing, this will make it an easier task.

INGREDIENTS

  • Fresh spinach leaves (optional)
  • 4 medium ripe tomatoes, sliced in ¼ inch slices
  • 6 ounces of fresh mozzarella cheese, sliced
  • 2 Tablespoons of extra-virgin olive oil
  • 2 Tablespoons of good balsamic vinegar
  • 2 cloves of garlic sliced into slivers or grated
  • 1 bunch of fresh basil, rinsed and pulled apart into individual leaves
  • ½ teaspoon of cracked pepper
  • 1 teaspoon Kosher or Sea salt, divided

DIRECTIONS

  1. In a small bowl with a lid mix the extra virgin olive oil, balsamic vinegar, ½ teaspoon cracked pepper, ½ teaspoon salt, and garlic. Mix together and set aside for at least 15 minutes to blend flavors
  2. Line a plate or platter with washed spinach leaves, stems removed
  3. Arrange the tomato slices on top of the spinach
  4. Sprinkle with ½ teaspoon of kosher or sea salt
  5. Layer half of the basil leaves on top of the tomatoes
  6. Layer the mozzarella cheese on top of the basil
  7. Spread remaining basil on top of the cheese
  8. Pour the olive oil, vinegar dressing on top of layers
  9. Serve at room temperature

Cucumber Salad

Cucumber Salad

Cucumber Salad

I have this amazing pork chop and sauerkraut cooking in the oven and it smells so good. I wondered what kind of cold salad would go good with this dish. A cucumber salad is the perfect accompaniment, fresh, sweet, lite, and full of flavor. A cucumber salad will not compete with my sauerkraut but a green salad would. I used to make this salad all the time when my kids were small and serve with hamburgers or steak. A refreshing summer salad but great all year round. I hope you enjoy it as much as we did.

INGREDIENTS

  • 2 large cucumbers
  • 2 sliced scallions or thinly sliced red onion
  • ½ tsp salt
  • ¼ tsp pepper
  • 2 tablespoons of fresh, minced parsley
  • Bunch of fresh Basil, chopped fine (Optional)
  • 1 tsp fresh minced dill (Optional)
  • 3 tablespoons of white vinegar and water
  • 2 tablespoons sugar

DIRECTIONS:

  1. Mix the sugar, vinegar and water together and let sit
  2. Peeling your cucumber is optional, I prefer to leave the skin on and wash it to remove any wax. Grate the cucumbers into paper thin slices.
  3. Slice scallions or red onion
  4. Sprinkle with salt and pepper
  5. Stir in vinegar mixture. Stir
  6. Cover and refrigerate for at least 30 minutes.

Enjoy, eat healthy