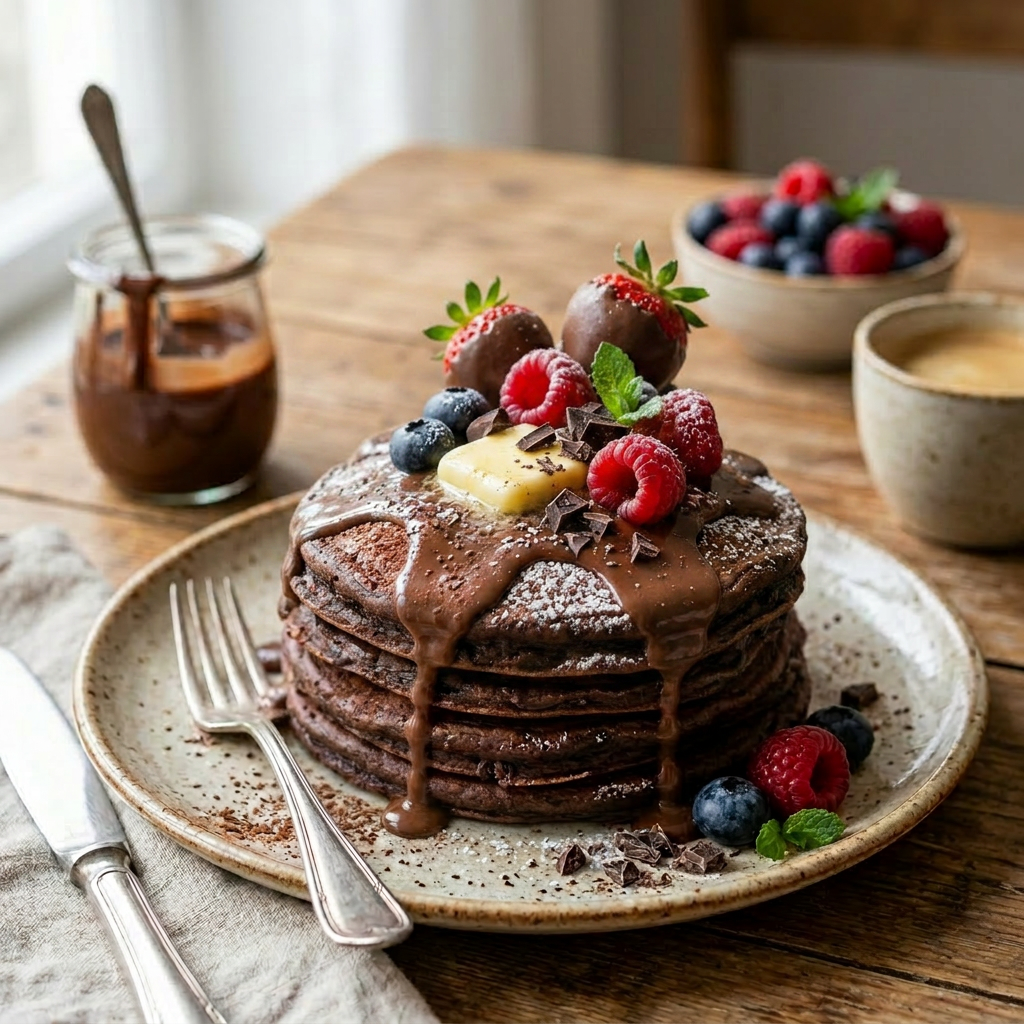
Category Archives: Dinner Ideas

Wonton Butternut Squash Ravioli

Ravioli pasta served with fried sage leaves, walnuts, and grated cheese in a rustic bowl

Embark on a delightful culinary adventure by transforming simple wonton wrappers into irresistibly tasty butternut squash dumplings! This fun and easy recipe combines the sweet, nutty flavor of roasted butternut squash with the delicate, chewy texture of wonton wrappers, creating a perfect bite-sized treat. Perfect for a cozy night in or impressing guests at your next gathering, this recipe proves that even simple ingredients can turn into a delightful culinary creation!

Ingredients

  • 1 butternut squash, halved lengthwise and seeded (about 1 1/2 pounds)
  • Cooking spray
  • 1 tablespoon chopped fresh oregano
  • 2 tablespoons unsalted butter, melted
  • 1/2 cup of Parmesan cheese, freshly grated
  • ½ teaspoon salt
  • 1/4 teaspoon freshly ground black pepper
  • 36 wonton wrappers
  • 1 large egg, lightly beaten

Pesto sauce recipe below

Process

  1. Preheat oven to 400° F.
  2. Place squash halves, cut sides down, on a foil-lined baking sheet coated with cooking spray.
  3. Bake for 30 minutes or until tender. Cool. Scoop out pulp, discard peel. Mash pulp.
  4. Combine oregano, squash pulp, and butter in a large bowl.
  5. Stir in Parmesan cheese, salt, and pepper.
  6. Working with 1 wonton wrapper at a time, spoon about 1 1/2 teaspoons of the squash mixture into the center of each wrapper.
  7. Moisten edges of wrapper with beaten egg; bring 2 opposite corners together. Pinch edges together to seal, forming a triangle. Repeat procedure with remaining wrappers, squash mixture, and egg. Cover wonton ravioli loosely with a towel to prevent drying.
  8. Bring 6 quarts of water to a boil in a large Dutch oven. Add half of the wonton ravioli; cook 3 minutes or until the ravioli begins to float to the top of the water.
  9. Remove wonton ravioli with a slotted spoon. Repeat the procedure with the remaining ravioli.
  10. Add ravioli to pesto; toss gently to coat.

Spinach Basil Pesto Ingredients

  • 2 garlic cloves
  • 1 1/2 cups of fresh baby spinach
  • 1/2 cup fresh basil
  • 1/4 cup walnuts, toasted, chopped, and divided
  • 2 tablespoons of Parmesan cheese, freshly grated
  • 2 tablespoons extra-virgin olive oil
  • 2 tablespoons organic vegetable broth
  • 1 teaspoon fresh lemon juice

Process

  1. Place garlic in a food processor, and pulse until finely chopped.
  2. Add cheese, 1/8 teaspoon salt, 1/4 teaspoon pepper, spinach, basil, and 2 tablespoons toasted walnuts to the food processor.
  3. With the processor on, slowly pour oil, broth, and juice through the food chute. Process until well blended.
  4. Plate with Wonton Ravioli. Arrange 6 ravioli on each of 6 plates: sprinkle each serving with 1 teaspoon walnuts, sprinkle with parmesan cheese.

Vegetable Wonton Dumplings

Plate of steamed dumplings garnished with green onions and sesame seeds next to a bowl of dipping sauce
A plate of steamed dumplings served with soy-based dipping sauce

Making vegetable dumplings from wonton wrappers is a fantastic way to enjoy a homemade, customizable, and satisfying treat that’s sure to impress family and friends alike. This fun and easy recipe invites you to get creative with fresh vegetables, turning them into bite-sized pockets of flavor. Start by chopping a colorful mix of vegetables such as carrots, cabbage, and green onions. Sauté or steam the vegetables until tender, then season with soy sauce, sesame oil, and a hint of ginger for an extra zing. Next, spoon the flavorful filling onto each wonton wrapper, fold and seal to create perfect little parcels. Whether you prefer steaming, pan-frying, or boiling, each method offers a unique taste experience. These vegetable dumplings are not only a healthy snack but also a fun activity for cooks of all ages.

Ingredients

  • Cooking spray
  • 2 teaspoons of Sesame oil (or olive oil)
  • 1-1/2 cups of green cabbage, finely shredded
  • 1/2 cup(s) carrot(s), shredded
  • 2 cloves garlic, grated or pressed
  • 1 teaspoon of grated ginger
  • 1 scallion, minced
  • 2 teaspoons of soy sauce
  • 24 wonton wrappers

Process

  1. Preheat oven to 350ºF. Coat a large baking sheet with cooking spray.
  2. Heat oil in a large skillet over medium-high heat. Add cabbage, carrots, garlic, and minced scallion: sauté until cabbage wilts, about 2 minutes.
  3. Remove from heat and stir in 2 teaspoons of soy sauce.
  4. Place wonton wrappers on a flat surface. Drop vegetable mixture by teaspoonfuls onto the center of each wrapper. Moisten the edges of the wrapper with wet fingers, fold over one corner to form a triangle, and press the sides together to seal.
  5. Transfer filled wrappers to the prepared baking sheet and coat the surface with cooking spray.
  6. Bake for 15 minutes, or until the wontons are golden brown.

Sauce

  • ¼ cup of soy sauce
  • 1 minced scallion
  • 1 teaspoon of seasoned rice vinegar
  • 1 teaspoon of Sesame oil
  1. In a small bowl, combine 1/4 cup of soy sauce, minced scallion, and sesame oil.
  2. Mix well and serve with vegetable wontons.

Pierogi Wontons

Golden-brown pierogies topped with bacon bits and green onions on a plate with sour cream
Golden-brown pierogies garnished with bacon bits and green onions, served over saurekraut with sour cream

Using Wonton wrappers is a fantastic shortcut for making pierogies, allowing you to create these delicious dumplings quickly and easily. Pierogies can be served boiled and then pan-fried or baked, and are best complemented with toppings like sautéed onions, sour cream, bacon, or fresh herbs like basil. Serve alongside kielbasa, sauerkraut, roasted vegetables, salads, or soups for a crowd-pleasing meal that is easy to make and enjoy.

Ingredients

  • 2 russet potatoes, washed, peeled, and cut into 1-inch pieces
  • 2 garlic clove(s) peeled and sliced lengthwise
  • ½ cup diced onion
  • ½ cup sharp cheddar shredded
  • 2 – 3 Tbsp sour cream
  • Salt and pepper to taste
  • 1 36-count package of wonton dumpling wrappers
  • 2 tablespoons of butter for sautéing pierogies
  • Salt for boiling water

Directions

  1. Combine cut potatoes and garlic in a medium saucepan. Cover with water, add 1 teaspoon of salt, and set the pan over high heat. Bring to a boil, lower the heat, and boil for 15-20 minutes until fork-tender.
  2. In a small pan over medium heat, melt the butter and add the diced onions. Cook onions until soft and translucent. Remove from heat.
  3. Drain and transfer the potato and garlic to a large bowl; add the cheese, onion, and sour cream, and salt and pepper to taste. Mash the mixture together. The mixture should not be dry; it should hold together so it can be scooped with a spoon, and it should not be loose or runny.
  4. Place wonton wrappers on a flat surface. Add a large spoonful of filling in the center of each wrapper. Wet the edges with your fingers, fold the wrapper in half to form a semicircle, and press the edges to seal. To prevent the dumplings from drying out, cover with plastic wrap or place the dumplings on a flat cookie sheet and freeze until ready to use.
  5. When you are ready to cook, bring a large pot of water seasoned with 1 teaspoon of salt to a boil. Drop the pierogies in the boiling water and stir. After 2 – 3 minutes, pierogies should float to the top and be finished cooking. Remove from the water with a slotted spoon and drain.
  6. Heat a skillet with 2 tablespoons of butter on medium heat. When the butter is melted, drop the boiled pierogies into the melted butter and sauté until golden brown on either side.

Cajun Shrimp Deviled Eggs

Deviled eggs topped with spicy shrimp and green herbs on a plate with lemon wedges

Discover the delightful world of Cajun Shrimp Deviled Eggs, a vibrant and flavorful appetizer that promises to excite your taste buds and brighten your table. These eggs are not just ordinary; they are a feast for the senses, combining the rich, smoky spices of Cajun cuisine with the succulent sweetness of perfectly cooked shrimp. Whether you’re a seafood lover or simply looking to add a splash of color to your appetizer platter, Cajun Shrimp Deviled Eggs are sure to be a hit, offering a perfect balance of spice, creaminess, and visual appeal that will leave everyone craving more.

Ingredients

  • 6 large eggs
  • 3 tablespoons of mayonnaise
  • 1 teaspoon Dijon mustard
  • ½ teaspoon lemon juice
  • 1 teaspoon hot sauce
  • ½ teaspoon Cajun seasoning
  • ¼ teaspoon garlic powder
  • ¼ teaspoon salt
  • ¼ teaspoon pepper
  • 2 tablespoons of chopped chives, for garnish
  • 2 tablespoons of fresh minced parsley, for garnish

Shrimp

  • 12 small shrimp, peeled and deveined
  • 1-1/2 tablespoon olive oil
  • 1 teaspoon Cajun seasoning
  • ¼ teaspoon smoked paprika
  • Paprika and green onions for garnish

Process

  1. Heat 1-1/2 tablespoon olive oil in a pan over medium heat.
  2. Toss shrimp with 1 teaspoon Cajun seasoning and smoked paprika.
  3. Sauté shrimp for 1-2 minutes per side until opaque, slightly curled, and golden.
  4. Remove and cool.

Assembly Directions

  1. Place eggs in a large pot; be sure the eggs are completely submerged in water.
  2. Bring water to a boil, turn the heat down to medium-high, and simmer for 11 minutes.
  3. Drain the hot water and fill the pot with cold tap water. When the eggs are cool enough to handle, remove the shells. It’s easier to remove shells when the eggs are warm.
  4. Slice eggs in half and remove the yolk to a separate bowl. Place the whites on a serving platter.
  5. Mix yolks with mayonnaise, Dijon mustard, lemon juice, hot sauce, Cajun seasoning, garlic powder, salt, and pepper.
  6. Spoon mixture into egg whites. Top each egg with minced red onion and a small shrimp. Sprinkle with paprika. Keep eggs refrigerated until they are ready to serve.

Bloody Mary Deviled Eggs

Deviled eggs topped with shrimp, bacon, and pickles served with Bloody Mary ingredients.

Are you ready to elevate your appetizer game with a splash of fun and flavor? Introducing the delightful twist on classic deviled eggs: Bloody Mary Deviled Eggs! This recipe combines the savory richness of traditional deviled eggs with the bold, tangy kick of a Bloody Mary cocktail. Perfect for brunch gatherings, holiday parties, or whenever you want to impress your guests with something uniquely delicious. One of the most exciting ways to make these eggs is by using Bloody Mary Pickled Eggs as a base.

Serve these Bloody Mary Deviled Eggs chilled, garnished with additional pickled vegetables or olives. They make a striking addition to any brunch table or cocktail party, offering a savory, tangy, and slightly spicy flavor profile that will delight your guests. For an extra touch, pair them with a cold Bloody Mary cocktail to complete the theme.

Ingredients

  • 6 large eggs
  • 3 tablespoons mayonnaise
  • ½ tablespoon prepared horseradish
  • 1 small garlic clove, minced
  • ½ tablespoon tomato paste
  • 1 teaspoon hot sauce
  • Juice of ½ lemon
  • ½ teaspoon celery seeds, or celery salt
  • ¼ teaspoon salt
  • Pepper to taste
  • 2 slices of crisp, cooked bacon crumbled
  • 1-1/2 teaspoon Old Bay seasoning
  • 12 Bacon pieces
  • 12 sliced celery leaves
  • 3 Sliced lengthwise sweet baby Gerkin pickles
  • 12 cherry tomatoes

Process

  1. Place eggs in a large pot; be sure the eggs are completely submerged in water.
  2. Bring water to a boil, turn the heat down to medium-high, and simmer for 11 minutes.
  3. When finished, drain the hot water and fill the pot with cold tap water.
  4. When cool enough to handle, remove shells from the eggs. (Note: shells are easier to remove when warm.
  5. Cut the eggs in half horizontally, not from top to bottom. If needed, trim the bottom of each egg so it can stand upright on a plate or dish.
  6. Remove the yolk to a separate bowl. Place the whites on a serving platter.
  7. With a hand mixer, beat or hand-mash together the yolks, mayonnaise, horseradish, garlic, tomato paste, hot sauce, lemon juice, celery seeds, salt, and pepper until smooth.
  8. Spread Old Bay seasoning onto a small plate. Tip the cut edges of the egg whites into the seasoning.
  9. Spoon or pipe the yolk mixture into the rimmed egg whites. To garnish, spear a sliced pickle, a slice of bacon, and a cherry tomato on a toothpick and top the egg with it. Slide celery leaves into the yolk mixture. Keep eggs refrigerated until they are ready to serve.

Candied Jalapeño Pickled Eggs

Pickled eggs with jalapeño slices and onions in a glass jar on a wooden table.
These zesty pickled eggs are infused with jalapeños and spices for a flavorful, rustic snack.

Embark on a flavor adventure with candied jalapeño pickled eggs—a delightful fusion of spicy, sweet, and tangy! This fun culinary project transforms ordinary eggs into a vibrant, zesty treat that’s perfect for snacking or garnishing your favorite dishes. The magic happens in a jar: slices of fiery jalapeños are combined with a sweet syrup made from sugar, tangy vinegar, and aromatic spices. As the eggs soak in this flavorful brine, they absorb the spicy-sweet goodness, developing a unique taste profile that balances heat with a touch of sweetness. The result is a colorful, eye-catching snack that offers a burst of flavor with every bite.

Ingredients

  • 10 eggs
  • 1 medium sweet onion, sliced thin (a mandolin slicer is a perfect tool for this job)
  • 2 cups apple cider vinegar
  • 1 cup white sugar
  • 1 cup brown sugar
  • 1 teaspoon garlic powder
  • 1 teaspoon ground Turmeric
  • ½ teaspoon cayenne pepper
  • 1 cup sliced Jalapeños

Process

  1. Place eggs in a large pot of water making sure they are fully submerged. Bring water to a boil, reduce heat and simmer for 11 minutes.
  2. First, drain the hot water and put the eggs in cold water. When they are cool enough to handle, peel off the shells. Do not put the eggs in the fridge, as they are easier to peel when warm.
  3. Wearing gloves, slice the jalapeño peppers about ¼ inch thick. Leave the seeds if you want more heat.
  4. In a large pot, combine the apple cider vinegar, sugars, seasonings and jalapeños, heat until sugars are dissolved and the jalapenos are tender.
  5. Remove jalapeños from the hot brine with a slotted spoon.
  6. Layer eggs, and jalapeños in a jar using a spoon to layer the jalapenos between the eggs.
  7. Pour the hot brine over the eggs to fill the jar up to 1/4-inch headspace.
  8. Let sit for 30 minutes before adding the lid.
  9. Secure the lid and place in the refrigerator when eggs cool to room temperature.  

Will last 3 to 4 months in the refrigerator. Let eggs pickle for 7 days to develop flavor.

Bloody Mary Pickled Eggs

Mason jar labeled 'Bloody Mary Pickled Eggs' filled with red eggs, celery, and lemon in brine.

Embark on a flavor adventure with the delightful art of making Bloody Mary Pickled Eggs! This fun culinary project combines the savory richness of traditional pickled eggs with the bold, spicy kick of a classic Bloody Mary cocktail. Perfect for brunch tables, snack platters, or a quirky gift, these eggs are sure to impress and amuse your friends. When ready to serve, enjoy these eggs as a savory snack, garnish for cocktails, or a unique addition to salads. Their striking appearance and complex flavor profile make them a conversation starter and a fun twist on traditional pickled eggs. So, gather your ingredients, embrace the process, and enjoy the deliciously bold results of your Bloody Mary Pickled gs adventure! *Just a reminder all of my recipes can be found at www.kitchenmoxy.com; where they can be searched and printed.

Ingredients

  • 10 eggs
  • 1 medium sweet onion, sliced thin (a mandolin slicer is a perfect tool for this job)
  • 1 cup Bloody Mary Mix
  • 1 cup white distilled vinegar
  • 1 tablespoon Worcestershire Sauce
  • 1 teaspoon minced Garlic
  • 1 tablespoon hot sauce
  • 1 tablespoon celery seed
  • 1 teaspoon red pepper flakes
  • 1 teaspoon kosher salt
  • 2 Bay leaves
  • 1 Jalapeño pepper, sliced
  • 10 drops red food coloring (optional) try ¼ cup beet juice

Process

  1. Place eggs in a large pot of water making sure they are fully submerged. Bring water to a boil, reduce heat and simmer for 11 minutes.
  2. First, drain the hot water and put the eggs in cold water. When they are cool enough to handle, peel off the shells. Do not refrigerate, shells are easier to peel when warm.
  3. Wearing gloves, slice the jalapeño peppers about ¼ inch thick. Leave the seeds if you want more heat.
  4. In a large pot, combine the Bloody Mary Mix, white vinegar, Worcestershire sauce, hot sauce, garlic, celery seed, red pepper flakes, salt, bay leaves and food coloring.  
  5. Bring mixture to a boil, stirring occasionally until the mixture is fully incorporated and salt is dissolved. Reduce heat to low. Simmer for about 5 minutes.
  6. Pour the hot brine over the eggs to fill the jar up to 1/4-inch headspace.
  7. Let sit for 30 minutes before adding the lid.
  8. Secure the lid and place in the refrigerator when eggs cool to room temperature. 

Will last 3 to 4 months in the refrigerator. Let eggs pickle for 7 days to develop flavor.

Mustard Pickled Eggs

A large glass jar filled with mustard pickled eggs, labeled MUSTARD PICKLED EGGS - EST. 1923 -.

Pickled eggs come in fun shades like pink, yellow, or deep amber, depending on the ingredients used. These tangy treats are a worldwide favorite, made by boiling eggs and soaking them in a spicy vinegar brine. The process not only preserves the eggs but also adds a zesty flavor, making them a hit in many recipes. After receiving great feedback on my Pickled Beet Eggs, I’m excited to share a new twist: Mustard Pickled Eggs! Get ready for a deliciously tangy adventure that’s sure to spice up your snack game.

Ingredients

  • 10 eggs
  • 1 medium yellow onion, sliced thin (a mandolin slicer is a perfect tool for this job)
  • 4 cups of water
  • 1 cup white vinegar
  • 1 cup sugar
  • 1 tablespoon kosher salt
  • 1 tablespoon mustard seeds
  • 3 tablespoons of yellow mustard or 1-1/2 tablespoon mustard powder
  • 2 teaspoons turmeric

Process

  1. Place eggs in a large pot of water making sure they are fully submerged. Bring water to a boil, reduce heat and simmer for 11 minutes.
  2. First, drain the hot water and put the eggs in cold water. When they are cool enough to handle, peel off the shells. Do not put the eggs in the fridge, as they are easier to peel when warm. In a large pot, combine 4 cups of water, white vinegar, sugar, kosher salt, mustard seeds, yellow mustard (or mustard powder), and turmeric. Bring mixture to a boil, stirring occasionally until the sugar and salt are fully dissolved. Reduce heat to low.
  3. Let mixture simmer for 5 minutes. This step is vital for infusing the pickling solution with the distinctive taste of mustard and spices.
  4. Put the shelled, hard-boiled eggs and sliced onions in a clean, sterilized glass jar.
  5. When the pickling solution has cooled, pour it over the eggs and onions, be sure they are fully submerged. Seal the jar tightly with a lid and place the jar in the refrigerator to marinate for 14 days. Give the jar a stir or shake every day to distribute the flavors.

These tasty treats are golden yellow and full of flavor. They have a tangy taste, a hint of mustard, and a little spice from the turmeric. If kept properly in a sealed container and refrigerated, they will stay good for many months.

PB Carmel Cloud Cookie

“Meet the PB Caramel Cloud — a dreamy cookie with a soft sponge cake base, creamy peanut butter, gooey caramel, and a silky chocolate top. This original recipe is melt‑in‑your‑mouth perfection and guaranteed to become your new signature dessert.”

Ingredients

  • 1 Cups of flour
  • 1/2 teaspoon of baking powder
  • 1 Cups of sugar
  • 1/2 Cup of milk
  • 1 tablespoon of soft butter
  • 2 eggs
  • 1 jar of peanut butter, creamy or chunky
  • 1 11 oz bag of Kraft Caramels
  • 1/3 cup of heavy cream
  • 1 bag of chocolate candy wafers

Process

Sponge cake

  1. Spray a 9″ x 13″ raised edge baking sheet with cooking spray, line it with parchment paper, then spray the paper. This prevents sticking and makes cleanup easier.
  2. Heat oven to 350°F.
  3. Combine flour, sugar, baking powder, milk, butter, and eggs in a bowl. Mix at a medium speed for 2 minutes until smooth.
  4. Pour the sponge mix into the baking sheet and bake for 20 minutes until done.
  5. Take cake out of the oven and spread the creamy peanut butter (or chunky) on top of the hot cake and spread evenly with an offset spatula.
  6. Refrigerate for an hour.
  7. Unwrap the caramels and melt them with the heavy cream in a microwave-safe bowl, keep stirring every 30 seconds until the caramels and cream are melted together creating a smooth and luscious spread. About 2 minutes.
  8. Remove the cake from the refrigerator and spread the caramel sauce on top of the peanut butter. Return to the refrigerator until the caramel sauce is set.

Note: At this point you can melt the chocolate according to the package instructions and spread on top of the caramel sauce. Cut the cookie into squares while the chocolate is still warm. Place the pan in the refrigerator until the chocolate hardens and then remove cookies to a storage container.

Or

  1. Do not pour chocolate over the set caramel.
  2. Using silicon or poly plastic cookie molds, cut the cookies to fit into the molds using a 2” cookie cutter, set aside.
  3.  Melt the chocolate according to package instructions and pour a tablespoon into the bottom of each mold. Place cookie cutouts in the molds, then refrigerate until the chocolate hardens. Once set, remove from the molds and enjoy your treat.

Old Fashioned Chicken Stew

Homemade chicken stew is a comforting and hearty dish that has the power to transform your space into a warm, inviting haven. Crafted with tender chicken, fresh vegetables, and aromatic herbs, this stew embodies the essence of home-cooked comfort food. The slow simmering process allows the flavors to meld beautifully, creating a rich and savory aroma that fills every corner of your kitchen and living area.

Whether enjoyed on a chilly evening or as a weekend treat, chicken stew is a versatile dish that brings comfort and a sense of belonging. Its aroma not only satisfies the palate but also creates an environment that feels like a warm embrace, making your space smell like home and fostering a sense of well-being and contentment.

Ingredients

  • One 2- to 3-pound chicken fryer, cut up
  • 3 carrots, diced
  • 2 celery stalks, diced
  • 1/2 medium onion, diced or 1 bag of frozen pearl onions
  • ½ bag of frozen peas (optional)
  • 1-1/2 teaspoon salt
  • 1/4 teaspoon black pepper
  • 1/2 teaspoon ground thyme
  • 1/4 teaspoon turmeric
  • 2 bay leaves
  • 16 ounces egg noodles
  • 2 teaspoons finely minced fresh parsley
  • Beurre Manié (recipe below) to thicken soup

Process

  1. Put the chicken pieces in a large stock pot and cover the chicken with water. Add a teaspoon of salt.
  2. Bring the water to a boil and then reduce the heat to low. Simmer for 45 minutes.
  3. Remove the chicken from the pot. Set the chicken aside to cool briefly.
  4. When cool enough to handle, shred the chicken with 2 forks, reserving the bones. Return the bones to the pot and boil for 25 minutes.
  5. With a slotted spoon remove the bones from the pot and discard. Reserve the liquid in the pot.
  6. Add the shredded chicken, carrots, celery, onions and peas to the pot. Then add ½ teaspoon salt, pepper, thyme, bay leaves and turmeric. Bring the mixture to a gentle boil and then reduce the heat and simmer for 10 minutes. Stir in the noodles.
  7. Simmer until the noodles are tender, about 15 minutes. Remove the bay leaves with a slotted spoon.
  8. Add the Beurre Manié to thicken the broth gradually, this method allows you to control the thickness more precisely and adds a rich flavor without the risk of lumps. Let stew simmer for 5 minutes and then taste the stew and add more salt or pepper to taste. Sprinkle the minced parsley on top and serve with a rustic loaf of bread and butter.

Beurre Manié

Ingredients

  • 2 tablespoons of flour
  • 2 tablespoons of salted butter, room temperature

Process

  1. Mix the flour and softened butter together with a fork or hands.
  2. Knead together until a soft paste forms.