Popcorn Salad

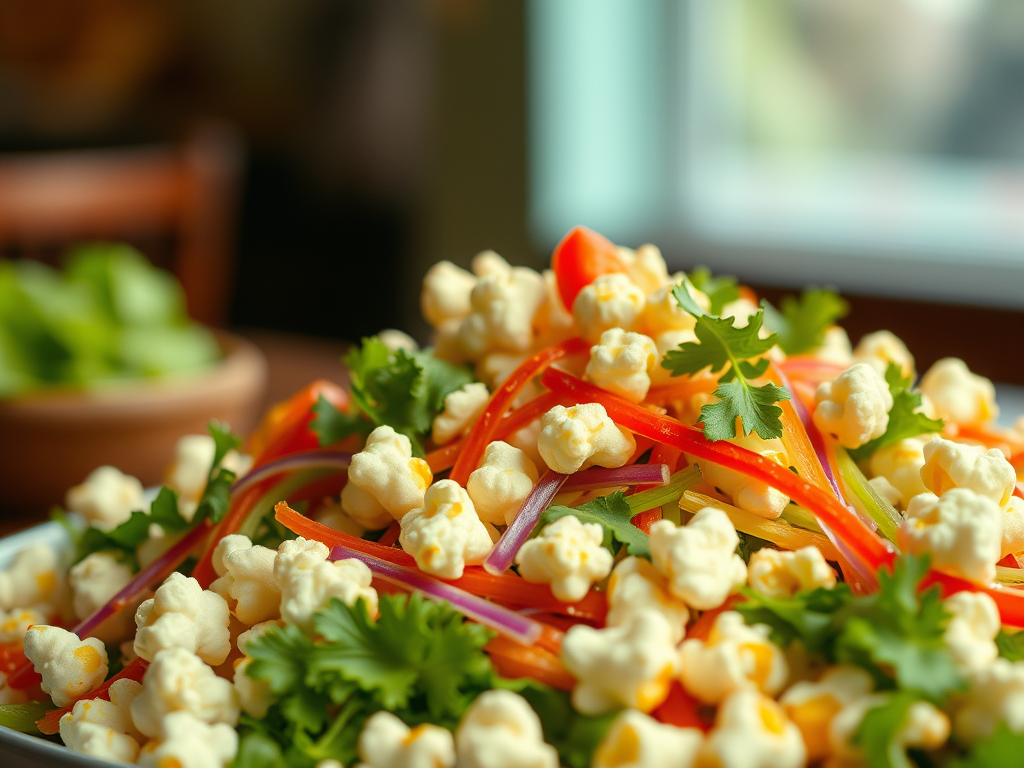
Popcorn salad comes across as one of those dishes that sounds quirky at first, then wins you over the moment you take a bite. It’s the contrast that makes it so delicious: crunchy, lightly salted popcorn folded into a creamy, tangy dressing, brightened with fresh veggies like snap peas, celery, or scallions, and often finished with herbs and a touch of sharp cheddar. Every forkful its a different note—crisp, cool, savory, and just a little indulgent, and a great way to get your kids to eat vegetables!

What makes it memorable is how unexpectedly balanced it is. The dressing softens the popcorn just enough to cling without turning soggy, the vegetables keep everything fresh, and the whole bowl feels like a playful twist on a classic potluck salad. It’s comfort food with personality, and it tends to disappear faster than anyone expects.

Ingredients

  • 1 bag of microwave buttered popcorn popped (about 6 cups)
  • 1 cup grated cheddar cheese
  • ½ cup of diced green pepper or bell pepper
  • 6 – 8 strips of cooked bacon crumbled (or substitute 1/3 cup bacon bits)
  • 1 cup of roasted corn cut off the cob, or a can of corn, drained
  • 1 cup of the following vegetables can be mixed in for color and flavor:
    • Shredded iceberg lettuce for crunch
    • Cherry tomatoes, sliced or quartered
    • Celery, sliced thin
    • Baby peas
    • Snap peas
    • French cut green beans
    • Grated carrot
    • Sliced water chestnuts, excellent crunch factor
    • Tiny little broccoli flowerets that have been steamed until crunch tender
    • Pomegranate seeds
    • Shredded cabbage, red or white
    • Shallots
  • ½ cup of lite mayonnaise or plain full fat Greek yogurt
  • 1 clove garlic, peeled and grated
  • 2 teaspoons of Dijon mustard
  • 2 tablespoons of white wine vinegar
  • 1 teaspoon of Worcestershire sauce
  • Salt and Pepper to taste

Process

Make Dressing

In a blender combine the following and blend until fully incorporated.

  1. Lite mayonnaise or plain full fat Greek yogurt, garlic, Dijon mustard, white wine vinegar, Worcestershire sauce, salt and pepper to taste.

Salad

Mix salad options together in a large bowl:

  1. 6 cups of popcorn, green onion or red onion, green or bell pepper, bacon, additional vegetables of choice.
  2. Pour dressing over salad and top with finely grated cheddar cheese.
  3. Serve immediately.

Baked Ziti

Sunday dinner on a cold winter day is special. Baked Ziti, a classic comfort food, is perfect for this occasion. Serve it with a fresh green salad and toasted garlic bread. You can use traditional pasta or opt for healthier options like whole wheat, protein, or high-fiber pasta. To keep it simple, I use jarred spaghetti sauce, but homemade sauce works well too. Sometimes, I add cooked Italian sausage or meatballs to enhance the flavor. This dish is easy to prepare and ideal for a cozy family meal.

Ingredients

  • 18-ounce box of Ziti, cook and drain as directed on the box. Do not rinse
  • 3-1/2 cups (32-ounce jar of sauce) spaghetti sauce
  • 2 cups of Ricotta cheese
  • 2 cups shredded mozzarella cheese
  • ¼ cup chopped, fresh parsley
  • 1 egg, slightly beaten
  • 1 teaspoon oregano
  • ½ teaspoon garlic powder
  • ¼ teaspoon pepper
  • 1 tablespoon freshly grated parmesan cheese
  • ½ cup shredded mozzarella cheese

Process

  1. Preheat oven to 375°F.
  2. Cook pasta according to directions, drain but do not rinse (rinsing pasta prevents sauce from sticking to it).
  3. In a large bowl combine ½ cup of spaghetti sauce, ricotta cheese, mozzarella cheese, fresh parsley, egg, oregano, garlic powder, pepper and 1 tablespoon of freshly grated parmesan cheese.
  4. In a 3-quart casserole pour another ½ cup of spaghetti sauce on bottom of dish and spread out with a spatula.
  5. Pour contents of ziti mixture into casserole pour remaining spaghetti sauce on top of ziti mixture, sprinkle with mozzarella cheese.
  6. Bake covered with aluminum foil for 30-35 minutes or until hot and bubbly

Baked Salmon with Brown Sugar Rub

Using a brown sugar rub on a salmon fillet not only elevates its flavor profile but also adds an appealing visual appeal, making it a popular choice among seafood enthusiasts and home cooks alike. Applying a brown sugar rub on a salmon fillet is a popular culinary technique that enhances the fish’s natural flavors while adding a subtle sweetness and caramelized crust. Additionally, the brown sugar rub can be customized with herbs or spices to suit personal preferences, making it a versatile option for enhancing the taste of salmon.

Ingredients

  • 1 tablespoon brown sugar
  • 1-1/2 teaspoon kosher salt
  • 1-1/2 teaspoon sweet paprika
  • 1-1/2 teaspoon garlic powder
  • 1 teaspoon Korean Pepper Flakes (optional)
  • ¼ teaspoon freshly cracked black pepper
  • 1 2-pound salmon filet
  • 1 tablespoon olive oil

Process

  1. Preheat the oven to 375° F.
  2. In a small bowl, combine the brown sugar, salt, paprika, garlic powder, pepper flakes, and pepper.
  3. Place the salmon on a parchment or aluminum foil lined, rimmed baking sheet, skin side down. Brush the salmon with the olive oil, then rub it with the spice mixture until completely coated.
  4. Bake in the center of the oven for 15 – 18 minutes, or until the fish flakes easily with a fork. (Internal temperature 145° F. or 63° C.)

Simple Stuffed Turkey Breast

This delicious roulade is perfect for your company or weekly dinners. It is filled with sautéed vegetables and sliced into attractive pinwheels, making it both tasty and visually appealing.
Preparing a turkey breast can be an excellent choice for a nutritious and flavorful meal. Turkey breast is a lean source of protein, making it suitable for health-conscious individuals. A well-prepared turkey breast can be tender, juicy, and full of flavor, especially when cooked with the right techniques and seasonings.

Ingredients

  • 1 whole turkey breast (about 2-3 pounds)
  • 2 tablespoons olive oil or melted butter
  • 1 cup of finely chopped red onion
  • 2 cups of chopped mushrooms
  • 2 carrots, shredded
  • 2 cloves of garlic, grated or pressed
  • 1 10-ounce box frozen chopped spinach, thawed and squeezed dry
  • 2 tablespoons of fresh parsley
  • ¼ cup grated Parmesan cheese
  • ½ teaspoon dried basil leaves
  • ¼ cup dry breadcrumbs
  • 1 cup low-sodium chicken broth
  • 1 tablespoon grated lemon zest
  • Salt and freshly ground black pepper to taste
  • Garlic cloves (minced)

Process

  1. Mix the dry breadcrumbs with ¼ cup of the chicken broth. Set aside.
  2. In a large nonstick skillet, melt the butter. Sauté the onions for 4 minutes. Add the garlic, mushrooms and carrots; sauté until the vegetables are tender, 4-5 minutes.
  3. Stir in the spinach, parsley, cheese and basil; cook for 2 minutes.
  4. Remove from the heat; stir in the breadcrumbs, and lemon zest.
  5. Preheat the oven to 325°F.
  6. Spray a 9×13” baking dish with nonstick cooking spray.
  7. Place the turkey between two sheets of plastic wrap, with a meat mallet or rolling pin, pound to an even thickness.
  8. Remove the top sheet of plastic wrap from the turkey; spread the mushroom mixture over the turkey breast, leaving a 2” border on all sides.
  9. Starting with the short side, roll up the turkey breast jelly-roll style; tie at 2” intervals with kitchen string.
  10. Place the roll, seam-side down in the baking dish, pour the remaining broth over the turkey and cover loosely with foil.
  11. Bake, basting frequently with the pan juices, until an instant-read thermometer inserted in the center of the roll reaches 180°F, 1-1½ hours.
  12. Transfer turkey to a cutting board; let stand 10 minutes before removing the string and slicing.

Serving Suggestions

Slice the turkey breast and serve with a variety of side dishes such as roasted vegetables, mashed potatoes, or a fresh salad. The turkey can also be used in sandwiches or salads for a quick and healthy meal.

Sautéed Zucchini Noodles

I purchased a small, handheld device that turns zucchini into noodle-like strands, similar to spaghetti. Alternatively, you can use a vegetable peeler to create thin slices, then stack and cut them into strips. A box grater can also be used by sliding the zucchini down its large holes. Additionally, spiralizers or mandolins are effective tools for slicing zucchini into noodles. Many slicers suitable for this purpose are available at market or online offering a variety of options for preparing zucchini noodles easily and efficiently.

Incorporating zucchini into your diet offers numerous health benefits, making it a valuable addition to a balanced nutritional plan. Zucchini, a versatile and nutrient-dense vegetable, is low in calories but rich in essential vitamins, minerals, and antioxidants. Its inclusion can support overall health, aid in weight management, and promote well-being.

Ingredients

  • 2 – 3 zucchinis’, wash do not peel, remove ends
  • 1 medium sweet onion, diced
  • 3 fresh garlic cloves, sliced on the long side
  • About 1 cup of any other vegetable, such as sweet peppers, mushrooms, broccoli florets, spinach or cauliflower
  • ¼ cup fresh parsley, chopped fine
  • 4 tablespoons Parmesan grated
  • 1 tablespoon of olive oil
  • 2 tablespoons of butter (use real butter)
  • ½ tsp of kosher salt
  • ¼ tsp of red pepper flakes

Process

  1. Set your sliced zucchini aside.
  2. Chop your onions, slice your other vegetables.
  3. Heat a wok or other heavy pan on medium-high with 1 tablespoon of olive oil
  4. When oil is hot, add onions, and vegetables (except fresh spinach, add that last)
  5. Sauté until soft
  6. Push the vegetables to the side of the pan and add butter
  7. When butter is melted, add the garlic and sauté for about 30 seconds, add zucchini noodles and sauté for 3-4 minutes in hot butter. Sprinkle red pepper flakes, Parmesan and salt over vegetables in pan and stir together, if using fresh spinach add it now and stir until wilted.

Add Ins

  • Add shredded chicken, scallops, or shrimp to noodles to turn a side dish into a full meal. Include poached eggs for breakfast or add spaghetti sauce with ground beef or turkey for a hearty, satisfying dish.

Notes

Overcooking zucchini strands makes them soggy, similar to overcooked pasta. Aim for a firm texture, or ‘al dente.’ The strands should have a slight bite, not be too soft, ensuring better taste and texture.

Turkey Burgers

Incorporating turkey burgers into a balanced diet can contribute to weight management and overall health. They are versatile and can be prepared with various herbs and spices to enhance flavor without adding extra calories or sodium. For those with dietary restrictions or health concerns, turkey burgers can be a nutritious alternative, especially when paired with whole-grain buns and fresh vegetables, adding fiber and essential nutrients to the meal. Overall, turkey burgers are a nutritious, tasty, and health-conscious choice that can be part of a balanced diet aimed at promoting cardiovascular health, maintaining a healthy weight, and supporting overall well-being. Makes 4 – 6 servings.

Ingredients

  • 1 pound ground turkey breast
  • ¼ cup minced onion, or scallions
  • 1 tablespoon soy sauce
  • 1 tablespoon ketchup or your favorite BBQ sauce
  • ¼ teaspoon garlic powder
  • ¼ teaspoon freshly ground black pepper
  • 1/3 cup of shredded cheese, your favorite
  • Buns and garnish

Process

  1. In a large bowl, combine the turkey, onions or scallions, soy sauce, ketchup, garlic powder, and pepper just until blended, don’t overwork the meat mixture. Blend in the grated cheese.  Form into 4 – 6 patties.
  2. Heat an indoor grill or pan to medium heat, spray with non-stick spray. Cook burgers until cooked through, 6 -8 minutes per side.
  3. Serve on a bun with your choice of garnish such as crispy turkey bacon, cheese slices, sliced tomato, sliced onion. Don’t forget to include a side of slaw and a dill pickle spear.
Read more: Turkey Burgers

Portabella Mushrooms, Stuffed with Feta cheese, Kalamata Olives and Avocado

Portabella mushrooms are healthy and practical. They are low in calories and rich in antioxidants, vitamins, and minerals. They can be used instead of bread or pastry for stuffing, providing nutrition and flavor. Alternative ingredients such as cooked Italian Sausage, sauteed bell peppers, chili peppers, or prosciutto could be considered as additions to the basic stuffing below. This recipe is versatile, allowing you to customize the filling with your favorite vegetables or cheeses. Served with a side salad or soup, enjoy the rich flavors and satisfying texture of this dish.


Ingredients

  • ¼ cup olive oil
  • 1 tablespoon of balsamic vinegar
  • 1 clove garlic, grated
  • ¼ cup of sliced Kalamata Olives
  • 4 or 5 sun dried tomatoes, chopped
  • ¼ cup diced sweet onion
  • 1 cup fresh spinach
  • 1 oz goat cheese
  • ½ Avocado – cut into chunks
  • ¼ tsp Kosher salt or sea salt
  • Sprinkle of freshly grated pepper
  •  4 large Portabella Mushrooms

Process

  1. Preheat oven to 425°F.
  2. Clean the mushrooms with a damp paper towel.
  3. Remove the stems by twisting them off and scrape out the gills using a spoon to create more space for the stuffing.
  4. Marinate the mushrooms for 30 minutes to 1 hour in ¼ cup olive oil and 1 tbsp. balsamic vinegar add 1 grated garlic clove.
  5. Add one teaspoon of olive oil to a skillet on medium-high heat, add Kalamata olives, and the sun-dried tomatoes, stir-fry for about 4-5 minutes until the olives are crispy. Remove from pan.
  6. Turn heat down to medium, add another teaspoon of olive oil and add the diced onions and garlic. Stir-fry for about 2-3 minutes until onions are soft. Add the spinach just until wilted.
  7. Add the olives and tomato mixture to the pan with the onions, garlic and spinach.
  8. Remove from heat, let cool slightly.
  9. Stir in goat cheese, sprinkle with salt and pepper to taste, stir in Avocado chunks.
  10. Place pan in pre-heated oven and bake for 20 minutes until mushrooms are tender.
  11. Remove from the oven and let mushrooms cool slightly before serving.

Cooking Endive

How to cook endive. Endive belongs to the chicory genus, which includes several similar bitter leafed vegetables. I am talking about the little bullet shaped endives, not the curly leaf or chicory. Endives are rich in many vitamins and minerals, especially in foliate and vitamins A and K, and are high in fiber. Endive has a bitter-sweet taste, but I thought it was very savory, almost nutty. I served it up with my baby potatoes and flounder; it made a very filling side dish. Let your kids eat these little “boats” with their fingers. Make it fun.

Here are a few suggestions on how to enjoy your endive:

Baked endive:

  1. Preheat oven to 375° F.
  2. Slice endive lengthwise, remove core. Keep the root end intact as it will hold the leaves together after slicing.
  3. Brush both halves with olive oil.
  4. Slice a fresh garlic clove into very thin slices and place the slices in between the endive leaves.
  5. Sprinkle with kosher salt and pepper, and a little garlic powder.
  6. Bake at 375°F. for 20 minutes.
  7. Remove them from the oven and sprinkle balsamic vinegar over them.

Pan braised endive:

  1. Slice your endives in half.
  2. Sprinkle cut side with kosher salt and pepper, and any other seasoning you might like.
  3. Melt 1 tablespoon of butter in a heavy pan along with 1 tablespoon coconut oil.
  4. Place the endive halves cut side down in the pan, cook on medium-high heat until they are brown.
  5. Add ½ cup chicken broth and simmer until almost all liquid is gone. Remove from pan sprinkle with Kosher salt, and drizzle with balsamic vinegar

Maple glazed endive:

  1. Preheat oven to 350°F.
  2. Halve 6 small endives, remove as much of the core as possible.
  3. Arrange endive into one layer on a baking sheet with raised edges.
  4. In a small saucepan, melt 2 tablespoons of butter then stir in 2 tablespoons of real maple syrup, 2 teaspoons of thyme and ¼ teaspoon salt. When hot, pour over the endive and bake until tender and the edges begin to brown, 20 to 25 minutes.

Chewy Salted Caramel Cookie

This cookie features a salted caramel finish, making it an excellent addition to holiday menus or a year-round indulgence, offering a sophisticated treat for discerning palates throughout the year.

Ingredients

  • ½ cup butter
  • 3/4 cup of brown sugar
  • ¼ cup granulated sugar
  • ¼ teaspoon baking soda
  • ¼ teaspoon cream of tarter
  • ½ tsp cinnamon
  • 1 egg
  • ½ teaspoon vanilla extract
  • 1-1/2 cup of flour
  • ¼ teaspoon of sea salt
  • 1/2 cup caramel squares, cut into quarters.

Cookie Finish

  • Mix ¼ cup granulated sugar and 2 teaspoons of ground cinnamon together in a small bowl. Set aside.
  • Set aside coarse sea salt for sprinkling or Maldon Sea Salt Flakes (use sparingly)

Process

  1. In a medium sized bowl, mix the flour, baking soda, cream of tartar, cinnamon, and set aside.
  2. To brown the butter, heat a medium saucepan to medium high heat. Add the sliced butter. It does not take long for the butter to begin browning on the bottom. When the butter begins to froth, watch carefully and stir. Once the butter turns light brown, remove from heat and let it cool to room temperature. The butter will burn fast, so don’t walk away.
  3. While the butter is cooling, cut the caramel squares into quarters and set aside
  4. In a stand mixer, combine the brown butter, brown sugar and granulated sugar. Mix until blended and smooth.
  5. Beat in egg and vanilla and mix until combined. Slowly add the dry ingredients until combined.
  6. Form the dough into a ball and cover with plastic. Chill in the refrigerator for at least 30 minutes or overnight.
  7. Once you are ready to bake preheat the oven to 350°F.
  8. Measure about 2 tablespoons of dough and roll into a ball or use a cookie scoop.
  9. Flatten and place a quartered caramel square on top, wrap the cookie dough over the caramel and roll back into a ball.
  10. Mix ¼ cup sugar and cinnamon in a small bowl and roll each cookie in the mixture. Place on a parchment lined cookie sheet 2 inches apart.
  11. Flatten slightly with a fork, and sprinkle lightly with coarse sea salt
  12. Bake for 10 minutes, or until the edges turn light brown. The centers will be soft. Allow it to cool for 2-3 minutes and transfer to a wire cooling rack to cool completely.

Fresh Herbed Chicken Breast

This recipe is for a simple, healthy herb-crusted chicken breast. I researched various oven-cooked herb chicken recipes but found many used flour, breadcrumbs, butter and oil. Instead, I chose to prepare my own version using fresh herbs from my garden, fresh herbs are also available at the markets. The preparation takes about 15 minutes from start to finish. The recipe does not include flour, breadcrumbs, or excessive fats, making it a quick and nutritious dinner option. It only takes around 8 minutes to cook, which I consider a fast meal. Overall, this approach emphasizes health, simplicity, and speed, making it suitable for busy weeknights while still delivering a flavorful dish.

Ingredients

  • 6 – 8 oz chicken breast, boneless, skinless
  • ¼ cup of chopped fresh herbs, I used a combination of parsley, sage, oregano, rosemary
  • ¼ tsp kosher salt
  • 2 tsp of coconut oil
  • 1 tsp of butter

Process

  1. Place chicken breast inside a plastic quart bag or between two pieces of plastic wrap and using a meat mallet begin to gently pound the chicken on both sides until all the same width
  2. Take half of the chopped herbs and spread on one side of chicken breast, sprinkle with salt and gently pound the herbs into that side of the chicken breast
  3. Turn chicken over and spread remaining herbs and salt on other side of breast and pound into the chicken breast.
  4. Melt coconut oil and butter in a heavy pan or non-stick pan over medium high heat, when oil is hot place the chicken in the oil and cook uncovered for 4 minutes each side.
  5. Turn the heat down to medium if it looks like it is browning too fast. When the chicken is ready to flip to the other side after 4 minutes, be careful not to splash yourself. Cook the second side for 4 more minutes. Slice the chicken breast to be sure the meat is no longer pink. Cook to an internal temperature of 165°F. (or 74°C)
  • Note: Melted oil must be hot before adding the chicken breast or it will absorb the oil as it is cooking. Hot oil will sear the meat as it hits the pan.
  • Pounded chicken breast cooks relatively fast, prepare your salad and vegetables before you begin cooking.