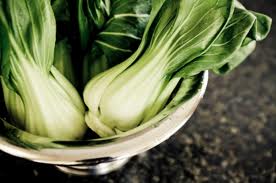
Sweet and Sour Red Cabbage for Special Occasions

Growing up in a household with German and Polish cultural influences, I developed a fondness for cabbage dishes. Among these, a traditional German red cabbage recipe stands out as a preferred preparation method. This dish involves simmering chopped onions with red cabbage until tender, incorporating sugar and apple cider vinegar to create a balanced sweet and sour glaze. The resulting vegetable side complements a variety of pork dishes, enhancing the overall culinary experience. This recipe exemplifies the rich culinary heritage of Central European cuisine, emphasizing the use of simple ingredients to produce a flavorful and versatile dish suitable for both everyday meals and special occasions.

Ingredients

  • 2 tablespoons of butter
  • 1 large red cabbage sliced thinly
  • 4 slices of cooked bacon, crumbled
  • 2 tablespoons of sugar
  • ¼ cup apple cider vinegar or red wine vinegar
  • ½ teaspoon Kosher salt
  • ¼ teaspoon freshly ground black pepper

Process

  1. Cut cabbage into quarters and then slice in thin slices, avoiding the hard core. Slice around it.
  2. Melt the butter in a large pot over medium heat.
  3. Add the onions and sauté until soft.
  4. Add the cabbage, toss to coat with the melted butter and onion. Cover pot and let simmer until slightly wilted. About 5 – 10 minutes. If the cabbage seems dry, add 1/4 cup of water.
  5. Sprinkle the sugar over the cabbage and toss to coat evenly. Add the vinegar to the pot. Bring to a simmer, then reduce the heat to medium low.
  6. Cover and simmer until the cabbage is completely tender but not mushy. Stir often about 30 to 40 minutes total.
  7. Season to taste with salt and pepper.
  8. Sprinkle the bacon crumbles on top before serving.

Hello…

It’s been about 13 years since I’ve posted in my Kitchen Moxy blog.  I apologize. Life throws curve balls at you and sometimes you get hit. I just didn’t realize it would take me this long to get grounded again. Please view my already posted recipes, they are yummy and stay tuned for new and improved ones.

I do test my recipes before posting. I will use an interesting recipe found in another publication and if I don’t l like what I taste, I will tweak it to make it “my own.” If I do like what I taste, I will give credit where credit is due. Please feel free to send me recipes you would like me to try, and leave comments in the comment section. 

Thank you,

Monica

Portabella Mushrooms stuffed with Goat cheese, Olives and Avocado

Paleo

Stuffed with goodness!

I purchased two large portabella mushrooms yesterday with no plan on how I was going to use them. I looked in my refrigerator this morning and pulled out items I thought would make a great stuffing; Kalamata Olives, sun dried tomatoes packed in olive oil, onions, white button mushrooms, a chili pepper, goat cheese and  half of an Avocado. Turned out, this was a stellar breakfast without dairy, meat or gluten. Great dish for lunch or dinner too!
Ingredients:
• ¼ cup of sliced Kalamata Olives
• 1 tsp olive oil
• 4 or 5 sun dried tomatoes, sliced into strips
• ¼ cup diced sweet onion
• 1 chili pepper, seeded and chopped or 1 tsp. dried pepper flakes
• ¼ cup sliced white button mushrooms
• 1 oz goat cheese
• ½ Avocado – slice lengthwise in 4 slices, turn and slice the opposite direction into chunks
• ¼ tsp Kosher salt or sea salt
• Sprinkle of freshly grated pepper
• 2 large Portabella Mushrooms, stems removed
Directions:
1. Heat oven broiler
2. Rub the two large portabella mushrooms with olive oil
3. Broil for 5 minutes, stem side down, remove from oven
4. Slice the Kalamata Olives, and the sun-dried tomatoes, heat the teaspoon of olive oil in a pan and add olives and tomatoes. Stir-fry on med-high heat for about 4-5 minutes until the olives are crispy. Remove from pan to a dish
5. Turn heat down to medium add the diced onions and mushrooms and stir-fry for about 2-3 minutes until mushrooms are browned and onions are soft. Remove onions and mushrooms from pan.
6. Add chilies to remaining olive oil, if needed replenish with another teaspoon of olive oil and sauté until limp.
7. Add the olive, tomatoes, onion and mushrooms mixture to the pan with the chilies, turn heat down to med-low and add goat cheese, sprinkle with salt and pepper. Stir until cheese is melted, remove from heat. Stir in chunks of Avocado.
8. Turn the broiled mushroom caps over to expose the gills, fill the caps with the mixture and return to the broiler, broil for about 3-4 minutes until hot.
Enjoy!

Glazed Smokey Links – Appetizer

Glazed Smoky LinksWhen my children were small we would host our annual New Year’s Eve party with close friends and their children.  The kids decorated the playroom downstairs with streamers, balloons and New Year decorations.  The grown-ups would eat shrimp and fondue upstairs. At midnight the grownups would join the kids in the playroom, open champagne for us and sparkling cider for the kids and bring in the New Year complete with confetti and plastic champagne flutes.  We would pass around fortune cookies and the kids would eat the gingerbread house I made for the holidays.  The New Year always started off on the right note with smiles and friends.  The most popular appetizer among kids were the little smokey links wrapped in crescent rolls. Here is another smoky link recipe.  Pass these around at your party, they are sure to be a hit!  Happy 2015 I hope it is prosperous, healthy and safe for all of us!

Ingredients

  • 1 pound Bacon, Cut Into Thirds
  • 1 pound Smoky Links (small)
  • 1 stick Butter
  • 1 cup Brown Sugar

Directions

Preheat oven to 375F.

  1. Cut the bacon into thirds and wrap each link.
  2. Place all the wrapped links in a single layer in a baking dish.
  3. Melt the stick of butter, add 1 cup of brown sugar and stir until mixed well.
  4. Pour the butter and brown sugar mixture on the links and bacon.
  5. Bake them for about 15-20 minutes and then turn the heat up to 400F for about 5 minutes or longer until the bacon becomes crispy. Watch them carefully because they will burn quick because of the glaze.
  6. Remove from oven, remove from baking dish and place on a plate for serving.

Fluffy Brown Sugar Icing

This frosting would be great on just about anything from gingerbread, chocolate

Brown Sugar Frosting

Brown Sugar Frosting

cupcakes, or even white cake.  If you have a sweet tooth, give this a try!


Fluffy Brown Sugar Icing

Yield: makes about 6 cups

Ingredients

  • 1 cup brown sugar (packed)
  • 1/4 cup water
  • 1/2 cup corn syrup
  • 4 egg whites*
  • 2 tsp vanilla

Instructions

  1. Mix brown sugar, water and corn syrup in a medium saucepan. Bring to a full rolling boil. (Be careful, as it will rise, so make sure the sides of your pan are taller). Let it boil at medium to medium high until the syrup drops like a hair from spoon (approximately 10 minutes). Remove from burner and set aside.
  2. Meanwhile, beat egg whites until stiff.
  3. SLOWLY pour the hot syrup in a THIN stream into egg whites, beating constantly. Beat until icing holds peaks, and then blend in vanilla.
  4. Let cool to room temp, then store covered in the fridge until ready to use.
  5. Enjoy!

Chewy Salted Caramel Cookie

An amazing cookie with a salted caramel finish. Add to your cookie menu for the holidays or just enjoy throughout the year for a special treat.

Ingredients

  • ½ cup butter
  • 3/4 cup of brown sugar
  • ¼ cup granulated sugar
  • ¼ teaspoon baking soda
  • ¼ teaspoon cream of tarter
  • ½ tsp cinnamon
  • 1 egg
  • ½ teaspoon vanilla extract
  • 1-1/2 cup of flour
  • ¼ teaspoon of sea salt
  • 1/2 cup caramel squares, cut into quarters.

Cookie Finish

  • ¼ cup granulated sugar
  • 2 teaspoons of ground cinnamon
  • Coarse Sea salt for sprinkling

Directions

  1. In a medium sized bowl, mix the flour, baking soda, cream of tartar, cinnamon, and set aside.
  2. To brown the butter, heat a medium saucepan to medium high heat. Add the sliced butter. It does not take long for the butter to begin browning on the bottom. When the butter begins to froth, watch carefully and stir. Once the butter turns light brown, remove from heat and let it cool to room temperature. The butter will burn fast, so don’t walk away.
  3. While the butter is cooling, cut the caramel squares into quarters and set aside
  4. In a stand mixer, combine the brown butter, brown sugar and granulated sugar. Mix until blended and smooth.
  5. Beat in egg and vanilla and mix until combined. Slowly add the dry ingredients until combined.
  6. Form the dough into a ball and cover with plastic. Chill in the refrigerator for at least 30 minutes or overnight.
  7. Once you are ready to bake preheat the oven to 350°F.
  8. Measure about 2 tablespoons of dough and roll into a ball, or use a cookie scoop.
  9. Flatten and place a quartered caramel square on top, wrap the cookie dough over the caramel and roll back into a ball.
  10. Mix ¼ cup sugar and cinnamon in a small bowl and roll each cookie in the mixture. Place on a parchment lined cookie sheet 2 inches apart.
  11. Flatten slightly with a fork, and sprinkle lightly with coarse sea salt
  12. Bake for 10 minutes, or until the edges turn light brown. The centers will be soft. Allow it to cool for 2-3 minutes and transfer to a wire cooling rack to cool completely.

Brussels Sprouts with Bacon, Garlic, and Onion

Well summer is wrapping up here in Montanna, we had our first snow last week. Thank goodness the ground was still too warm for any build up. Today is in the 70’s and everyone is outside enjoying the beautiful day and it is time for me to start posting my favorite recipes again.

The Brussels sprout, not a favorite with many people, but I love them; they remind me of tiny cabbages (also a fav, must be my Germanic upbringing). Everything is “better” with bacon, right? As well as garlic and sweet onion, so give these little morsels a try with your next dinner. Brussels sprouts are hardy, and fair well with beef or pork dishes. Raw Brussels sprouts contain excellent levels of vitamin C, and vitamin, with more moderate amounts of B vitamins, such as folic acid and B6, essential minerals and dietary fiber. Brussels sprouts, contain sulforaphane, a phytochemical under research for its potential anticancer properties. Although boiling reduces the level of sulforaphane, steaming and stir frying do not result in significant loss. Brussels sprouts are also a source of indole-3-carbinol, a chemical being studied for how it affects DNA repair in cells and appears to block the growth of cancer cells in vitro. So there you have it, the almighty Brussels sprout. I hope this dish helps you on your way to acquiring a taste for these little gems. Enjoy.

Brussel sprouts with bacon, garlic, and Sweet Onion

Brussels sprouts with bacon, garlic, and Sweet Onion

Brussels Sprouts with Bacon, Garlic, and Onion

Ingredients

  • 6 slices bacon
  • ½ cup sweet onion, diced
  • 1/2 pounds Brussels sprouts, trimmed and halved
  • 4 garlic cloves, grated
  • 1/2 cup fat-free chicken broth
  • 1/8 teaspoon salt
  • 1/8 teaspoon red pepper flakes
  • 1 tablespoon red current jelly

Directions

  1. Heat a large nonstick skillet over medium-high heat. Add bacon, and sauté until bacon begins to brown. Remove pan from heat. Remove the bacon from pan, reserve 1 tablespoon drippings in pan (discard the remaining drippings).
  2. Chop bacon into small pieces
  3. Return pan to medium-high heat, and stir in bacon pieces, onion, and Brussels sprouts; sauté 4 minutes.
  4. Add garlic, and sauté for 4 minutes or until garlic begins to brown, stirring frequently.
  5. Add the chicken broth, and bring to a boil. Cook for 2 minutes until the broth reduces almost completely gone and the sprouts are crisp-tender, stirring occasionally.
  6. Remove from heat; stir in salt and red pepper flakes, toss with a tablespoon of current jelly.
  7. For a colorful, special Thanksgiving or Christmas dinner or any holiday dinner, try stirring in pomegranate seeds.

Herb Crusted Chicken Breast

herbed chickenNot sure what to call this dish, so I researched other recipes that claim they are “oven cooked herb chicken” but most of them incorporate flour or breadcrumbs, and a stick of butter and/or olive oil. They didn’t seem all that healthy too me and took too much time in the oven. I decided to stick with my tried and true herb crusted chicken breast, coated with my own fresh herbs that I cut from my garden, from start to finish it took all of 15 minutes to prepare and cook. Yes, my chicken breast is “sautéed” in coconut oil I feel it is so much healthier than the alternative. This recipe is for an individual 7oz chicken breast, if you have two chicken breasts to add to the pan, you should probably increase the cooking time by one minute on each side or until done. My recipe does not use flour, breadcrumbs or an colossal amount of grease, oil or butter to cook with and it only takes 8 minutes to cook, so I consider this “fast food” for dinner.

Ingredients

  • 7oz chicken boneless, skinless
  • ¼ cup of chopped fresh herbs, I used a combination of: parsley, sage, oregano, rosemary
  • ¼ tsp kosher salt
  • 2 tsp of coconut oil
  • 1 tsp of butter

Directions

  1. Place chicken breast inside a plastic quart bag or between two pieces of plastic wrap and using a meat mallet begin to gently pound the chicken on both sides until all the same width
  2. Take half of the chopped herbs and spread on one side of chicken breast, sprinkle with salt and gently pound the herbs into that side of the chicken breast
  3. Turn chicken over and spread remaining herbs and salt on other side of breast and pound into the chicken breast.
  4. Melt coconut oil and butter in a heavy pan or non-stick pan over medium high heat, when oil is hot place the chicken in the oil and cook uncovered for 4 minutes each side.
  5. Turn the heat down to medium if it looks like it is browning too fast. When the chicken is ready to flip to the other side after 4 minutes, be careful not to splash yourself. Cook the second side for 4 more minutes. Slice the chicken breast to be sure the meat is white (cooked) before serving.

    *Note: Melted oil must be hot before adding the chicken breast or it will absorb the oil as it is cooking. Hot oil will sear the meat as it hits the pan.

Pounded chicken breast cooks relatively fast, prepare your salad and vegetables while it is cooking.

Oven Cooked Potato Skins


Oven Cooked Crispy Potato Skins

Oven Cooked Crispy Potato Skins

Crispy cheese potato skins, baked to a crisp, then topped with cheddar cheese, bacon, sour cream and green onions.

  • Yield: Serves 4 to 6.

Ingredients

  • 6 small to medium sized russet baking potatoes (total 3 pounds)
  • Olive oil
  • Canola oil or coconut oil
  • Kosher salt
  • Freshly ground pepper
  • 6 strips of bacon
  • 4 ounces grated cheddar cheese
  • 1/2 cup sour cream
  • 2 green onions, thinly sliced, including the greens of the onions

Instructions:

Preheat oven to 400°F

  1. Rub potatoes with olive oil and bake in a 400°F oven for about an hour until the potatoes are cooked through and give a little when pressed.
  2. While the potatoes are cooking, cook the bacon strips in a frying pan on medium low heat for 10 to 15 minutes, or until crisp. Drain on paper towels. Let cool. Crumble.
  3. Remove the potatoes from the oven and let cool enough to handle. Cut in half horizontally. Use a spoon to carefully scoop out the insides, reserving the scooped potatoes for another use, leaving about 1/4 of an inch of potato on the skin.
  4. Increase the heat of the oven to 450°F. Brush or rub canola or coconut oil (or another high smoke point oil) all over the potato skins, outside and in. Sprinkle with kosher salt. Place on a baking rack in a roasting pan (do not use a cookie sheet, it will warp, use a roasting pan or broiler pan that can take the heat). Cook for 10 minutes on one side, then flip the skins over and cook for another 10 minutes. Remove from oven and let cool enough to handle.
  5. Arrange the potato skins skin-side down on the roasting pan or rack. Sprinkle the insides with freshly ground black pepper, cheddar cheese, and crumbled bacon. Return to the oven. Broil for an additional 2 minutes, or until the cheese is bubbly. Remove from oven. Use tongs to place skins on a serving plate. Add a dollop of sour cream to each skin, sprinkle with chopped green onions. Serve immediately.

Three Cheese Wonton Ravioli


Three Cheese Wonton Ravioli

Makes 4 servings

Ingredients

  • ½ cup squeezed, chopped, cooked fresh or frozen spinach
  • ½ cup coarsely grated mozzarella
  • ½ cup ricotta (whole milk or low fat)
  • ½ cup freshly microplane grated Parmigiano-Reggiano plus extra for sprinkling
  • ¼ teaspoon freshly grated nutmeg
  • Kosher salt and freshly ground black pepper to taste
  • 32 square wonton wrappers
  • shredded basil for garnish.

Directions

  1. In a large bowl combine the spinach, mozzarella, ricotta, ½ cup parmesan, nutmeg and salt and pepper to taste.
  2. Working with a few wonton won tons at a time, keeping the others covered, moisten the edges with water.
  3. Put a level teaspoon of the filling in the center of each wrapper, and put another wonton on top.
  4. Press out the air and crimp the edges tightly to seal. As they are filled, transfer the ravioli to a flour dusted sheet pan. Repeat with the remaining wonton wrappers and filling.

Add the ravioli to the pot of boiling water, turn down to a simmer and cook, until just tender, 3 to 5 minutes. Meanwhile, heat the sauce. To serve: divide the ravioli among four shallow soup plates, top with some of the sauce and a sprinkling of the cheese. Garnish with the shredded basil.