Enhancing this rustic treat is a spread of vanilla butter, which adds a layer of creamy richness and aromatic sweetness. The vanilla butter melts gently over the warm muffins, infusing each bite with a fragrant vanilla essence that elevates the overall flavor experience. This combination of textures and flavors makes blueberry cornbread muffins with vanilla butter an ideal choice for breakfast, brunch, dinner side dish, or a cozy snack.
Ingredients
1 cup of yellow cornmeal
1 cup all-purpose flour
2 teaspoons of baking powder
1⁄2 teaspoon baking soda
1⁄2 teaspoon salt
1⁄2 cup unsalted butter, melted and cooled
2 tablespoons vegetable oil
1⁄2 cup granulated sugar
2 large eggs
1 cup of buttermilk
1 teaspoon vanilla extract
1 cup fresh blueberries or frozen (not thawed)
Instructions
Preheat the oven to 400°F. Line a 12-cup muffin pan with paper liners or grease the cups with cooking spray.
In a large bowl, mix the dry ingredients together until well combined. Set aside.
In a separate mixing bowl, beat the melted butter, oil, and sugar until smooth and thick. Add the eggs one at a time and mix until combined.
To add the dry ingredients to the buttermilk mixture, start and end with the flour. Mix gently by hand until about halfway combined. Add the blueberries and stir just until no streaks of flour are visible.
Divide the batter evenly between the muffin cups, filling each all the way to the top.
Bake for 15-18 minutes or until a toothpick inserted into the center comes out with just a few moist crumbs.
Let the muffins cool in the pan for 5 minutes before removing them to a cooling rack.
Vanilla Butter
Ingredients
1 cup of good unsalted butter
2 vanilla pods
3 tablespoons powdered sugar
½ teaspoon flakey sea salt (Maldon)
Process
Let the butter come to room temperature.
Using a very sharp knife, cut the vanilla pods in half lengthwise, exposing the seeds. Using the knife, scrape out the seeds and add to the butter.
Combine the butter, vanilla seeds, sugar and salt to a mixing bowl and whip until light and fluffy.
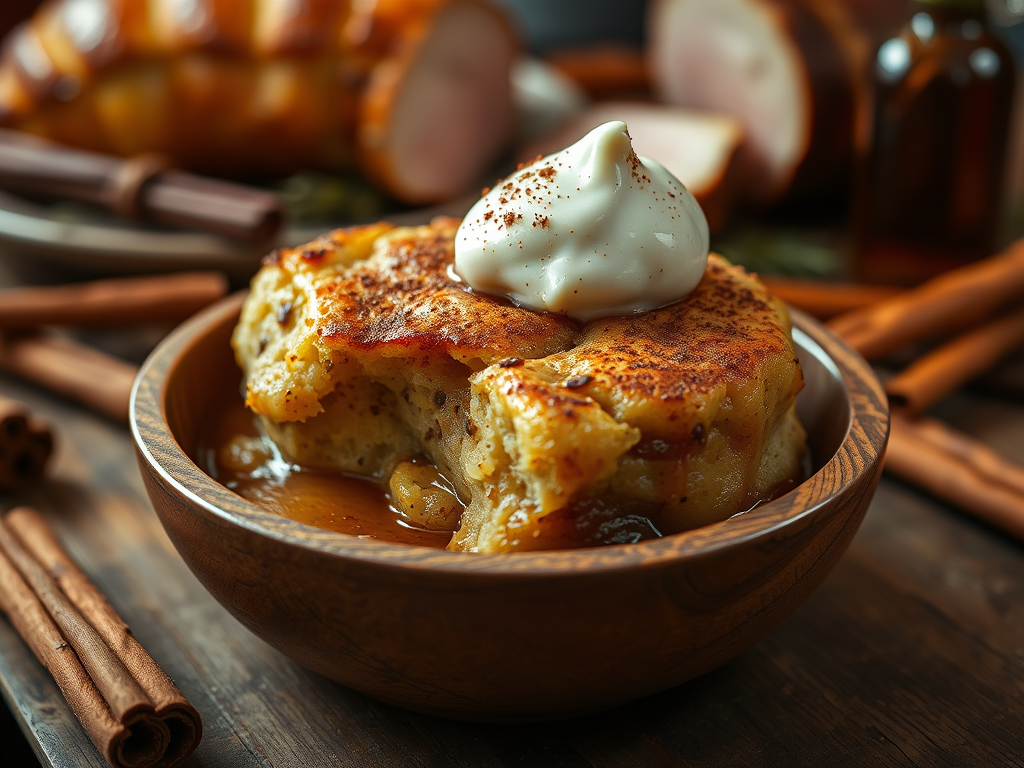
Discover the ultimate bread pudding recipe that fills your home with irresistible aromas of brown sugar, cinnamon, and vanilla. Perfect for holiday brunches or cozy weekends, this rich, comforting treat is totally addictive. Feel free to get creative with your bread—stale French bread, day-old glazed doughnuts, cinnamon rolls—anything goes! Bake, enjoy, and watch everyone rave about this delightful, fun dessert that warms both your heart and your home.
Ingredients
Pudding
1 cup firmly packed brown sugar
½ cup granulated sugar
1 loaf or 10 cups of cubed brioche or other stale bread *see note below
1-1/2 cups of Half and Half
1/2 cup of heavy whipping cream
4 eggs
2 teaspoons cinnamon
¼ teaspoon nutmeg
1 teaspoon vanilla extract
½ cup melted butter
Vanilla Bourbon Sauce
1 cup heavy cream
½ cup granulated sugar
½ cup bourbon
1-1/2 teaspoons pure vanilla extract
2 tablespoons of butter
1 tablespoon cornstarch (optional)
Process
Preheat oven to 350°F.
Spray a 9 x 13-inch baking dish with cooking spray. Spray a piece of aluminum foil with cooking spray to cover the bread pudding while it is baking.
In a large mixing bowl, beat together the eggs, sugars, cinnamon, nutmeg, vanilla, and melted butter until smooth.
Stir in the Half and Half, and whip cream and mix well. Add the cubed bread and let the mixture sit for 2 hours, stirring occasionally to ensure the bread absorbs the custard mixture.
Pour bread pudding batter into pan. Cover with foil and bake for 50 minutes to 1 hour or until center of pudding is firm.
NOTE: This can be made about 1 or 2 days in advance, reheating it at 250°F. for 30 minutes before serving.
Vanilla Bourbon Sauce
In a saucepan over medium heat, combine the cream, sugar, and vanilla.
Heat until the mixture is warm but not boiling.
In a separate bowl, mix the bourbon with a bit of the cornstarch to thicken the sauce.
Whisk in the bourbon mixture and continue to cook for another minute until slightly thickened.
Remove from the heat and stir in the butter until melted.
Cut pudding into squares and serve with a generous serving of bourbon sauce and a dollop of whipped cream or ice cream.
NOTE: If your bread is not stale, start by cutting a fresh loaf into small 1” pieces. Place the pieces on a baking sheet lined with parchment paper. Dry the bread in a 350°F oven, stirring once. Remove when the bread is slightly dry.
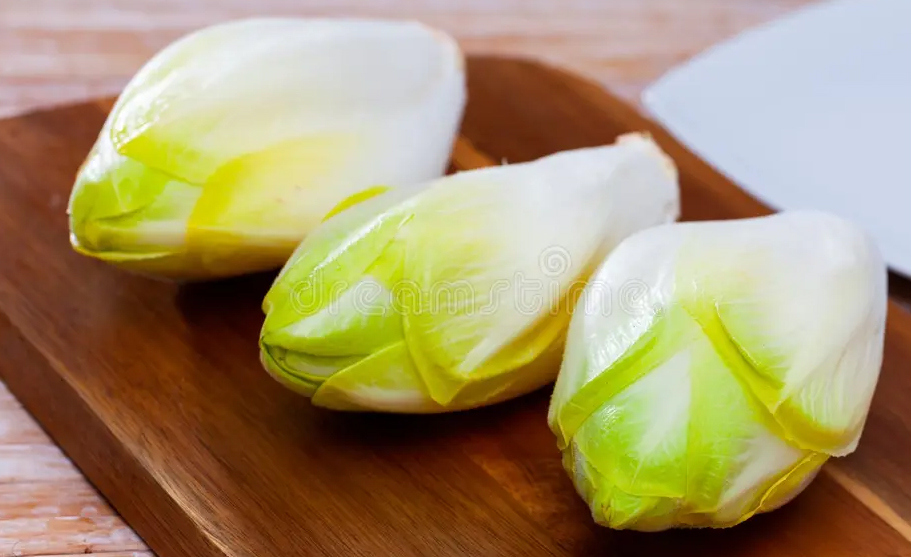
How to cook endive. Endive belongs to the chicory genus, which includes several similar bitter leafed vegetables. I am talking about the little bullet shaped endives, not the curly leaf or chicory. Endives are rich in many vitamins and minerals, especially in foliate and vitamins A and K, and are high in fiber. Endive has a bitter-sweet taste, but I thought it was very savory, almost nutty. I served it up with my baby potatoes and flounder; it made a very filling side dish. Let your kids eat these little “boats” with their fingers. Make it fun.
Here are a few suggestions on how to enjoy your endive:
Baked endive:
Preheat oven to 375° F.
Slice endive lengthwise, remove core. Keep the root end intact as it will hold the leaves together after slicing.
Brush both halves with olive oil.
Slice a fresh garlic clove into very thin slices and place the slices in between the endive leaves.
Sprinkle with kosher salt and pepper, and a little garlic powder.
Bake at 375°F. for 20 minutes.
Remove them from the oven and sprinkle balsamic vinegar over them.
Pan braised endive:
Slice your endives in half.
Sprinkle cut side with kosher salt and pepper, and any other seasoning you might like.
Melt 1 tablespoon of butter in a heavy pan along with 1 tablespoon coconut oil.
Place the endive halves cut side down in the pan, cook on medium-high heat until they are brown.
Add ½ cup chicken broth and simmer until almost all liquid is gone. Remove from pan sprinkle with Kosher salt, and drizzle with balsamic vinegar
Maple glazed endive:
Preheat oven to 350°F.
Halve 6 small endives, remove as much of the core as possible.
Arrange endive into one layer on a baking sheet with raised edges.
In a small saucepan, melt 2 tablespoons of butter then stir in 2 tablespoons of real maple syrup, 2 teaspoons of thyme and ¼ teaspoon salt. When hot, pour over the endive and bake until tender and the edges begin to brown, 20 to 25 minutes.
This cookie features a salted caramel finish, making it an excellent addition to holiday menus or a year-round indulgence, offering a sophisticated treat for discerning palates throughout the year.
Ingredients
½ cup butter
3/4 cup of brown sugar
¼ cup granulated sugar
¼ teaspoon baking soda
¼ teaspoon cream of tarter
½ tsp cinnamon
1 egg
½ teaspoon vanilla extract
1-1/2 cup of flour
¼ teaspoon of sea salt
1/2 cup caramel squares, cut into quarters.
Cookie Finish
Mix ¼ cup granulated sugar and 2 teaspoons of ground cinnamon together in a small bowl. Set aside.
Set aside coarse sea salt for sprinkling or Maldon Sea Salt Flakes (use sparingly)
Process
In a medium sized bowl, mix the flour, baking soda, cream of tartar, cinnamon, and set aside.
To brown the butter, heat a medium saucepan to medium high heat. Add the sliced butter. It does not take long for the butter to begin browning on the bottom. When the butter begins to froth, watch carefully and stir. Once the butter turns light brown, remove from heat and let it cool to room temperature. The butter will burn fast, so don’t walk away.
While the butter is cooling, cut the caramel squares into quarters and set aside
In a stand mixer, combine the brown butter, brown sugar and granulated sugar. Mix until blended and smooth.
Beat in egg and vanilla and mix until combined. Slowly add the dry ingredients until combined.
Form the dough into a ball and cover with plastic. Chill in the refrigerator for at least 30 minutes or overnight.
Once you are ready to bake preheat the oven to 350°F.
Measure about 2 tablespoons of dough and roll into a ball or use a cookie scoop.
Flatten and place a quartered caramel square on top, wrap the cookie dough over the caramel and roll back into a ball.
Mix ¼ cup sugar and cinnamon in a small bowl and roll each cookie in the mixture. Place on a parchment lined cookie sheet 2 inches apart.
Flatten slightly with a fork, and sprinkle lightly with coarse sea salt
Bake for 10 minutes, or until the edges turn light brown. The centers will be soft. Allow it to cool for 2-3 minutes and transfer to a wire cooling rack to cool completely.
There are so many recipes for Banana Nut Bread and truthfully, they are all pretty good. I discovered this recipe about 10 years ago and decided it is the best recipe I have ever made for Banana Nut Bread, moist, dense with an intense banana flavor highlighted by toasted walnuts and cinnamon streusel topping. This recipe makes two loaves, great for gifting or freezing for later use.
Ingredients
¾ cup butter, softened
1 8oz package of cream cheese, softened
2 cups of sugar
2 large eggs
3 cups of all-purpose flour
½ teaspoon baking powder
½ teaspoon baking soda
½ teaspoon salt
1-1/2 cups mashed ripe bananas (about 4 with dark spots) *
1 cup chopped toasted walnuts
1 teaspoon vanilla extract
Process
Preheat oven to 350°F. Grease and flour two 8 x 4-inch bread pans.
Mix butter and cream cheese with an electric mixer until smooth.
Gradually add sugar and beat until the mixture is light and fluffy.
Add eggs one at a time, beating until just blended after each addition.
COMBINE flour and next three ingredients
Gradually add to the butter mixture at low speed until blended.
Add bananas, vanilla and nuts.
Spoon batter into two greased and floured bread pans.
Top with streusel topping.
Bake for 1 hour until a toothpick inserted in the center comes out clean and sides pull away from pan.
Cool pans on wire rack for 10 minutes before removing from pans.
Cool completely before slicing.
STREUSEL TOPPING
Ingredients
½ cup firmly packed brown sugar
½ cup chopped toasted walnuts
1 tablespoon melted butter
1 tablespoon flour
1/8 tsp ground cinnamon.
Process
Mix all ingredients for streusel together in a bowl.
Sprinkle over the batter before baking
Press streusel into the dough with the back of a spoon to ensure streusel is baked into the loaf and doesn’t shed when removed from the pan.
*Note: the riper the bananas (black even) the more banana flavor will impart in your recipe. I use frozen bananas that have been defrosted in the refrigerator, they are overripe and work wonderfully.
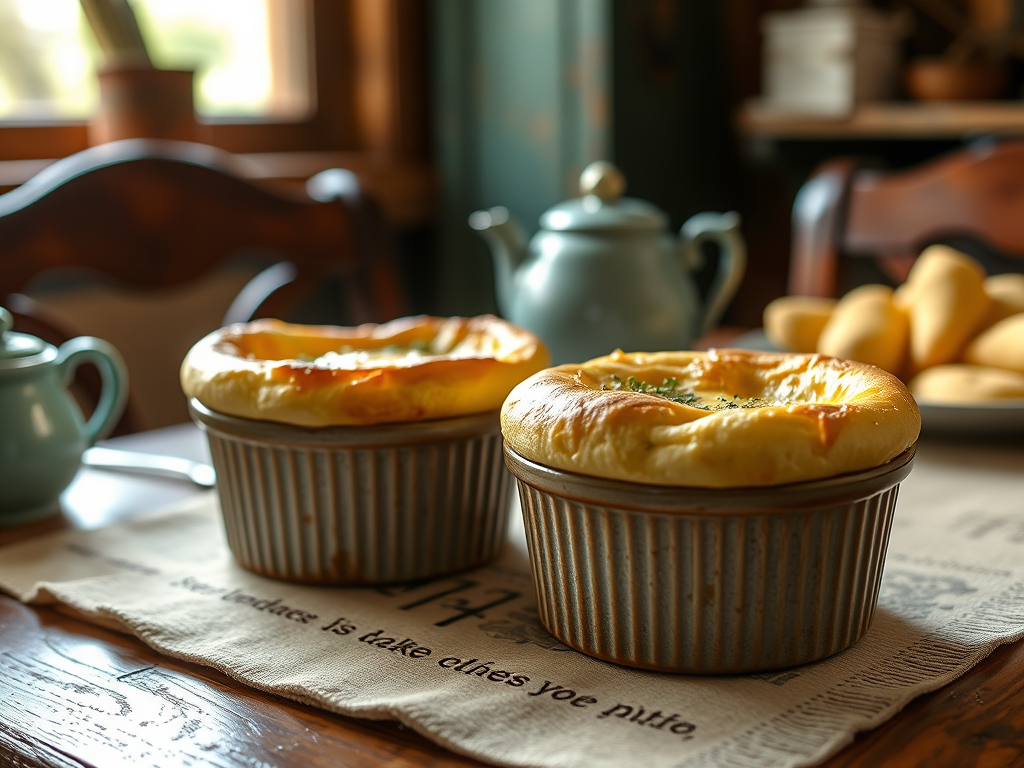
This was my first time attempting to make a cheese souffle, I’ve had the recipe for about 20 years and decided to check out other recipes online to compare ingredients and methods. I decided to use this one with a few ingredient additions because it was simple. I honestly didn’t think it would turn out. But I have to say, even though my 8-ounce ramekins were filled to the top with the egg mixture, they were beautifully puffed, golden, crispy crust and light as air inside. The taste was incredible and I devoured both.
Great for brunch, a light supper or as a versatile side dish, these melt-in-your-mouth souffles are flavorful, fluffy and fun. Served hot, egg soufflés can be accompanied by a fresh salad or a side of toasted bread, making them a wholesome and refined light meal option.
Ingredients
1-1/2 tablespoons of butter
1-1/2 tablespoons of all-purpose flour
½ cup milk, or cream
1 teaspoon Dijon mustard
½ cup shredded cheddar cheese, or Gruyère cheese
¼ teaspoon of cream of tarter
2 eggs, separated
Process
Preheat oven to 350°F. Spray two 8-ounce ramekins with nonstick cooking spray. Set aside.
Crack eggs and separate yolks from whites.
Beat egg yolks with a fork and set aside.
In a saucepan over medium-low heat, melt butter.
Stir in the flour until smooth; gradually add milk.
Bring to boil and cook stirring for 1-2 minutes or until thickened.
Reduce heat, stir in cheese until melted. Remove pan from heat.
Gradually add a small amount of hot cheese mixture to the beaten egg yolks, stirring constantly to prevent cooking. Then, pour the mixture back into the pan, stirring continuously until fully incorporated. Set aside to allow it to cool slightly.
In a mixing bowl, beat egg whites and cream of tartar until stiff peaks form.
Fold a third of the whites into the egg yolk mixture to loosen then fold in the remaining whites, streaky whites are okay, do not overmix. Pour into prepared ramekins. Wipe rims of ramekins clean.
Bake for 25 minutes or until a toothpick inserted near the center comes out clean. *Note: do not open the oven door while cooking.
Serve immediately. They will deflate as they cool, but will still be delicious!
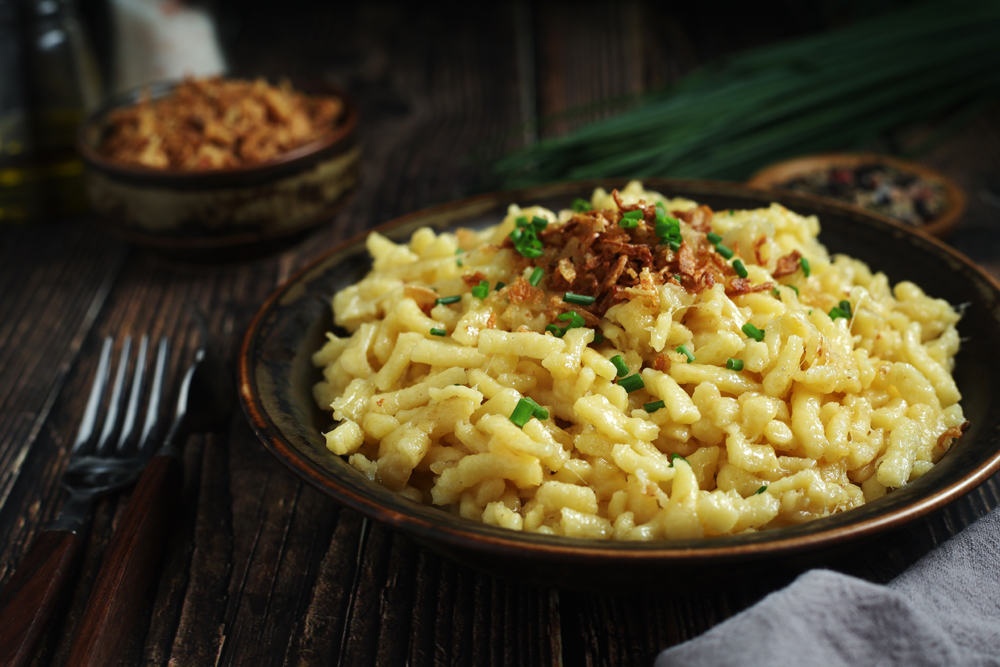
This German Käsespätzle is a tasty homemade pasta tossed with onion and Emmentaler cheese. It’s a German version of macaroni and cheese. Made with Spätzle a type of egg noodle that originated in the Swabian region of Germany. The name “Spätzle” translates to “little sparrows” in English, reflecting the small, irregular shapes of the noodles. They are made from a simple batter of eggs, flour, and milk, resulting in a chewy, dumpling-like texture.
Ingredients
2 cups of all-purpose flour
¾ teaspoon freshly grated nutmeg, if possible
¾ teaspoon salt
⅛ teaspoon pepper
3 large eggs
3/4 cup milk more as needed (milk produces a richer Spaetzle) (**add more flour if the dough is too runny, add more milk if it’s too stiff)
3 tablespoons of butter
1 ½ cups shredded Emmentaler cheese (See note for substitute)
1 onion, sliced thin
Process
Gather all ingredients.
Mix flour, nutmeg, salt, and pepper.
Beat eggs in a medium bowl. Alternately mix in milk and flour mixture until smooth. Set aside for 30 minutes.
Bring a large pot of lightly salted water to a boil. Press batter through a spaetzle press into the water. One can also use a rubber spatula to push the batter through the holes of a large-holed colander or a kitchen spoon with holes.
Don’t overload the pot of water. Work in small batches. The spätzle batter will sink to the bottom of the pot of boiling water, then float to the top as it cooks. Cook the spätzle for approximately five minutes. Remove from boiling water with a slotted spoon to a clean colander to drain.
Mix in 1 cup of cheese.
Melt butter in a large skillet over medium-high heat. Add onion and cook until golden. Stir in spaetzle and remaining 1/2 cup cheese until well blended. Remove from heat and serve immediately.
Notes:
Gruyère is the best substitute for Emmental cheese. It’s super easy to find in food stores and should be around the same price as a pack of Emmental. In terms of flavor, gruyere cheese is more complex. Along with the nutty notes it shares with Emmental, there’s also a salty and earthy undertone.
Traditionally Spätzle batter is quite thick because it was cut into noodles using the board & knife method. Even if using a Spätzle press or other method, thicker batter yields a better consistency. If you’re using the Spätzle press yes, it will require some muscle strength – you don’t want the batter to be so runny that it squishes right through with ease. That said, if you’re straining way too hard to press the batter through, go ahead and add a bit more liquid to thin it out.
The history of Whoopie Pies is an interesting part of American food culture, mainly in the Northeastern U.S. They likely started in the early 1900s, possibly in Pennsylvania or Maine. The name “Whoopie” may come from children’s exclamations of joy or surprise when discovering the sweet filling inside. These treats have become a beloved regional specialty, reflecting local culinary traditions and history.
Cookie Ingredients
1 cup sugar
½ cup shortening
1 egg
1 egg yolk
2 cups of all-purpose flour
2/3 cup unsweetened cocoa powder
¼ teaspoon salt
1 teaspoon of baking soda
½ cup hot water
2/3 cup buttermilk
Cookie Process
Preheat oven to 350°F. Line 2 cookie sheets with parchment paper.
Beat together sugar and ½ cup shortening at high speed with a stand mixer until fluffy.
Add the egg and egg yolk and beat until incorporated.
In a separate bowl, stir together the flour, cocoa powder, and salt; set aside.
Dissolve baking soda in the ½ cup of hot water; cool slightly.
Add the flour mixture, the soda mixture, and 2/3 cups of buttermilk alternately to the sugar, shortening mixture.
Beat at a medium speed until well mixed.
Drop batter by rounded tablespoonfuls 2 inches apart onto a parchment paper lined cookie sheet. Bake for 8 – 10 minutes.
Cool cookies on a cookie rack. Yields 48 cookies.
Filling Ingredients
2 cups sifted powdered sugar
½ teaspoon of meringue powder
1 teaspoon vanilla
½ cup shortening (such as white Crisco)
¼ cup butter
Filling Process
In a stand mixer, add shortening and butter, vanilla, 1 teaspoon of water and beat at high speed until light and fluffy.
Turn mixer to low and gradually add powdered sugar and meringue powder.
Beat on high until mixture is light and fluffy. If mixture is too thick to spread, add 1 teaspoon of water at a time, until it is spreading consistency.
Spread some filling on the flat side of half the cookies, top with the remaining cookies, flat side down.
Compound flavored butters serve multiple culinary purposes. They can be melted over grilled meats, seafood, or vegetables to add moisture and flavor. Perfect to add fun and flair to any breakfast spread. They are also used as finishing touches on baked potatoes, bread, or pasta, providing an extra layer of richness. Additionally, they can be incorporated into sauces, marinades, or used as a base for more complex flavor combinations. Their ease of use and ability to add depth to meals make them popular among chefs and home cooks alike. Following are six compound butters that are equally delicious for all meals.
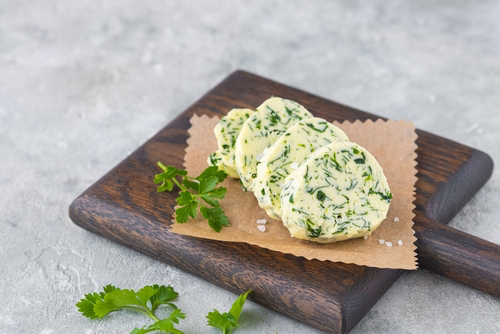
Compound Herb and Garlic Butter
Compound herb and garlic butter is a versatile culinary ingredient that enhances a wide range of dishes with its rich, aromatic flavor. Made by blending softened butter with fresh herbs, this butter offers a fragrant and savory profile that elevates both simple and complex recipes. Its culinary appeal lies in its ability to add depth and richness to meats, seafood, vegetables, and bread.
Ingredients
½ cup of unsalted butter, softened to room temperature
¼ cup of fresh chopped fresh herbs
Example: rosemary, oregano, thyme, parsley, sage, basil or chives. Fresh herbs will give a beautiful display of green flecks in your butter.
2 grated or pressed garlic cloves
½ teaspoon fresh lemon juice
½ teaspoon Kosher salt
Process
Place the softened butter in a small bowl. Add the chopped herbs, garlic, lemon juice and salt and mix well.
Transfer the mixture onto a sheet of plastic wrap. Roll into a log shape and twist ends to seal tightly. Or leave it in a covered bowl.
Refrigerate the butter for at least 2 hours, or until firm.
Room Temperature – Let butter sit out for a few minutes before using to soften. Butters can sit at room temperature for a couple of days, just like plain butter. But if the weather is hot, store it in refrigerator so butter doesn’t melt.
Compound Lemon Dill Butter
Delicious spread over seafood dishes, such as grilled salmon, baked cod or shrimp where the citrus notes complement the natural flavors of seafood. It also works well as a finishing touch for roasted vegetables or spread on warm bread.
Ingredients
1 stick of unsalted butter room temperature
2 tablespoons finely chopped fresh dill weed
1 tablespoon fresh squeezed lemon juice
½ teaspoon lemon zest
¼ teaspoon kosher salt
½ teaspoon freshly ground black pepper
Process
Wash and finely mince the dill leaves.
Zest and juice lemon.
Cut the softened stick of butter in a mixing bowl.
Using a stand mixer or hand beater, mix until light and fluffy.
Add the chopped dill, lemon zest, lemon juice, salt and pepper. Mix until combined.
Transfer the mixture onto a sheet of plastic wrap. Roll into a log shape and twist ends to seal tightly. Or leave in a covered bowl.
Refrigerate the butter for at least 2 hours, or until firm.
Room Temperature – Let butter sit out for a few minutes before using to soften. Butters can sit at room temperature for a couple of days, just like plain butter. But if the weather is hot, store it in refrigerator so butter doesn’t melt.
Compound Maple Bourbon Butter
This is a smooth, sweet butter with a smoky flavor from bourbon. It is great to spread on bread, pancakes, waffles, roasted vegetables or melted over steak.
Ingredients
1 cup (2 sticks) unsalted butter, softened
2 tablespoons pure maple syrup
1 tablespoon bourbon
1 tablespoon brown sugar
1/2 teaspoon cinnamon
1/2 teaspoon vanilla extract
Pinch of salt
Process
Bring butter to room temperature.
In a mixing bowl, add softened butter and beat butter until light and fluffy.
Gradually mix in pure maple syrup, bourbon, brown sugar, cinnamon, vanilla extract and salt.
Taste and adjust sweetness or bourbon as needed.
Transfer the mixture onto a sheet of plastic wrap. Roll into a log shape and twist ends to seal tightly. Or leave in a covered bowl.
Refrigerate the butter for at least 2 hours, or until firm.
Room Temperature – Let butter sit out for a few minutes before using to soften. Butters can sit at room temperature for a couple of days, just like plain butter. But if the weather is hot, store it in refrigerator so butter doesn’t melt.
Compound Hot Honey Butter
One of my favorite ways to enjoy this whipped hot honey butter is on Jalapeno and Cheese Cornbread or Cheddar and Chive Biscuits, sweet potatoes or baked potatoes or corn on the cob.
Ingredients
1 stick of unsalted butter, room temperature
2 tablespoons honey
2 teaspoons hot sauce
½ teaspoon Koren red chili flakes
Process
Bring butter to room temperature.
In a mixing bowl, add softened butter and beat butter until light and fluffy.
Gradually mix in honey, hot sauce and chili flakes.
Transfer the mixture onto a sheet of plastic wrap. Roll into a log shape and twist ends to seal tightly.
Refrigerate the butter for at least 2 hours, or until firm.
Room Temperature – Let butter sit out for a few minutes before using to soften. Butters can sit at room temperature for a couple of days, just like plain butter. But if the weather is hot, store it in refrigerator so butter doesn’t melt.
Compound Orange Butter
Orange butter is a tasty spread that can be used on French toast, pancakes, sweet breads, and more. It is smooth and rich, making it perfect for breakfast and brunch. It adds color and flavor to your dishes, making them more appealing.
Ingredients
1 cup (2 sticks) butter, softened
1 teaspoon of Grand Marnier, substitute with Cointreau, or orange juice.
1 tablespoon orange zest. Be careful not to zest the white pith under the orange skin as it is bitter.
Process
Bring butter to room temperature.
In a mixing bowl, add softened butter and beat butter until light and fluffy.
Gradually mix in Gand Marnier, and orange zest.
Transfer the mixture onto a sheet of plastic wrap. Roll into a log shape and twist ends to seal tightly.
Refrigerate the butter for at least 2 hours, or until firm.
Room Temperature – Let butter sit out for a few minutes before using to soften. Butters can sit at room temperature for a couple of days, just like plain butter. But if the weather is hot, store it in refrigerator so butter doesn’t melt.
Compound Chocolate Butter
Spread chocolate butter on various baked goods such as toast, pancakes, croissants, or bagels, and explore different flavor combinations to enhance your culinary experience.
Ingredients
1 cup butter, softened
2 tablespoons unsweetened cocoa
3 tablespoons powder sugar
½ teaspoon of vanilla extract
Process
Bring butter to room temperature.
In a mixing bowl, add softened butter and beat butter until light and fluffy.
Gradually mix in unsweetened cocoa, powder sugar and vanilla extract.
Transfer the mixture onto a sheet of plastic wrap. Roll into a log shape and twist ends to seal tightly. Or leave in covered bowl.
Refrigerate the butter for at least 2 hours, or until firm.
Room Temperature – Let butter sit out for a few minutes before using to soften. Butters can sit at room temperature for a couple of days, just like plain butter. But if the weather is hot, store it in refrigerator so butter doesn’t melt.
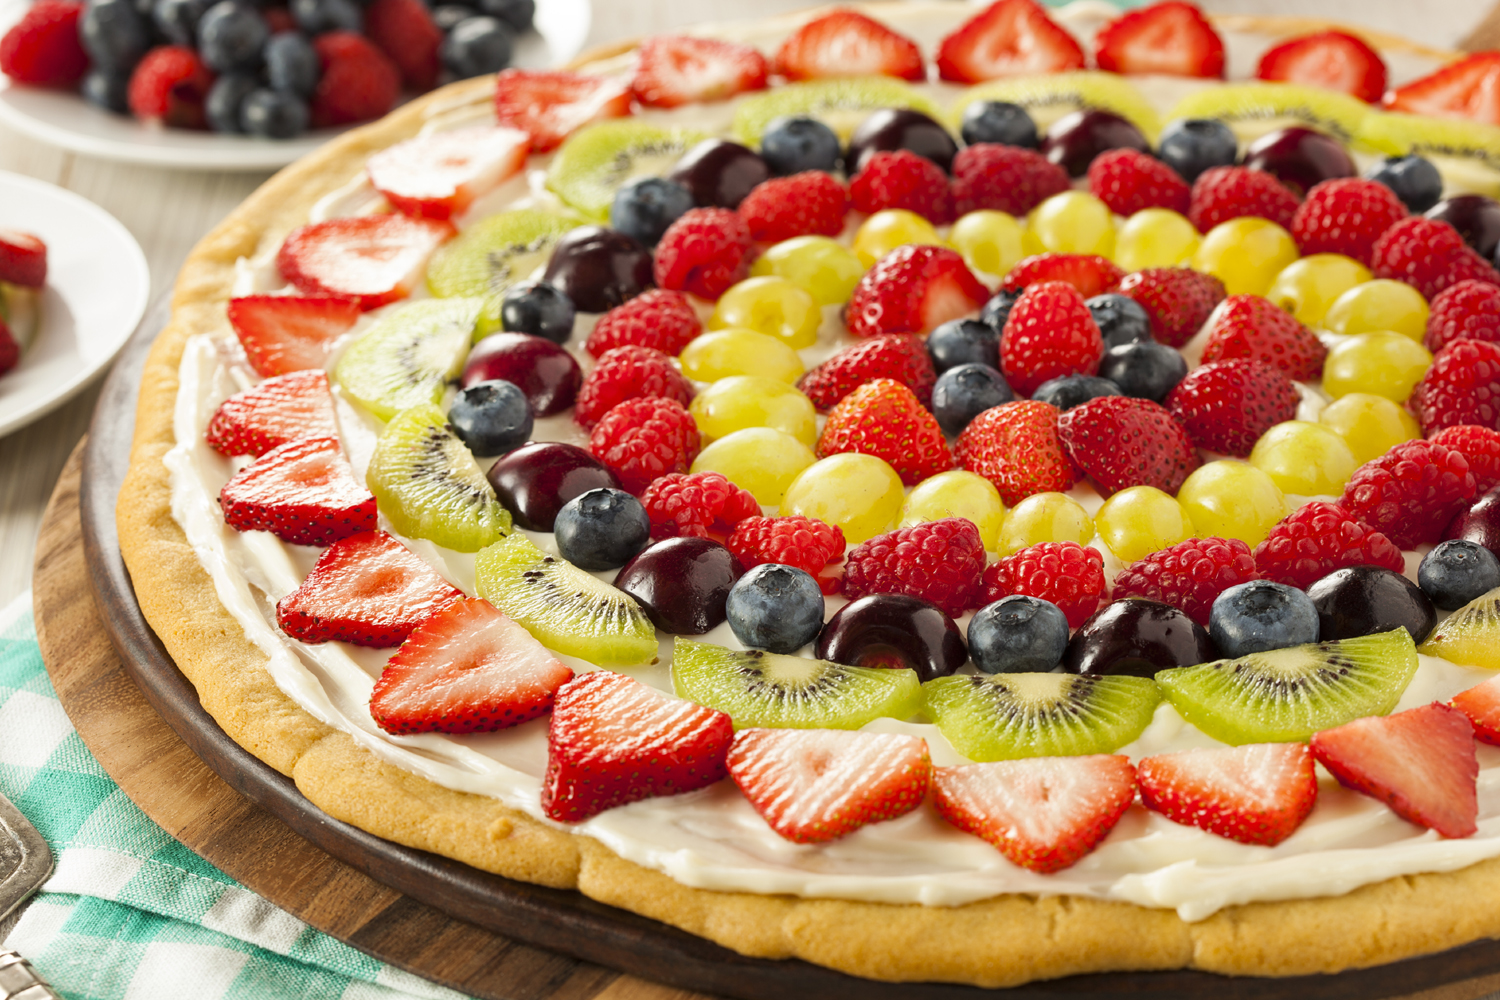
Perfect for any summer gathering, this impressive dessert is sure to wow your guests. This dazzling fruit pizza is a summer showstopper—and surprisingly easy to make!
Choosing the right fruit for a fruit pizza is important for both appearance and taste. The fruit should be soft enough to cut and bite easily, but not too watery. It should also resist browning to keep the pizza looking fresh. To make the presentation attractive, select fruits that vary in color and shape. When placing the fruit on the cream cheese layer, press gently to help it stick. Popular options include different berries, sliced peaches, bananas, canned mandarin oranges, strawberries, kiwi, and passion fruit. These fruits not only look appealing but also add a variety of flavors, making fruit pizza more delicious and visually attractive.
For the best texture and presentation, fruit pizza is best made the same day it’s served.
Crumble dough into a 12” pizza pan, or 9″ x 13″ baking pan with raised edges.
Work the dough until it is spread out to the outer edges of the pan.
Bake until lightly brown, about 10 – 12 minutes. Remove from oven, cool completely.
Filling
1/3 cup granulated sugar
1 egg
1 8oz cream cheese, room temperature
1/4 cup of sour cream
1 teaspoon vanilla
Glaze
Jelly: is used as a glaze for the fruit, it protects it from drying out or turning brown as well as giving it a healthy shine.
½ cup of apple jelly, apricot jelly, orange marmalade or peach jelly make great options for glazing the fruit. Apple jelly is clear, allowing the fruit to stand out. Orange marmalade compliments the flavors of the fruit beneath.
Process
With an electric mixer, in a medium bowl combine sugar and egg, beat until sugar is dissolved.
Add cream cheese, sour cream and vanilla, beat until creamy. Add more sour cream if filling is too stiff to spread.
Spread filling on cookie crust.
Beginning in the center of the pizza begin adding fruit in a circular fashion until it fills the crust.
Stir the jelly or marmalade until smooth and use a pastry brush or spoon spread on top of fruit. Note: if jelly or marmalade won’t smooth out by stirring, microwave for 20 seconds.